Streamline external access to Amazon SageMaker MLflow using a REST API proxy

Machine learning (ML) teams use MLflow to manage their ML lifecycle effectively. Amazon SageMaker MLflow provides comprehensive ML experiment tracking and model management capabilities. However, many enterprises have existing infrastructure requirements that need HTTPS-based integrations rather than direct SDK usage.
Many organizations need to integrate Amazon SageMaker MLflow with their established systems while maintaining their security and infrastructure patterns. This integration challenge affects teams who can’t use the SDK directly because of corporate security policies, network restrictions, or legacy system constraints.
In this post, we demonstrate how to build a secure Flask-based MLflow proxy service that provides HTTPS access to Amazon SageMaker MLflow without requiring the MLflow SDK. This solution is for organizations undergoing cloud transformation who want to preserve their existing ML workflows while adopting cloud-native services.
This post covers the following topics:
- Implementing the MLflow proxy service for MLflow HTTPS requests.
- Configuring AWS Identity and Access Management (IAM) authentication for secure access.
- Managing URL pre-signing and request transformation.
After implementing this solution, you can:
- Access SageMaker MLflow securely through standard HTTPS endpoints.
- Maintain compliance with your organization’s security requirements.
- Integrate MLflow with existing enterprise systems.
- Reduce implementation complexity and maintenance overhead.
Solution overview
A lightweight Flask-based MLflow proxy architecture provides secure integration between enterprise systems and Amazon SageMaker MLflow through three key components.
Component 1: Application Load Balancer (ALB)
An AWS Application Load Balancer serves as the upstream router, providing the following:
- Traffic distribution for MLflow UI and REST API requests.
- Initial request handling and routing.
- Support for custom domain names and SSL termination.
Note: This implementation uses ALB, but you can alternatively use other routing solutions such as Nginx based on your requirements.
Component 2: Flask MLflow Proxy Service
At the heart of the architecture, a Python-based Flask application handles the following:
- Intercepting and processing incoming HTTPS requests.
- Managing AWS authentication and request signing.
- Transforming URLs for secure MLflow endpoint access.
- Handling response routing back to clients.
Component 3: Amazon SageMaker MLflow
The AWS managed SageMaker MLflow service provides the following:
- Support for two MLflow deployment modes:
- MLflow Tracking Server – managed MLflow tracking server.
- MLflowApp – serverless MLflow application.
- Backend metadata store for tracking information.
- Storage for model files and data.
This architecture provides secure communication while maintaining compatibility with existing enterprise systems. The proxy service acts as a bridge, transforming standard HTTPS requests into authenticated AWS API calls that can interact with SageMaker MLflow.
Architecture and request workflow
The following diagram shows how the Flask proxy service provides secure communication between external clients and Amazon SageMaker MLflow.
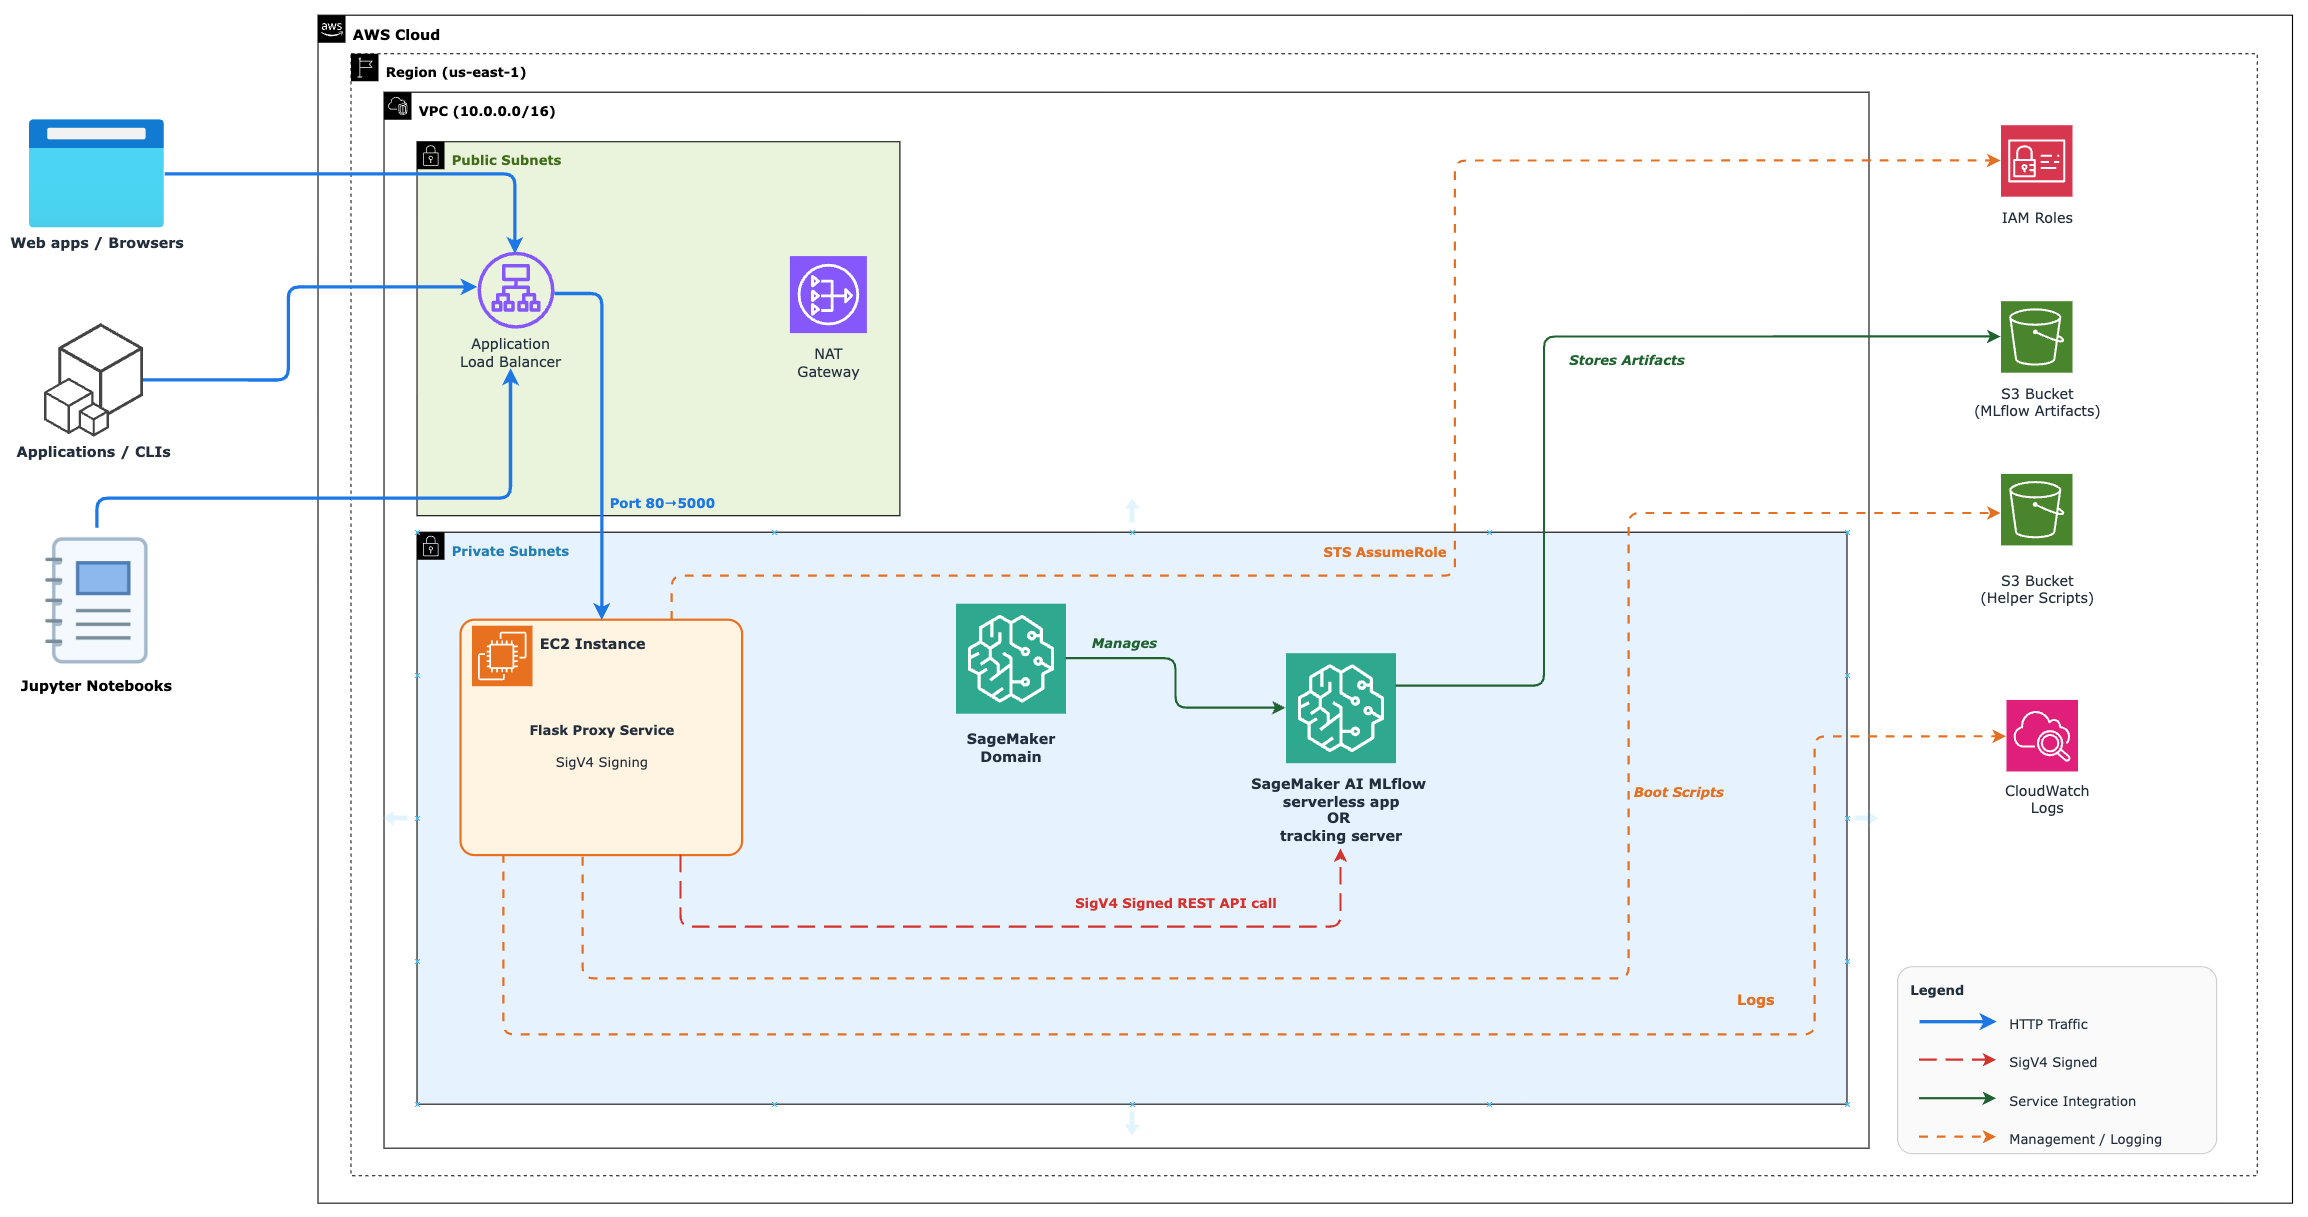
Figure 1: Architecture diagram showing the Flask proxy service integration with Amazon SageMaker MLflow
The architecture diagram shows three main components:
- An ALB that handles incoming traffic.
- A Flask proxy service that manages authentication and request transformation.
- Amazon SageMaker MLflow that processes ML operations.
Request workflow
Let’s explore how requests flow through this architecture to provide secure MLflow access.
When a client initiates an HTTPS request, it first reaches the ALB, which acts as the entry point for all incoming traffic. The ALB then routes these requests to the MLflow proxy service.
When it receives the request, the MLflow proxy service performs several critical functions:
- Handles authentication through AWS IAM integration.
- Transforms URLs and pre-signs them for secure access.
- Processes the MLflow REST API endpoints as needed.
The MLflow proxy service transforms the incoming request into an authenticated AWS request before making the API call to SageMaker MLflow REST endpoints. After SageMaker MLflow processes the request, it returns a response which the MLflow proxy service processes and routes back to the original client.
This workflow maintains security while providing integration between enterprise systems and SageMaker MLflow.
Prerequisites
To follow this walkthrough, make sure you have the following:
- An AWS account.
- A workstation with the following tools installed:
- AWS Command Line Interface (AWS CLI) configured with permissions to create:
- Amazon Virtual Private Cloud (Amazon VPC) and associated networking components.
- Amazon Elastic Compute Cloud (Amazon EC2) instances.
- Amazon SageMaker AI resources.
- Amazon Simple Storage Service (Amazon S3) buckets.
- AWS Identity and Access Management (IAM) roles and policies.
- AWS CloudFormation stacks.
- AWS Application Load Balancers.
- Node.js version 18.0.0 or later.
- NPM.
- AWS Cloud Development Kit (AWS CDK) CLI version 2.100.0 or later.
- Python 3.x with pip or pip3.
- AWS Command Line Interface (AWS CLI) configured with permissions to create:
- Required knowledge:
- Basic understanding of AWS services and IAM permissions.
- Familiarity with Python and Flask applications.
- Understanding of MLflow concepts and operations.
- Cost considerations:
- This solution creates AWS resources that might incur costs.
- Key cost-driving resources include:
- Amazon EC2 instances.
- Application Load Balancer.
- Amazon SageMaker AI resources.
- Amazon S3 storage.
For information about AWS service pricing, see AWS Pricing Calculator.
Deploy the solution
This section walks you through deploying the solution in your AWS account and validating it. The deployment process takes approximately 40 minutes.
Step 1: Deploy the infrastructure using AWS CDK
- Download the solution code and install dependencies:
- Bootstrap your environment for AWS CDK. Skip this step if your AWS account and Region are already bootstrapped for AWS CDK.Bootstrap the AWS account and Region for CDK:
- Deploy the required resources on your AWS account.The solution consists of four CDK stacks:
- Networking stack — creates the VPC and networking components.
- SageMaker AI domain stack — sets up the SageMaker domain.
- SageMaker MLflow stack — deploys the MLflow tracking server or MLflow serverless app.
- Flask application stack — deploys the MLflow proxy service.
Deploy all the stacks with one of the following commands.
For tracking server based deployment:
For serverless app based deployment:
Step 2: Install and configure the Flask MLflow proxy service
- Connect to the EC2 instance:
- Note the Amazon EC2 instance ID from the CDK output or from the sagemaker-infra-flaskapp-{mlflowType} AWS CloudFormation stack output section.
- Use AWS Systems Manager Session Manager to connect. Follow the Session Manager connection guide.
- Install Python 3.13 and dependencies.Install Python packages:
Note: This script is designed for Ubuntu-based systems. For other Linux distributions, install Python 3.12+, PIP3, and Virtualenv using your system’s package manager.
- Install and start the MLflow proxy service:
- Check the Flask MLflow proxy service status:
Note: If the service isn’t running, check logs with the following command:
Step 3: Validate MLflow REST API access
This section demonstrates how to interact with MLflow REST APIs through the ALB.
Note: These examples use the HTTP (unsecured) protocol. For production environments, we recommend HTTPS. We use curl to make the API requests in this post, but you can use any tool you prefer. The provided curl commands work identically for both tracking server and serverless modes; the proxy service handles the differences transparently.
- Get your ALB DNS name by running the following command on your workstation:
- Test MLflow API endpoints by running the following commands on your workstation. Replace
<ALB DNS>,<EXP ID>,<RUN ID>, and<RUN NAME>with appropriate values.- Create an experiment:
- Search experiments:
- Get an experiment:
- Create a run inside an experiment:
- List artifacts from a run:
- Set a tag on a run:
- Delete a run:
Note: You can also open the MLflow UI and view the changes you make using the preceding curl commands. For instructions on launching the MLflow UI, see Launch the MLflow UI using a presigned URL.
Cleanup
To avoid ongoing charges and remove the resources created by this solution, follow these cleanup steps:
- Delete CDK-managed resources.Navigate to the root directory of the cloned repository on your workstation and run the following.For tracking server based deployment:
For serverless app based deployment:
Note: The networking and SageMaker domain stacks are shared across both deployment modes. AWS CDK only deletes them when the last MLflow or Flask app stack pair is removed.
- Manual resource cleanup. Some resources might require manual deletion because of retention policies or dependencies:
- Amazon S3 buckets:
- Navigate to the Amazon S3 console.
- Identify the buckets created by this solution.
- Empty each bucket and delete it.
- Amazon CloudWatch log groups:
- In the CloudWatch console, find the log groups associated with this solution.
- Delete these log groups.
- Amazon S3 buckets:
Security considerations
When you deploy this solution in a production environment, consider the following security measures:
- Configure Amazon CloudWatch monitoring for the Flask-based proxy service to track application health, detect anomalies, and set up alerts for suspicious activities.
- Implement rate limiting for the Flask-based proxy service to protect against potential denial-of-service (DoS) attacks and control the number of requests from individual clients. You can use AWS WAF (web application firewall) with the ALB to implement rate-based rules.
- Deploy an internal (non-internet-facing) ALB to restrict proxy access to your private network. This setup makes sure that only traffic from within your VPC or connected networks can reach the service. Connect through VPC peering or AWS Transit Gateway.
- Enable HTTPS termination at the ALB level for secure communication between clients and your application. You can use AWS Certificate Manager (ACM) to provision and manage SSL/TLS certificates for your application. For instructions on configuring HTTPS listeners, see the Application Load Balancer HTTPS listeners documentation.
These security measures help protect the Flask application against common web vulnerabilities and provide secure communication between components.
Conclusion
In this post, we showed how to build a secure Flask-based proxy service that provides HTTPS access to Amazon SageMaker MLflow. This solution helps organizations bridge their existing infrastructure with AWS managed MLflow capabilities while maintaining enterprise security requirements.
Solution benefits:
- Integration with existing enterprise security controls.
- Minimal changes to existing ML workflows.
- Reduced deployment complexity.
- REST API integration.
- Compatibility with enterprise proxy services.
Next steps
To learn more about Amazon SageMaker MLflow and related topics, you can:
- Explore the Amazon SageMaker MLflow documentation.
- Read about MLflow tracking servers and MLflow apps.
Try this solution in your own environment and let us know your experience in the comments.
