
Unsloth Just Made Fine-Tuning LLMs a Free-Tier Task.
A single library reduces VRAM use by 70%. This is why you can now train Qwen3 on a free Google Colab notebook.

Here is the situation in 2026: fine-tuning open-source LLMs is no longer the bottleneck it used to be, and Unsloth is one of the main reasons why.
If you have tried fine-tuning before, you’ve likely run into problems. You might have run out of GPU memory during training. You could be watching the loss curve move at a painfully slow pace. You may have even thought about paying for a cloud instance because your local setup struggles with the model. This frustrating experience is exactly what Unsloth was designed to address.
What it actually does is rewrite the slowest, most memory-hungry parts of training. The team replaced PyTorch’s default GPU code, specifically the parts that handle attention and backpropagation, with their own hand-written versions. The numbers they report are:
- Around 70% less VRAM used during training
- 2x faster training on the free open-source version (the paid Pro version goes higher, sometimes considerably higher depending on the model and configuration)
- No loss in model accuracy – the math is exact, not approximated
To put that in practical terms: fine-tuning Qwen3 – 8B with QLoRA normally needs somewhere around 24GB of GPU to run comfortably. That means an RTX 3090, an RTX 4090, or a paid Colab Pro+ instance. With Unsloth, the same job fits inside the free 15GB T4 GPU that Google Colab hands out to anyone with a Gmail account. That is the real shift this library represents – not “impossible to easy,” but “you used to need paid hardware, and now you don’t.”
Unsloth supports the standard techniques you would expect -LoRA, QLoRA, 4-bit quantization – along with newer methods like GRPO for reinforcement learning fine-tuning. You do not need to know what any of those mean to use it; the configuration is handled for you under the hood. In 2026, the team also shipped Unsloth Studio, a visual interface for people who would rather not write Python at all.
By the end of this guide, you will have fine-tuned Qwen3 – 8B on a Python code instruction dataset, running on a free Colab notebook, with every line of code provided.
Let’s build.
Why Qwen3 Is the Model Everyone Is Fine-Tuning Right Now
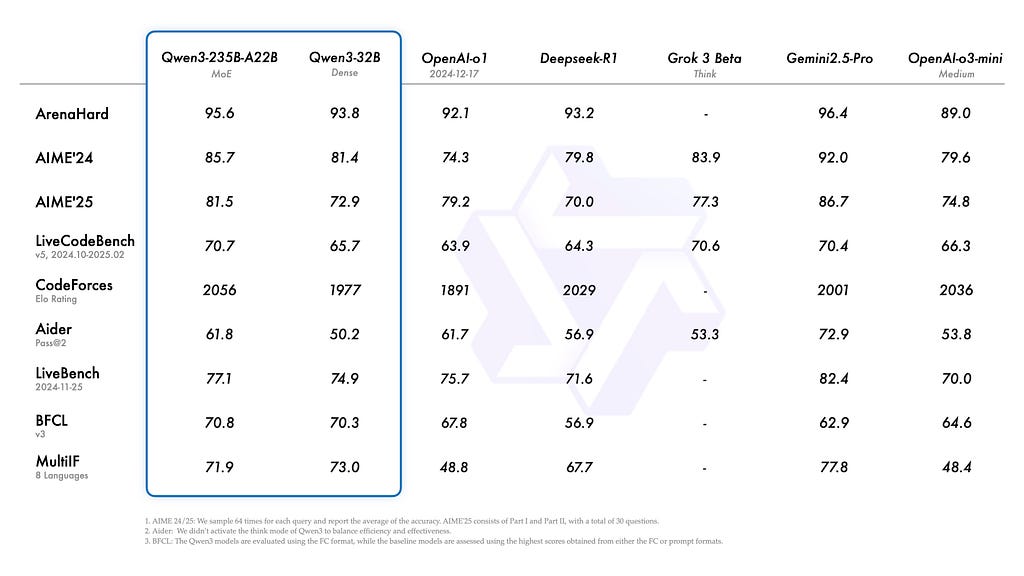
Qwen3 model punches so far above its weight class, it has essentially made ‘model size’ an irrelevant metric.
When Alibaba dropped Qwen3 in April 2025, the open-source AI community lost its collective mind – and for good reason.
Qwen3–8B scores competitively against models in the 30B–70B range on standard coding, reasoning, and instruction following benchmarks. It supports 119 languages, handles a 128K context window, and ships with a genuinely novel feature: a built-in thinking/non-thinking toggle.
Enable thinking mode(enable_thinking=True)and the model reasons through problems step by step before answering – like a chain-of-thought that is baked directly into the architecture. Disable it for fast, direct responses when latency matters more than depth.
For a coding assistant use case, this is a killer combination.
Other models worth knowing in 2026:
- Gemma 3 (Google): Exceptional at multimodal tasks and instruction following. The 12B variant is a strong general-purpose pick.
- Phi-4 (Microsoft): Remarkable reasoning in a small footprint. The 14B model rivals much larger competitors in math and code.
- Mistral Small 3.1: Fast, multilingual, genuinely open-licensed for commercial use.
For this tutorial, we are going with Qwen3–8B. It is the community favourite right now, the benchmarks back it up, and Unsloth has a fully optimized pre-quantized version ready to go.
The Dataset: 18,000 Python Code Instructions (And Why It Is Perfect for Beginners)
Before we touch a single line of training code, let us talk about the dataset – because your data is 80% of your model’s final quality.
We are using iamtarun/python_code_instructions_18k_alpaca from Hugging Face.
Here is why it is a great first dataset:
- It is immediately useful. Every sample is a Python coding task – write a function, debug this code, explain this algorithm. Fine-tuning on this teaches your model to think like a Python developer.
- It is the right size. 18,000 samples are large enough to produce meaningful behavior changes, but small enough to train on a free T4 in a reasonable time.
- It is clean and structured. The dataset is already in the Alpaca format (instruction + input + output), so there is minimal preprocessing work.
- The results are visible. Unlike abstract NLP benchmarks, you can test your fine-tuned model by asking it to write a function. You will see the difference immediately.
Each sample looks like this:
{
  "instruction": "Write a Python function to find all prime numbers up to a given number N.",
  "input": "",
  "output": "def sieve_of_eratosthenes(n):n    primes = [True] * (n + 1)n    p = 2n    while p * p <= n:n        if primes[p]:n            for i in range(p * p, n + 1, p):n                primes[i] = Falsen        p += 1n    return [p for p in range(2, n + 1) if primes[p]]"
}
Clean. Purposeful. Immediately testable. Let’s use it.
Setting Up the Environment (Fewer Steps Than You Think)
What you need:
- A free Google Colab Notebook with with a T4 GPU (Runtime → Change runtime type → T4 GPU), or
- A local NVIDIA GPU with 8GB+ VRAM (RTX 3060, 3080, 4070, or better)
“You can follow along using my pre-configured Colab notebook here: Open in Colab →. Everything is already set up – just hit Run All”
Installation – paste this into your first cell:
%%capture
!pip install unsloth
!pip install --upgrade --no-cache-dir "unsloth[colab-new] @ git+https://github.com/unslothai/unsloth.git"
!pip install datasets trl transformers accelerate
For a local setup with CUDA 12.1+:
pip install "unsloth[cu121-torch240] @ git+https://github.com/unslothai/unsloth.git"
pip install datasets trl
One command. No dependency hell. Unsloth’s install is genuinely one of the cleanest in the ecosystem.
The Step-by-Step Fine-Tuning Code
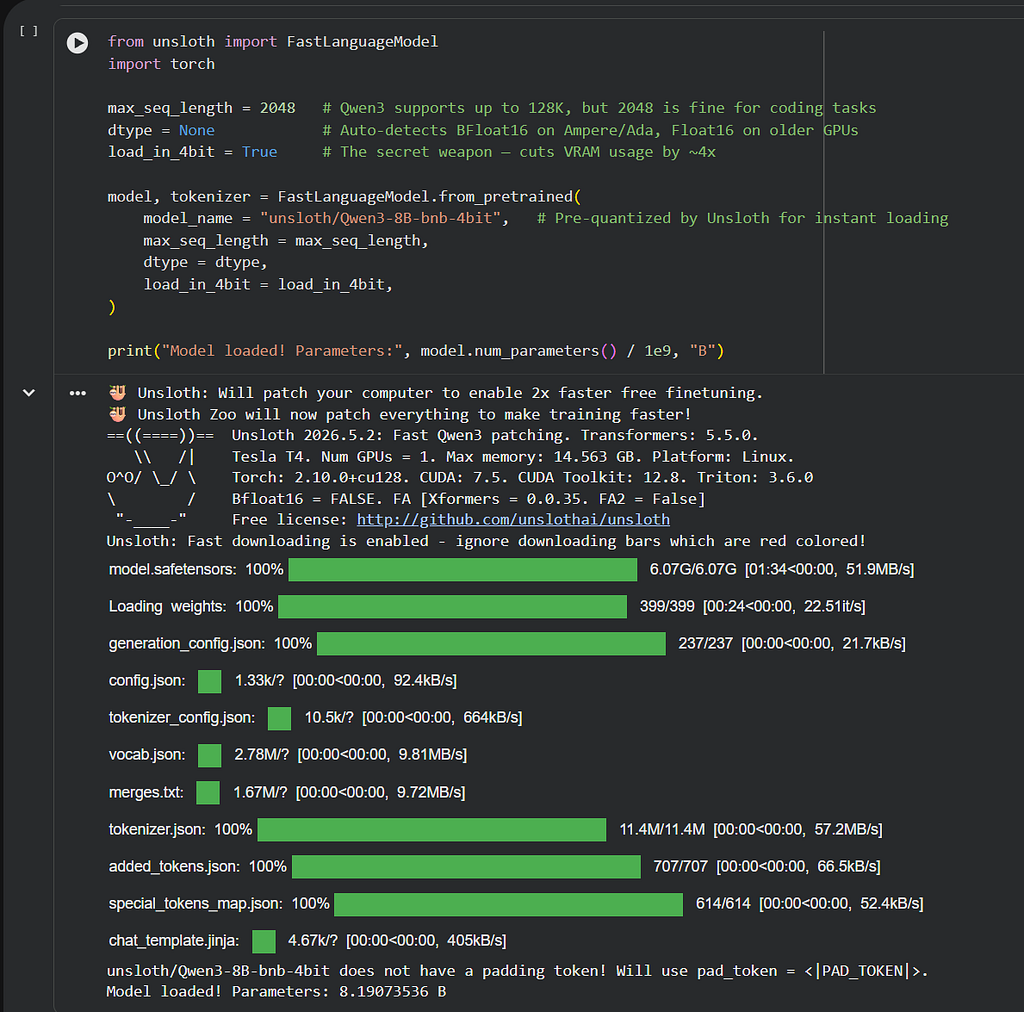
Step 1: Load Qwen3–8B in 4-Bit Quantization
from unsloth import FastLanguageModel
import torch

max_seq_length = 2048   # Qwen3 supports up to 128K, but 2048 is fine for coding tasks
dtype = None            # Auto-detects BFloat16 on Ampere/Ada, Float16 on older GPUs
load_in_4bit = True     # The secret weapon - cuts VRAM usage by ~4x

model, tokenizer = FastLanguageModel.from_pretrained(
    model_name = "unsloth/Qwen3-8B-bnb-4bit",   # Pre-quantized by Unsloth for instant loading
    max_seq_length = max_seq_length,
    dtype = dtype,
    load_in_4bit = load_in_4bit,
)

print("Model loaded! Parameters:", model.num_parameters() / 1e9, "B")
The unsloth/Qwen3-8B-bnb-4bitvariant is pre-quantized and hosted directly on Hugging Face by the Unsloth team. It loads in roughly 60 seconds on Colab – no manual quantization step required.
Now attach the LoRA adapters – the lightweight trainable layers that sit on top of the frozen base model:
model = FastLanguageModel.get_peft_model(
    model,
    r = 16,                      # LoRA rank. 16 is a solid default. Increase to 32 for richer tasks.
    target_modules = [
        "q_proj", "k_proj", "v_proj", "o_proj",
        "gate_proj", "up_proj", "down_proj"
    ],
    lora_alpha = 16,
    lora_dropout = 0,            # Unsloth recommends 0 for optimized performance
    bias = "none",
    use_gradient_checkpointing = "unsloth",  # Unsloth's custom gradient checkpointing
    random_state = 42,
    use_rslora = False,
)

print("Trainable parameters:", sum(p.numel() for p in model.parameters() if p.requires_grad) / 1e6, "M")
You will notice you are training roughly 20–80 million parameters – out of 8 billion total. That is the magic of LoRA. You change ~1% of the model and get 80%+ of the benefit of a full fine-tune.
Step 2: Load and Format the Python Code Dataset
from datasets import load_dataset
from unsloth.chat_templates import get_chat_template

# Apply Qwen3's native chat template to the tokenizer
tokenizer = get_chat_template(
    tokenizer,
    chat_template = "qwen-2.5",  # Qwen3 uses the Qwen-2.5 ChatML template
)

# Load the dataset
dataset = load_dataset("iamtarun/python_code_instructions_18k_alpaca", split = "train")

print(f"Dataset loaded: {len(dataset)} samples")
print("Sample:", dataset[0])
Now format each sample into Qwen3’s expected chat structure:
def format_sample(examples):
    instructions = examples["instruction"]
    inputs       = examples["input"]
    outputs      = examples["output"]
    texts = []

    for instruction, context, output in zip(instructions, inputs, outputs):
        # Merge instruction + context if context exists
        if context and context.strip():
            user_message = f"{instruction.strip()}nnContext:n{context.strip()}"
        else:
            user_message = instruction.strip()

        # Format as a Qwen3 chat conversation
        messages = [
            {"role": "user",      "content": user_message},
            {"role": "assistant", "content": output.strip()},
        ]

        # Apply the chat template (adds special tokens, role markers, etc.)
        text = tokenizer.apply_chat_template(
            messages,
            tokenize = False,
            add_generation_prompt = False
        )
        texts.append(text)

    return {"text": texts}

dataset = dataset.map(format_sample, batched = True)
print("Formatted sample:n", dataset[0]["text"][:500])
Step 3: Configure the SFTTrainer and Hyperparameters
from trl import SFTTrainer
from transformers import TrainingArguments, DataCollatorForSeq2Seq

trainer = SFTTrainer(
    model = model,
    tokenizer = tokenizer,
    train_dataset = dataset,
    dataset_text_field = "text",
    max_seq_length = max_seq_length,
    dataset_num_proc = 2,
    data_collator = DataCollatorForSeq2Seq(tokenizer = tokenizer),
    args = TrainingArguments(
        per_device_train_batch_size = 1,
        gradient_accumulation_steps = 8,    # Effective batch size = 1* 8= 8
        warmup_steps = 10,
        max_steps = 100,                    # ~9–11 minutes on Colab T4. Increase to 500+ for serious runs.
        learning_rate = 2e-4,
        fp16 = not torch.cuda.is_bf16_supported(),
        bf16 = torch.cuda.is_bf16_supported(),
        logging_steps = 10,
        optim = "adamw_8bit",              # 8-bit Adam saves ~30% additional VRAM
        weight_decay = 0.01,
        lr_scheduler_type = "cosine",      # Cosine decay works slightly better than linear for code tasks
        seed = 42,
        output_dir = "qwen3-python-coder",
        report_to = "none",                # Set to "wandb" if you want training curves
    ),
)
A note on max_steps:
- 100 steps → Quick sanity check. You’ll see a behavior shift, but not optimal quality.
- 500 steps → Good quality. Recommended for personal use.
- 1500–3000 steps → Production-grade fine-tune. Use Kaggle’s 30-hour free GPU for this.
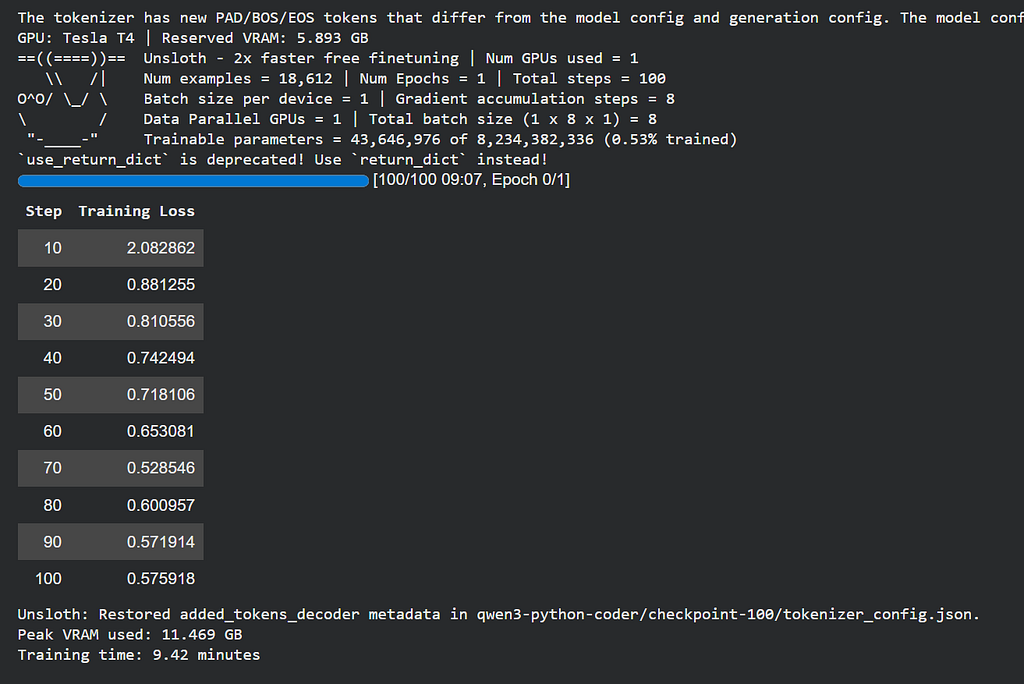
Step 4: Train and Watch the Loss Drop
# Show GPU memory before training
gpu_stats = torch.cuda.get_device_properties(0)
start_gpu_memory = round(torch.cuda.max_memory_reserved() / 1024 / 1024 / 1024, 3)
print(f"GPU: {gpu_stats.name} | Reserved VRAM: {start_gpu_memory} GB")

# Train
trainer_stats = trainer.train()

# Show memory usage after training
used_memory = round(torch.cuda.max_memory_reserved() / 1024 / 1024 / 1024, 3)
print(f"Peak VRAM used: {used_memory} GB")
print(f"Training time: {round(trainer_stats.metrics['train_runtime'] / 60, 2)} minutes")
On a Colab T4 with max_steps=100You will typically see:
- Peak VRAM used: ~11.5 GB (of the T4’s 15 GB)
- Training time: ~8–10 minutes
- Loss curve: Starting around 1.8–2.2, dropping to 0.8–1.1 by step 100
That loss drop is your model learning to code.
Step 5: Run Inference on Your Fine-Tuned Model
from transformers import TextStreamer

# Switch to inference mode (Unsloth's 2x speed optimization)
FastLanguageModel.for_inference(model)

# Test prompt - ask your new coding assistant something real
test_prompt = "Write a Python function that reads a CSV file and returns the top 5 rows with the highest value in a specified column."

messages = [{"role": "user", "content": test_prompt}]
formatted = tokenizer.apply_chat_template(
    messages,
    tokenize = False,
    add_generation_prompt = True,
    enable_thinking = False      # Set to True to activate Qwen3's chain-of-thought reasoning mode
)

inputs = tokenizer([formatted], return_tensors="pt").to("cuda")
streamer = TextStreamer(tokenizer, skip_prompt=True, skip_special_tokens=True)

_ = model.generate(
    **inputs,
    streamer = streamer,
    max_new_tokens = 512,
    temperature = 0.7,
    top_p = 0.9,
)
Pro tip: Try flipping enable_thinking=True and running the same prompt. You will see the model visibly “think” through the problem before writing code. It is one of Qwen3’s standout features and genuinely impressive for complex algorithmic tasks.
Saving Your Model and Taking It Offline
Your fine-tuned model lives in RAM right now. Let’s make it permanent.
Option 1 – Push to Hugging Face Hub:
model.push_to_hub("your-username/qwen3-python-coder", token = "YOUR_HF_TOKEN")
tokenizer.push_to_hub("your-username/qwen3-python-coder", token = "YOUR_HF_TOKEN")
Option 2 – Export to GGUF and run locally via Ollama:
# Q4_K_M is the community's go-to: best quality-to-size ratio
model.save_pretrained_gguf(
    "qwen3-python-coder",
    tokenizer,
    quantization_method = "q4_k_m"
)
Download the .gguf file from Colab’s file panel and run it on your local machine:
# Create an Ollama Modelfile
echo 'FROM ./qwen3-python-coder.Q4_K_M.gguf' > Modelfile

# Register and run
ollama create my-python-coder -f Modelfile
ollama run my-python-coder
You now have a custom Python coding assistant running entirely offline, with no API key, no usage limits, and no monthly bill.
“The gap between ‘using AI’ and ‘owning AI’ just collapsed. You’re on the right side of it now.”
What You Actually Built Today
Let’s zoom out for a second.
You took a state-of-the-art open-source model. You taught it to specialize in Python programming. You did it on hardware that costs you nothing. And the whole process took less time than a lunch break.
This same workflow scales to anything:
- Fine-tune on your company’s internal documentation → a private enterprise assistant
- Fine-tune on medical Q&A datasets → a triage assistant (with appropriate safety layers)
- Fine-tune on customer support tickets → an automated first-response bot
- Fine-tune on legal filings → a document summarization tool
The architecture is identical. Only the dataset changes.
Unsloth, Qwen3, and the broader open-source ecosystem have genuinely democratized model customization. The only remaining barrier is knowing the workflow – and now you do.
What Dataset Are You Planning to Fine-Tune On?
Have a niche use case in mind? A specific domain, language, or task you want your model to master?
Drop it in the comments below. I read every reply and will personally suggest the best publicly available dataset for your use case – or help you structure your own.
If this guide saved you hours of research, hit the clap button (up to 50 times – Medium allows it!) and follow for weekly hands-on AI engineering tutorials.
References:
[1] Unsloth Official Documentation – https://docs.unsloth.ai
[2] Unsloth GitHub Repository – https://github.com/unslothai/unsloth
[3] Qwen3 Technical Report, Alibaba Cloud (2025) – https://huggingface.co/Qwen/Qwen3-8B
[4] Python Code Instructions Dataset – https://huggingface.co/datasets/iamtarun/python_code_instructions_18k_alpaca
[5] Hu et al., “LoRA: Low-Rank Adaptation of Large Language Models” (2021) – https://arxiv.org/abs/2106.09685
[6] Dettmers et al., “QLoRA: Efficient Finetuning of Quantized LLMs” (2023) – https://arxiv.org/abs/2305.14314
Unsloth Just Made Fine-Tuning LLMs a Free-Tier Task. was originally published in Towards AI on Medium, where people are continuing the conversation by highlighting and responding to this story.