FastAPI for MLOps: Python Project Structure and API Best Practices
Table of Contents
- What You Will Build and Learn
- Why Software Engineering Comes First in MLOps Best Practices
- Where This Fits in the Overall Curriculum
- How to Structure a Python Project with src/ Layout
- Python Project Structure Explained: Repository Walkthrough
- Python Project Structure Best Practices: Directory Breakdown
- How This Structure Scales to Larger ML Systems
- Python Poetry vs PDM vs UV: Choosing a Package Manager for MLOps
- Understanding pyproject.toml for Python Project Configuration
- Installing Dependencies (Poetry, PDM, UV)
- Managing Python Virtual Environments for Reproducible MLOps
- Automating MLOps Setup with Python Environment Scripts
- Using Pydantic Settings for MLOps Configuration Management
- What This Means for MLOps Configuration and System Design
- Loading YAML and Merging Layers
- Designing YAML Configs for Scalable MLOps Pipelines
- Using .env Files for Secure MLOps Configuration
- Why Configuration Management Matters in MLOps Systems
- How the App Uses Configuration (src/main.py)
- How FastAPI Uses Configuration in Production MLOps Systems
- Extending MLOps Configuration Safely in Python Projects
- Why Logging Is Critical for ML Systems
- Logger Initialization
- Log Formatting and Levels
- Logging Across the App
- Together, This Gives Us Structured, Traceable Behavior Across the App
- Why FastAPI Is Ideal for MLOps API Development
- Creating a FastAPI Application for Machine Learning APIs
- Implementing Health Check Endpoints in FastAPI (MLOps)
- Building a FastAPI Prediction Endpoint for ML Models
- Behind This Endpoint Is Your Prediction Engine
- Deploying FastAPI with Uvicorn for MLOps Applications
- Auto-Generated API Docs (Swagger, ReDoc)
- Why We Separate Services from Routes
- Designing an ML Inference Service
- Scaling MLOps Systems with Modular Service Architecture
- Designing a Python ML Model Class for MLOps
- How to Replace Dummy Models with Production ML Models
- Versioning the Model Class
- Running via Poetry
- Running via UV
- Running Python MLOps Projects with PDM
- Testing FastAPI Endpoints: Health Check and Prediction API
FastAPI for MLOps: Python Project Structure and API Best Practices
In this lesson, you will learn how to structure a Machine Learning (ML) project like a real production system, complete with a src directory layout, layered configuration, environment management, logging, and a FastAPI service that exposes your model through clean Application Programming Interface (API) routes.

This lesson is the 1st of a 2-part series on Software Engineering for Machine Learning Operations (MLOps):
- FastAPI for MLOps: Python Project Structure and API Best Practices (this tutorial)
- Lesson 2
To learn how to build reliable, scalable ML software the right way, just keep reading.
Introduction
Modern ML systems do not succeed because of models alone — they succeed because of the software engineering wrapped around them. Most real-world failures in MLOps come from poor structure, missing configuration, messy environments, unclear APIs, or nonexistent logging, not from bad ML.
This lesson gives you the engineering foundation you need to build ML systems that are stable, testable, and production-ready. You’ll learn how to structure your project, manage environments, load configurations, build APIs, and prepare your system for future modules like testing, deployment, and automation.
To learn how solid software engineering underpins every ML workflow, just keep reading.
What You Will Build and Learn
In this lesson, you’ll build the backbone of a real ML application: a clean repository layout, environment management with modern tooling, configuration loading via Pydantic, structured logging, a FastAPI interface, and a simple service layer to power prediction.
These concepts form the “foundation layer” every MLOps system relies on — regardless of the model you eventually plug in.
Why Software Engineering Comes First in MLOps Best Practices
ML projects fail not because the model is wrong, but because the plumbing around the model collapses. Scripts turn into spaghetti, notebooks become unmaintainable, configs get scattered, and environments drift until the system becomes impossible to debug.
Good software engineering fixes this by introducing structure, consistency, and predictable behavior. When your API, config, logs, and model code work together cleanly, everything built on top (e.g., testing, serving, scaling, monitoring) suddenly becomes reliable.
Where This Fits in the Overall Curriculum
This lesson is the foundation of the entire MLOps series. Everything that comes next — testing, model integration, deployment workflows, Continuous Integration/Continuous Delivery (CI/CD) automation, monitoring, and scaling — builds on the engineering habits you establish here.
Think of this as your “software engineering base layer.” Once you master this structure, adding real models, adding load testing, or plugging the system into cloud infrastructure becomes far easier.
Python Project Structure Best Practices for MLOps
A well-structured repository is the first sign of a healthy ML system. Before we write any API code or load a model, we need a layout that cleanly separates configuration, services, models, and utilities. This not only prevents chaos — it makes testing, scaling, and future modules dramatically easier.
How to Structure a Python Project with src/ Layout
ML projects quickly become messy if everything sits at the root level. The src/ layout prevents naming collisions, enforces imports that match production structure, and makes it clear where application code actually lives.
This is the same structure used in mature Python services deployed in production environments.
Python Project Structure Explained: Repository Walkthrough
Here’s the repository layout we’re working with in this module (the exact tree will be shown later when you provide it):
sw-eng-mlops/
│
├── src/
│   ├── core/
│   ├── models/
│   ├── services/
│   ├── api/
│   ├── utils/
│   └── config/
│
├── tests/
│   ├── unit/
│   ├── integration/
│   └── performance/
│
├── pyproject.toml
├── README.md
├── setup_env.sh
└── .env.example
This structure is intentionally clean: core/ contains primitives, models/ stores your ML logic, services/ contains business logic, and api/ exposes everything through FastAPI routes.
Python Project Structure Best Practices: Directory Breakdown
core/ — The Application Base Layer
This folder contains shared components such as logging setup, base classes, or utility abstractions. Everything here is meant to be reusable across the whole system.
models/ — ML or Dummy Model Code
Even if you’re starting with a dummy model, isolating model code here makes it easy to swap in real models later.
services/ — The Business Logic Layer
This is where you place the logic that actually powers /predict, not inside the API route. This separation keeps production-grade APIs maintainable.
api/ — FastAPI Endpoints
Routes live here. Each endpoint calls a service, which calls a model.
Tight, clean, and testable.
utils/ — Shared Helpers
Config loaders, yaml readers, or general-purpose helper functions sit here.
If it isn’t domain logic or a model, it goes here.
config/ — Configuration Files
YAML configs, BaseSettings classes, validation logic, and environment overrides.
Centralizing config makes behavior predictable and testable.
How This Structure Scales to Larger ML Systems
This layout scales easily as your ML workload grows:
- Add a new model → create a folder inside
models/. - Add a new prediction workflow → add a service in
services/. - Add new API functionality → add a route in
api/. - Add data pipelines or vector DB logic → expand
core/orservices/.
This way, the project grows horizontally, not chaotically.
Would you like immediate access to 3,457 images curated and labeled with hand gestures to train, explore, and experiment with … for free? Head over to Roboflow and get a free account to grab these hand gesture images.
Managing Python Dependencies with Poetry for ML Projects
Modern MLOps projects rely on predictable, repeatable environments — and this section teaches you how to create exactly that. Before we build APIs or load models, we need a clean, isolated workspace where dependencies are installed, versions are pinned, and tools behave consistently across machines.
To learn how to manage dependencies, virtual environments, and setup scripts in real-world ML projects, just keep reading.
Python Poetry vs PDM vs UV: Choosing a Package Manager for MLOps
There are 3 modern Python toolchains worth knowing:
- Poetry: full-featured dependency + environment + packaging manager.
- PDM (Python Dependency Manager): simpler and faster than Poetry, with PEP-582 support.
- UV: an extremely fast Rust-based package manager from Astral.
All 3 support pyproject.toml, the modern Python standard for dependencies and metadata.
Teams often standardize on a single tool, but your project supports all three, so students can use whichever they prefer.
Understanding pyproject.toml for Python Project Configuration
Your pyproject.toml defines:
- project
name,version,description - dependencies like
fastapi,pydantic,pyyaml - dev tools like
pytest(Lesson 2) - optional entrypoints (
start-server = "src.main:main")
In other words, it is the single source of truth for installation and build metadata.
Any tool (Poetry, PDM, UV, pip) reads this file to install exactly what the project needs.
This is how professional ML systems avoid “works on my machine” issues.
Installing Dependencies (Poetry, PDM, UV)
Using Poetry (recommended)
poetry install
poetry shell
poetry run python src/main.py
Poetry creates an isolated virtual environment and resolves all versions deterministically.
Using UV (lightweight + blazing fast)
uv venv
source .venv/bin/activate
uv pip install -e .
python src/main.py
UV is perfect for fast installs and CI systems where speed matters.
Using PDM (simple + modern)
pdm install
pdm run python src/main.py
PDM feels like npm — no venv folder by default; lightweight and straightforward.
Managing Python Virtual Environments for Reproducible MLOps
Regardless of what tool you choose, the goal is the same: isolate project dependencies from the system Python installation.
- Poetry creates its own environment automatically.
- UV uses
.venv/inside your project. - PDM can create or avoid virtual environments depending on the configuration.
The important principle:
Never install ML dependencies globally.
Environments keep your project reproducible and safe.
Automating MLOps Setup with Python Environment Scripts
Your project includes a helper script:
./scripts/setup_env.sh
This script:
- Detects whether Poetry, UV, or plain pip is available
- Installs dependencies using the detected tool
- Creates or activates the
.envfile - Shows the next steps to start the API
This is extremely helpful for teams because it removes all “setup guessing” and gives new developers a consistent starting point.
You now know how environments, dependency managers, and pyproject.toml work together to create a stable foundation for ML systems. With everything installed and configured, you’re ready to build and serve a real API.
Up next, we’ll create your first ML service with FastAPI and connect it to your project’s service layer.
Need Help Configuring Your Development Environment?
All that said, are you:
- Short on time?
- Learning on your employer’s administratively locked system?
- Wanting to skip the hassle of fighting with the command line, package managers, and virtual environments?
- Ready to run the code immediately on your Windows, macOS, or Linux system?
Then join PyImageSearch University today!
Gain access to Jupyter Notebooks for this tutorial and other PyImageSearch guides pre-configured to run on Google Colab’s ecosystem right in your web browser! No installation required.
And best of all, these Jupyter Notebooks will run on Windows, macOS, and Linux!
Configuration Management in MLOps: YAML, .env, and Pydantic
How the entire ML system loads, merges, and applies configuration at runtime.
Configuration is one of the most important engineering foundations in any ML system. In Lesson 1, we want students to walk away understanding not only why configuration matters but exactly how this project loads and merges config values. That means stepping through the real code inside src/core/config.py, the .env.example, and configs/config.yaml.
We also want to show how the API, model, and services consume configuration. So when students replace the dummy model with a real one, the pattern already scales.
Let’s walk through it piece by piece.
Using Pydantic Settings for MLOps Configuration Management
Your configuration system starts with a Settings class:
class Settings(BaseSettings):
    api_host: str = "0.0.0.0"
    api_port: int = 8000
    debug: bool = False
    environment: str = "development"
    log_level: str = "INFO"

    class Config:
        env_file = ".env"
        env_file_encoding = "utf-8"
What This Means for MLOps Configuration and System Design
- Pydantic’s
BaseSettingsautomatically reads:- environment variables
.envfile- any overrides you pass at runtime
- Defaults are provided in code so the system always works, even if
.envis missing. - Type safety ensures that if someone writes
API_PORT=hello, the app will fail fast.
This is the right pattern for ML systems where dozens of environment variables must be synchronized across dev, test, staging, and production.
Loading YAML and Merging Layers
Next comes one of the most important parts of your system:
def load_config() -> Settings:
    settings = Settings()

    config_path = "configs/config.yaml"
    if os.path.exists(config_path):
        yaml_config = load_yaml_config(config_path)

        for key, value in yaml_config.items():
            if hasattr(settings, key):
                setattr(settings, key, value)

    return settings
Why This Is Powerful
You now have layered configuration, which production ML systems use everywhere:
Layer 1: Code defaults
Ensures the app always runs.
Layer 2: YAML (configs/config.yaml)
Great for team-shared configs, model settings, cache sizes, service parameters.
Layer 3: .env file
Local overrides (ports, debug mode, secrets).
Layer 4: Runtime environment variables
Final source of truth in cloud deployments.
This layered system prevents the “hard-coded value” trap and keeps ML infra consistent across environments.
Designing YAML Configs for Scalable MLOps Pipelines
Your YAML file contains deeper structural config:
api_host: "0.0.0.0"
api_port: 8000
debug: true
environment: "development"

log_level: "INFO"

model:
  name: "dummy_classifier"
  version: "1.0.0"
  cache_size: 100

service:
  timeout: 30
  max_retries: 3
Even though Settings does not yet support nested objects for models or services, YAML allows you to introduce new structured configuration later. This is how real ML teams configure:
- model version
- tokenizer version
- max batch size
- timeouts
- cache settings
- experiment IDs
Using .env Files for Secure MLOps Configuration
You also provide .env.example:
API_PORT=8000
API_HOST=0.0.0.0
DEBUG=true
ENVIRONMENT=development
LOG_LEVEL=INFO
Why Configuration Management Matters in MLOps Systems
.env.exampleacts as documentation and a template.- You copy it to
.env, fill values, and the system boots. - This is a best practice in every production ML repo.
How the App Uses Configuration (src/main.py)
Your FastAPI entrypoint reads config like this:
logger.info(f"Starting server on {settings.api_host}:{settings.api_port}")

uvicorn.run(
    "main:app",
    host=settings.api_host,
    port=settings.api_port,
    reload=settings.debug
)
Meaning:
- Change
.envtoAPI_PORT=9000: Your app automatically runs on port 9000. - Change YAML to
debug: false: Hot reload turns off.
This is the practical benefit of structured configuration: no hard-coded values are buried inside the code.
How FastAPI Uses Configuration in Production MLOps Systems
Today, your inference service is simple, but in real projects, you might use:
- model name
- version
- batch size
- latency budget
- max retries
- cache settings
- rate limits
All of these come from settings, not hardcoded logic.
In this lesson, you teach the pattern, so when the dummy model is eventually replaced with an Open Neural Network Exchange (ONNX) model, a Hugging Face model, or a custom PyTorch model, the service already has the right structure.
Extending MLOps Configuration Safely in Python Projects
Suppose tomorrow you want:
MODEL_PATH=models/checkpoint.pt
ENABLE_CACHE=true
CACHE_TTL=300
You add:
model_path: str = "models/dummy.pt"
enable_cache: bool = False
cache_ttl: int = 120
Then update .env.example. Then, optionally override in YAML.
The app instantly supports new behavior — no rewrites, no refactoring, no confusion.
This is the level of software engineering maturity we want students to learn.
Logging Best Practices for MLOps and FastAPI Applications
Logging is one of the most underappreciated parts of an ML system. A model prediction might take milliseconds, but diagnosing a production issue without proper logs can take hours. Good logs reduce that time to minutes. In this section, we’ll look at how our lesson’s project initializes a logger, formats log messages, and uses logs consistently across the entire API.
Why Logging Is Critical for ML Systems
ML systems fail in ways traditional software does not.
A model might produce an unexpected prediction, a dependency might break silently, or the environment might load the wrong configuration. Logging gives you the breadcrumbs needed to understand:
- What inputs reached the API
- What model version was used
- What the service did before failing
- How often errors occur
- Whether latency is increasing
Logs are your “black box recorder” when something goes wrong, and they’re equally important when everything seems to be working — because they tell you why things are working.
Logger Initialization
The project defines a single shared logger in src/core/logger.py:
import logging
import sys

logger = logging.getLogger("mlops-lesson1")
logger.setLevel(logging.INFO)

handler = logging.StreamHandler(sys.stdout)
formatter = logging.Formatter('%(asctime)s - %(levelname)s - %(message)s')
handler.setFormatter(formatter)

if not logger.handlers:
    logger.addHandler(handler)
Here’s what this setup accomplishes:
- A named logger (
mlops-lesson1) groups logs for later aggregation (e.g., in Datadog, ELK (Elasticsearch, Logstash, Kibana), OpenTelemetry). INFOas the default level ensures we capture meaningful operational details without spamming output.- A
StreamHandlerwrites logs tostdout— the standard for containerized deployments (Docker, Kubernetes). - A simple timestamped formatter makes logs human-readable while remaining machine-parseable.
- The
if not logger.handlers:guard prevents duplicate logs if modules are reloaded.
This small file gives us a production-friendly logger with minimal overhead.
Log Formatting and Levels
The logger uses this format:
2025-01-01 12:34:56 - INFO - Prediction result: positive
Each part of the log line matters:
- Timestamp: crucial for correlating logs with events or latency spikes.
- Log level: signals severity:
INFO,WARNING,ERROR. - Message: the human-readable explanation.
In MLOps systems, you’ll most commonly use:
INFOfor model loading, API calls, predictionsWARNINGfor slow responses, unexpected patternsERRORwhen something fails
Because FastAPI reloads modules during development, you may see log duplication without safeguards — which is why we include the if not logger.handlers: check.
If you later want structured JSON logs (for cloud log ingestion), this same module is the place to upgrade.
Logging Across the App
The logger is used in multiple places, showing a consistent logging strategy.
Health endpoint (src/main.py)
@app.get("/health")
async def health_check():
    logger.info("Health check requested")
    return {"status": "ok"}
This gives visibility into uptime checks — important when a load balancer or Kubernetes performs probes.
Prediction endpoint (src/services/inference_service.py)
logger.info(f"Making prediction for input: {input_text[:50]}...")
prediction = model.predict(input_text)
logger.info(f"Prediction result: {prediction}")
Here we log:
- The incoming input (truncated to avoid leaking full user data)
- The model’s output
- Any errors
If something goes wrong:
except Exception as e:
    logger.error(f"Error during prediction: {str(e)}")
    raise
This ensures errors appear in the logs before FastAPI converts them into HTTP exceptions.
Server startup (main.py)
logger.info(f"Starting server on {settings.api_host}:{settings.api_port}")
This is important for:
- verifying the config loaded correctly
- ensuring the correct port is used
- debugging environments with conflicting overrides
Together, This Gives Us Structured, Traceable Behavior Across the App
If a user reports:
“The API feels slow today.”
You can immediately look at:
- prediction request timestamps
- whether model loading was triggered again
- whether latency warnings appear
- whether certain inputs correlate with errors
Without logs, you’re flying blind.
FastAPI for MLOps: Building a Production ML API
APIs are the interface between your ML system and the outside world. Whether the consumer is a mobile app, a batch job, another microservice, or a human developer testing in Postman, every interaction eventually flows through an API. In MLOps, your API becomes the stable contract that hides internal details (model type, version, preprocessing, logging) — allowing you to upgrade models without breaking clients.
Why FastAPI Is Ideal for MLOps API Development
FastAPI gives you a fast, typed, and production-ready way to expose ML predictions.
It handles validation, serialization, documentation, and error responses, so your ML logic stays clean and modular.
The goal is simple: your API should stay stable even when everything behind it changes — models, configs, logging, monitoring, infrastructure.
Creating a FastAPI Application for Machine Learning APIs
Your project defines the API inside src/main.py:
from fastapi import FastAPI
app = FastAPI(
    title="ML Service API",
    description="Code Foundations & API Engineering for MLOps",
    version="0.1.0"
)
This initializes a fully documented ML service with:
- A
titlefor the UI - A
descriptionthat shows up in Swagger - A semantic
version - Automatically generated schemas
FastAPI instantly gives you API docs and a clean, declarative way to add endpoints.
Implementing Health Check Endpoints in FastAPI (MLOps)
A health endpoint is the first thing any production system needs.
Kubernetes, AWS Application Load Balancer (ALB), Docker Compose, Jenkins, and uptime monitors all rely on it.
Your implementation:
@app.get("/health")
async def health_check():
    logger.info("Health check requested")
    return {"status": "ok"}
This performs 2 critical functions:
- Confirms the API server is alive
- Confirms logs are working
It also gives you a simple smoke test to verify the environment.
Building a FastAPI Prediction Endpoint for ML Models
The /predict endpoint is where real ML work happens.
@app.post("/predict")
async def predict_route(input: str):
    return {"prediction": predict_service(input)}
This endpoint:
- Accepts a simple string input
- Passes it into the inference service
- Returns a structured JSON prediction
Because prediction logic is isolated in services/inference_service.py, the API stays lightweight and focused on HTTP behavior — not business logic.
Behind This Endpoint Is Your Prediction Engine
from models.dummy_model import DummyModel

model = DummyModel()

def predict(input_text: str) -> str:
    logger.info(f"Making prediction for input: {input_text[:50]}...")
    prediction = model.predict(input_text)
    logger.info(f"Prediction result: {prediction}")
    return prediction
Even though this is a dummy model, the structure mirrors real production design:
- The service layer owns the prediction logic
- The model is instantiated once
- Logging wraps the input and output
When you upgrade to a real transformer or classifier, the API does not need to change.
Deploying FastAPI with Uvicorn for MLOps Applications
The server entrypoint lives at the bottom of main.py:
def main():
    logger.info(f"Starting server on {settings.api_host}:{settings.api_port}")
    uvicorn.run(
        "main:app",
        host=settings.api_host,
        port=settings.api_port,
        reload=settings.debug
    )
A few details matter:
reload=Truereloads on code changes → perfect for developmenthostandportcome from config → ideal for containers/cloud- logging is integrated → so you can trace server start behavior
You can run the server with:
poetry run start-server
or
uvicorn src.main:app --reload
Both give you a live API with hot reload.
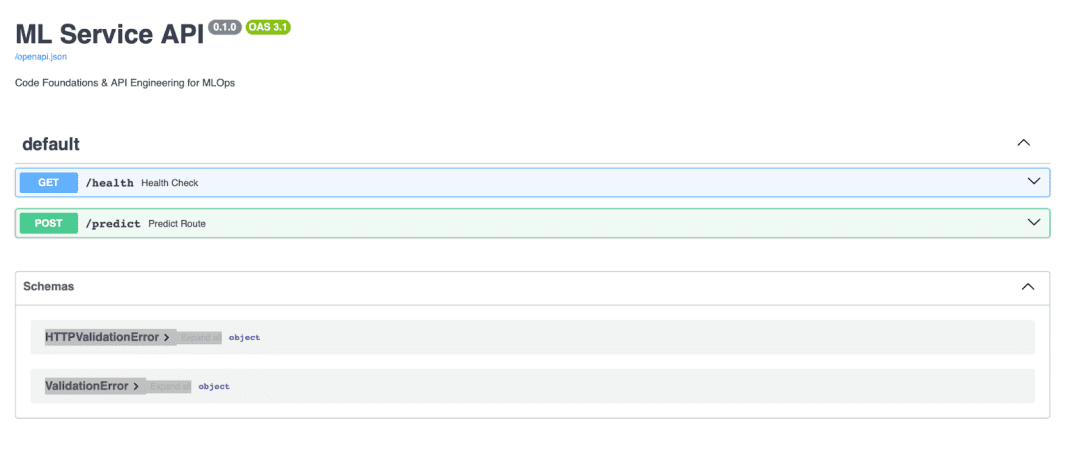
Auto-Generated API Docs (Swagger, ReDoc)
FastAPI automatically exposes:
- Swagger UI:
http://localhost:8000/docs - ReDoc:
http://localhost:8000/redoc - OpenAPI schema:
http://localhost:8000/openapi.json
These docs are invaluable in ML workflows because:
- You can test predictions interactively
- Product, QA, and frontend engineers can explore endpoints
- Payload schemas are always up to date
- No one needs to ask “What does this endpoint expect?”
FastAPI generates this from your Python type hints, which makes documentation essentially free.
MLOps Architecture: Service Layer Design Patterns
The service layer is where your application’s real business logic lives. In an ML system, this includes preprocessing, model selection, inference, error handling, postprocessing, and logging. By keeping this logic out of your API routes, you ensure that your codebase remains modular, testable, and ready for future model upgrades.
Why We Separate Services from Routes
FastAPI routes should only handle HTTP concerns: input validation, request parsing, and response formatting.
They should not know how your model works internally.
Separating logic into a services/ folder gives you:
- Cleaner API routes: easier to read and maintain
- Better testability: you can unit test the inference logic without starting a server
- Loose coupling: upgrading models doesn’t require rewriting routes
- Clear ownership: one layer handles HTTP, the other handles ML logic
This separation is one of the most critical software engineering patterns in MLOps — you want your system flexible enough that models can change, scale, or switch frameworks without touching your API.
Designing an ML Inference Service
Your inference logic lives in:
src/services/inference_service.py
Let’s look at how it’s structured:
from models.dummy_model import DummyModel
from core.logger import logger

# Initialize model
model = DummyModel()
logger.info(f"Loaded model: {model.model_name}")
This loads the model once at startup. In a real ML system, this is where:
- You load a transformer model
- You warm up a GPU
- You hydrate a vector store
- You initialize the tokenizer/preprocessor state
Then comes the prediction function:
def predict(input_text: str) -> str:
    logger.info(f"Making prediction for input: {input_text[:50]}...")

    try:
        prediction = model.predict(input_text)
        logger.info(f"Prediction result: {prediction}")
        return prediction
    except Exception as e:
        logger.error(f"Error during prediction: {str(e)}")
        raise
This function represents the business logic of your ML service:
- It trims the input for logging
- Calls the model’s
predict() - Logs errors and output cleanly
- Returns only the result — not HTTP details
This is exactly why we keep services separate: inference is not an HTTP concern, so it does not belong in a route.
Scaling MLOps Systems with Modular Service Architecture
A great design scales. Tomorrow, your system might need:
SentimentService: for NLPRecommendationService: for personalizationVisionService: that loads YOLO or CLIPBatchService: for async workflowsRetrievalService: for Retrieval-Augmented Generation (RAG) pipelines
You don’t modify main.py or existing endpoints.
You simply add more files under:
src/services/
├── inference_service.py
├── recommendation_service.py
├── vision_service.py
└── retrieval_service.py
Each service becomes independent, testable, and reusable.
Later in Lesson 2, this design becomes even more powerful because:
- Unit tests: target individual services
- Integration tests: validate routes and services working together
- Load tests: measure the throughput of the
/predictpipeline
By the time you add real ML models, this service layer becomes the heart of your system.
Model Abstraction in MLOps: Decoupling ML from APIs
Models change constantly in MLOps. Today you may be serving a dummy classifier; tomorrow it might be a 7B LLM or a YOLOv12 object detector. A good software engineering foundation treats the model as a pluggable, versioned component that can be replaced with minimal friction.
Your current models/ directory demonstrates exactly how this abstraction works.
Designing a Python ML Model Class for MLOps
Your lesson uses a simple placeholder model located at:
src/models/dummy_model.py
The goal of this class isn’t to perform “real” ML — it’s to give you a clean structure that mimics how production model classes are written.
class DummyModel:
    def __init__(self) -> None:
        self.model_name = "dummy_classifier"
        self.version = "1.0.0"

    def predict(self, input_data: Any) -> str:
        text = str(input_data).lower()
        if "good" in text or "great" in text:
            return "positive"
        return "negative"
Even in this tiny model, you already see foundational patterns:
- A constructor to load or initialize model state
- A
predict()method that defines the inference interface model_nameandversionfields for introspection and tracking
This interface is intentionally minimal: it forces your service and API layers to depend on an abstraction, not on implementation details.
In real MLOps systems, this exact pattern makes it easy to introduce new models without breaking your API.
How to Replace Dummy Models with Production ML Models
Here’s where the abstraction shines.
If tomorrow you decide to replace the dummy model with:
- A Hugging Face transformer
- A PyTorch Lightning checkpoint
- A TensorRT engine
- An ONNX Runtime session
- A vLLM text-generation server
- A YOLO detection model
…all you need to do is drop a new file into:
src/models/
For example:
src/models/
├── dummy_model.py
├── sentiment_model.py
├── llm_generation_model.py
└── object_detector.py
And update your service:
from models.sentiment_model import SentimentModel
model = SentimentModel()
Nothing else changes.
Your FastAPI routes stay the same.
Your service interface stays the same.
Your tests stay the same (except for new model-specific tests).
This is model decoupling.
This is how ML systems avoid turning into tangled spaghetti when models evolve.
Versioning the Model Class
Model versioning is a real production concern, and your dummy model subtly teaches the pattern.
self.version = "1.0.0"
Model versioning matters because:
- You may deploy multiple models at once
- Clients might depend on specific behaviors
- A/B testing needs separate versions
- Rollbacks require deterministic reproducibility
- Monitoring tools (e.g., Prometheus or Langfuse) track model changes
In production, versioning happens in several places:
- version field in the class
- model registry tag (MLflow, SageMaker, Hugging Face Hub)
- Docker image tag
config.yamlentry- model card metadata
Your project follows the simplest, clearest entrypoint: a version attribute that propagates everywhere the model is used.
Later in Lesson 2, test cases and load tests will automatically pick up this version, mimicking real-world CI/CD systems that validate each model release.
Building Reusable Utilities in Python MLOps Projects
A well-designed ML system always contains a dedicated utilities layer — small, reusable functions that solve cross-cutting problems without polluting your core logic, service layer, or API routes.
In this project, the src/utils/ folder gives you a clean space to organize those helpers, starting with configuration loading, and is ready to grow as your system becomes more complex.
This layer keeps your codebase maintainable, testable, and extensible.
Loading YAML Configs
Your primary helper is load_yaml_config() found in:
src/utils/helpers.py
Here’s the implementation:
def load_yaml_config(path: str) -> Dict[str, Any]:
    config_path = Path(path)

    if not config_path.exists():
        return {}

    try:
        with open(config_path, 'r', encoding='utf-8') as file:
            config = yaml.safe_load(file)
            return config if config is not None else {}
    except yaml.YAMLError as e:
        print(f"Error loading YAML config from {path}: {e}")
        return {}
    except Exception as e:
        print(f"Unexpected error loading config from {path}: {e}")
        return {}
This function may look simple, but it embodies 3 production-level lessons:
Separation of concerns
Your application logic (FastAPI, inference services) should not know how a YAML file is parsed. They should only receive clean configuration objects.
Fault tolerance
In real deployments:
- configs may be missing
- YAML indentation may break
- a misconfigured CI pipeline may pass an empty file
Returning {} instead of crashing gives you graceful degradation.
Extensibility
Tomorrow you may add:
- JSON config support
- remote config loading (S3, Google Cloud Storage (GCS), Azure Blob)
- encrypted secrets
- multiple config layers
This helper becomes the foundation.
Inside core/config.py, you saw how load_yaml_config() merges YAML values into your Pydantic settings. This is a real-world pattern used in production MLOps stacks like Airflow, FastAPI microservices, Ray Serve, and MLflow.
Adding New Helper Functions
The utilities layer is designed to grow organically as your system grows.
Common helpers you may introduce later include:
String helpers
- text normalization
- input cleaning
- token counting
File helpers
- safe file writes
- temporary directory management
- checksum calculation for model files
Model helpers
- downloading artifacts from cloud storage
- caching models on disk
- validating model signatures
API helpers
- request validation
- standardized error responses
- retry/backoff wrappers around external calls
Monitoring helpers
- timing decorators
- metrics emitters (Prometheus, StatsD, OpenTelemetry)
- latency buckets
All of these belong in one place:
src/utils/
This prevents your service layer or route handlers from becoming cluttered and ensures that common functionality is implemented once and reused everywhere.
Running a FastAPI MLOps Application Locally
At this point, you have a fully structured ML application: configuration, logging, models, service layer, and a clean FastAPI interface. Now it’s time to actually run the system locally.
This section walks you through running the API with Poetry, UV, or PDM, depending on your setup. We’ll conclude with a quick validation test to ensure everything works end-to-end.
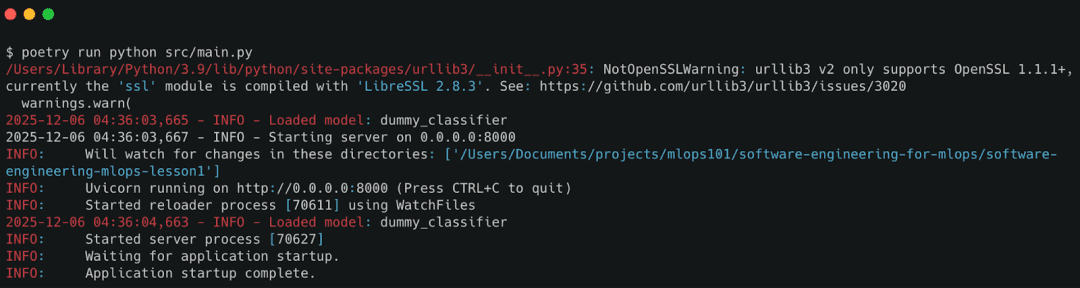
Running via Poetry
If you’re using Poetry (recommended for most workflows), your steps are:
# Install dependencies
poetry install

# Activate the environment
poetry shell

# Start the API server
poetry run python src/main.py
You should see log lines like:
INFO - Starting server on 0.0.0.0:8000
INFO - Loaded model: dummy_classifier
Running via UV
If you prefer UV (super-fast installer by Astral), run:
# Create and activate a virtual environment
uv venv
source .venv/bin/activate

# Install project in editable mode
uv pip install -e .

# Start the API
python src/main.py
This path is great for users who want lightweight dependency management without Poetry’s abstraction.
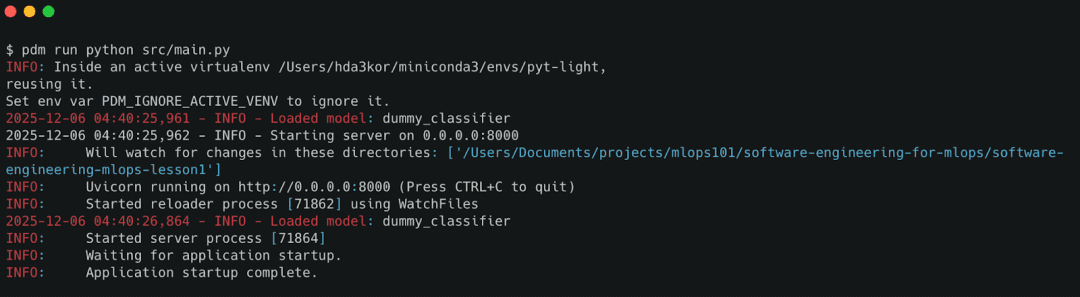
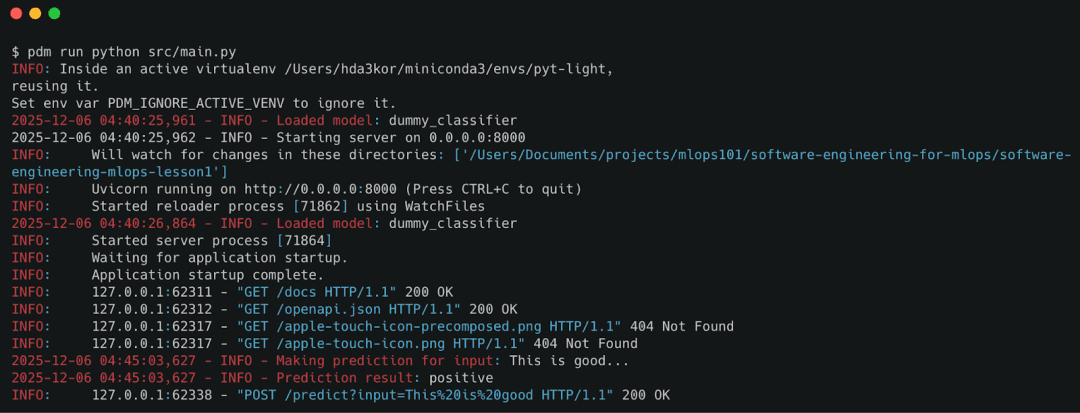
Running Python MLOps Projects with PDM
If your workflow uses PDM, run:
# Install dependencies
pdm install

# Start the server
pdm run python src/main.py
PDM offers a cleaner pyproject-first workflow and works well for CI/CD pipelines that prefer explicit environment setup.
Testing FastAPI Endpoints: Health Check and Prediction API
Once the server is running, validate the system with 2 quick API calls.
Health Check
Open:
http://localhost:8000/health
Expected response:
{"status": "ok"}
This confirms:
- the API is reachable
- config and logger initialized
- FastAPI routes are registered
Prediction Test
Send a prediction request:
curl -X POST "http://localhost:8000/predict?input=This+is+good"
Expected response:
{"prediction": "positive"}
Under the hood:
- the service layer logs the request
- the dummy model classifies sentiment
- the API returns structured JSON
/predict endpoint, validating the end-to-end workflow of the ML API.What’s next? We recommend PyImageSearch University.
86+ total classes • 115+ hours hours of on-demand code walkthrough videos • Last updated: April 2026
★★★★★ 4.84 (128 Ratings) • 16,000+ Students Enrolled
I strongly believe that if you had the right teacher you could master computer vision and deep learning.
Do you think learning computer vision and deep learning has to be time-consuming, overwhelming, and complicated? Or has to involve complex mathematics and equations? Or requires a degree in computer science?
That’s not the case.
All you need to master computer vision and deep learning is for someone to explain things to you in simple, intuitive terms. And that’s exactly what I do. My mission is to change education and how complex Artificial Intelligence topics are taught.
If you’re serious about learning computer vision, your next stop should be PyImageSearch University, the most comprehensive computer vision, deep learning, and OpenCV course online today. Here you’ll learn how to successfully and confidently apply computer vision to your work, research, and projects. Join me in computer vision mastery.
Inside PyImageSearch University you’ll find:
- ✓ 86+ courses on essential computer vision, deep learning, and OpenCV topics
- ✓ 86 Certificates of Completion
- ✓ 115+ hours hours of on-demand video
- ✓ Brand new courses released regularly, ensuring you can keep up with state-of-the-art techniques
- ✓ Pre-configured Jupyter Notebooks in Google Colab
- ✓ Run all code examples in your web browser — works on Windows, macOS, and Linux (no dev environment configuration required!)
- ✓ Access to centralized code repos for all 540+ tutorials on PyImageSearch
- ✓ Easy one-click downloads for code, datasets, pre-trained models, etc.
- ✓ Access on mobile, laptop, desktop, etc.
Summary
In this lesson, you learned how to build a clean, scalable foundation for ML systems using real software-engineering practices. You now understand why ML projects must be structured like production services — not experiments — if they are ever going to ship reliably.
We began by exploring the why: ML code becomes maintainable only when you enforce clear boundaries between configuration, logic, services, and I/O. That idea naturally led to the src/ layout, which gave our project a predictable and extensible shape.
You then learned how to manage dependencies using Poetry, UV, or PDM — ensuring that every ML environment is reproducible, isolated, and easy to rebuild. This solved the classic “it works on my machine” trap that haunts ML teams.
Next, we built a robust configuration system using Pydantic BaseSettings, merging defaults, YAML files, and .env variables into a single typed interface. You now have a configuration pattern used by real-world production ML systems.
We also implemented structured logging, enabling the application to communicate what it’s doing internally — a prerequisite for debugging, observability, and monitoring.
From there, you built your first production-style ML API with FastAPI, complete with /health, /predict, and auto-generated documentation. You learned how to expose ML logic cleanly, and why APIs are the interface between ML systems and the real world.
We introduced the Service Layer, showing how routes should delegate to independent business logic so APIs stay thin and models stay swappable. This design decision is what makes the system testable and future-proof.
You then explored model abstraction, using a simple dummy model to illustrate how real models (PyTorch, TensorFlow, ONNX, vLLM, Transformers) can be slotted in without changing the API layer.
Finally, you saw how helper utilities make the system cleaner, and how to run the full application with Poetry, UV, or PDM. The result is a working ML service that looks, behaves, and organizes itself like production-grade software.
By completing this lesson, you’ve built the foundation required for every advanced MLOps practice: testing, performance monitoring, CI/CD, orchestration, and deployment.
You’re now ready for Lesson 2, where we transform this service into a fully tested, validated, and performance-monitored ML system.
Citation Information
Singh, V. “FastAPI for MLOps: Python Project Structure and API Best Practices,” PyImageSearch, S. Huot, A. Sharma, and P. Thakur, eds., 2026, https://pyimg.co/yn8a5
@incollection{Singh_2026_fastapi-for-mlops-python-project-structure,
  author = {Vikram Singh},
  title = {{FastAPI for MLOps: Python Project Structure and API Best Practices}},
  booktitle = {PyImageSearch},
  editor = {Susan Huot and Aditya Sharma and Piyush Thakur},
  year = {2026},
  url = {https://pyimg.co/yn8a5},
}
To download the source code to this post (and be notified when future tutorials are published here on PyImageSearch), simply enter your email address in the form below!

Download the Source Code and FREE 17-page Resource Guide
Enter your email address below to get a .zip of the code and a FREE 17-page Resource Guide on Computer Vision, OpenCV, and Deep Learning. Inside you’ll find my hand-picked tutorials, books, courses, and libraries to help you master CV and DL!
The post FastAPI for MLOps: Python Project Structure and API Best Practices appeared first on PyImageSearch.