Vector Search Using Ollama for Retrieval-Augmented Generation (RAG)
Table of Contents
-
Vector Search Using Ollama for Retrieval-Augmented Generation (RAG)
-
How Vector Search Powers Retrieval-Augmented Generation (RAG)
-
What Is Retrieval-Augmented Generation (RAG)?
-
How to Build a RAG Pipeline with FAISS and Ollama (Local LLM)
-
Configuring Your Development Environment: Setting Up Ollama and FAISS for a Local RAG Pipeline
-
Implementation Walkthrough
-
Integrating Ollama with FAISS Vector Search for RAG
-
Running a Local RAG Pipeline with Ollama and FAISS
-
Tiny Gotchas and Tips
-
How to Run a Local RAG System with Ollama and FAISS
-
Example Output
-
What You Learned: Building a Production-Ready Local RAG System with Ollama and FAISS
-
Summary
Vector Search Using Ollama for Retrieval-Augmented Generation (RAG)
In the previous lessons, you learned how to generate text embeddings, store them efficiently, and perform fast vector search using FAISS. Now, it’s time to put that search power to use — by connecting it with a language model to build a complete Retrieval-Augmented Generation (RAG) pipeline.
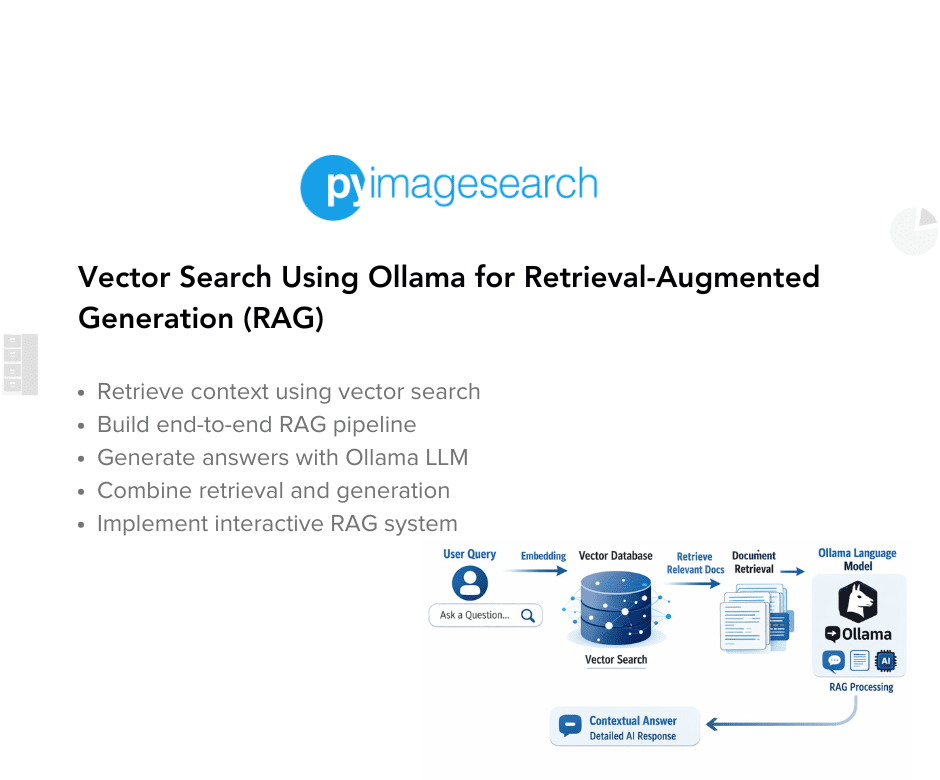
RAG is the bridge between retrieval and reasoning — it lets your LLM (large language model) access facts it hasn’t memorized. Instead of relying solely on pre-training, the model fetches relevant context from your own data before answering, ensuring responses that are accurate, up-to-date, and grounded in evidence.
Think of it as asking a well-trained assistant a question: they don’t guess — they quickly look up the right pages in your company wiki, then answer with confidence.
This lesson is the last of a 3-part series on Retrieval-Augmented Generation (RAG):
- TF-IDF vs. Embeddings: From Keywords to Semantic Search
- Vector Search with FAISS: Approximate Nearest Neighbor (ANN) Explained
- Vector Search Using Ollama for Retrieval-Augmented Generation (RAG) (this tutorial)
To learn how to make your LLM do the same, just keep reading.
How Vector Search Powers Retrieval-Augmented Generation (RAG)
Before we start wiring our first Retrieval-Augmented Generation (RAG) pipeline, let’s pause to understand how far we’ve come — and why this next step is a natural progression.
In Lesson 1, we learned how to translate language into geometry.
Each sentence became a vector — a point in high-dimensional space — where semantic closeness means directional similarity. Instead of matching exact words, embeddings capture meaning.
In Lesson 2, we tackled the scale problem: when millions of such vectors exist, finding the nearest ones efficiently demands specialized data structures such as FAISS indexes — Flat, HNSW, and IVF.
These indexes allow us to perform lightning-fast approximate nearest neighbor (ANN) searches with only a small trade-off in precision.
Now, in Lesson 3, we finally connect this retrieval ability to an LLM.
Think of the FAISS index as a semantic memory vault — it remembers every sentence you’ve embedded.
RAG acts as the retrieval layer that fetches the most relevant facts when you ask a question, passing those snippets to the model before it generates an answer.
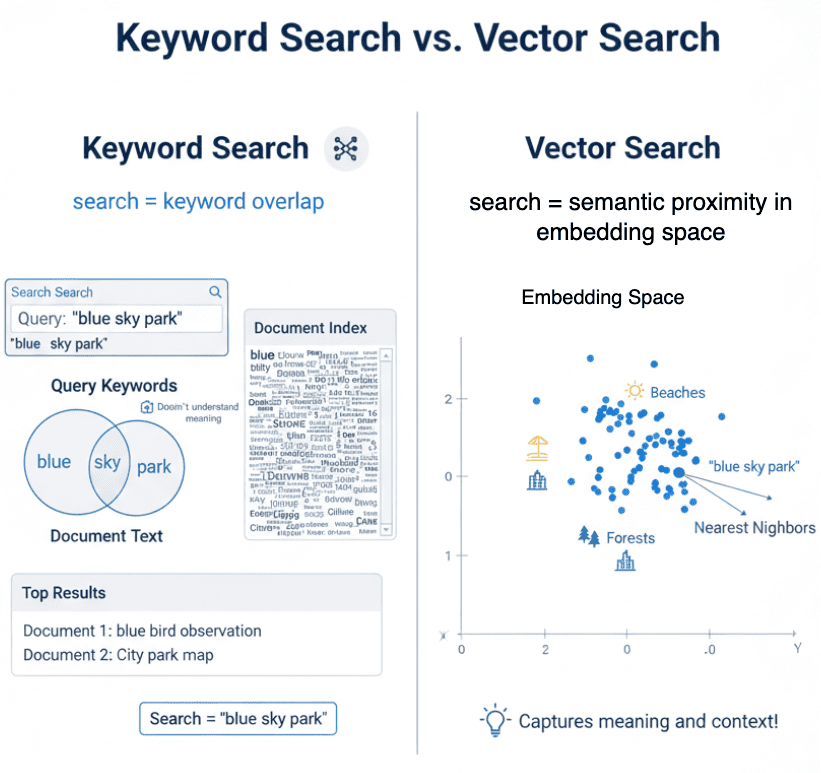
From Search to Context
Traditional vector search stops at retrieval:
You enter a query, it finds semantically similar passages, and displays them as search results.
RAG goes one step further — it feeds those retrieved passages into the language model’s input prompt.
Instead of reading raw similarity scores, the model sees sentences such as:
Context:
1. Vector databases store and search embeddings efficiently using ANN.
2. FAISS supports multiple indexing strategies including Flat, HNSW, and IVF.

User Question:
What’s the advantage of using HNSW over Flat indexes?
Now the model doesn’t have to “guess” — it answers with contextually grounded reasoning.
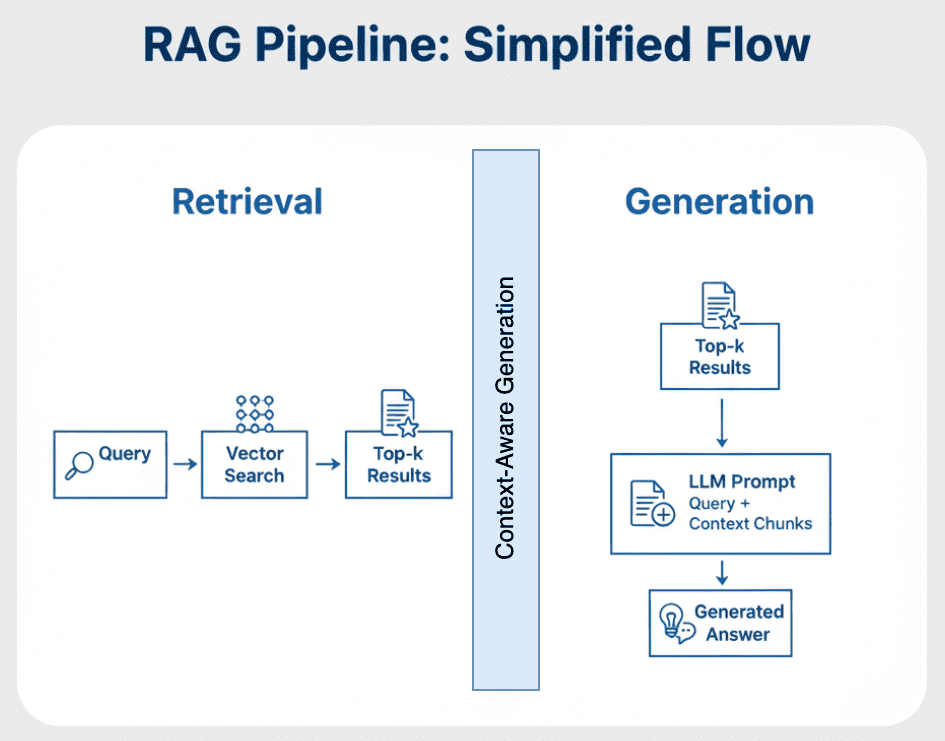
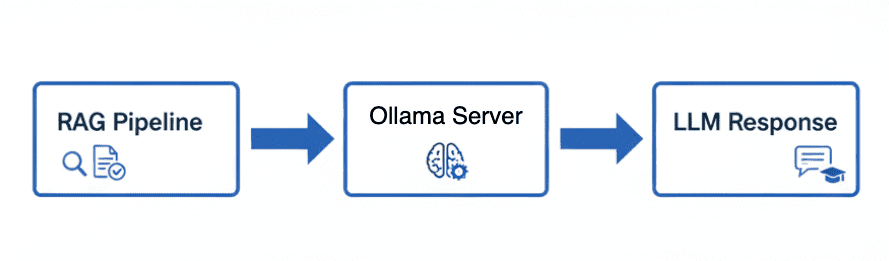
That is what transforms search into retrieval-based reasoning (Figure 1).
The Flow of Meaning
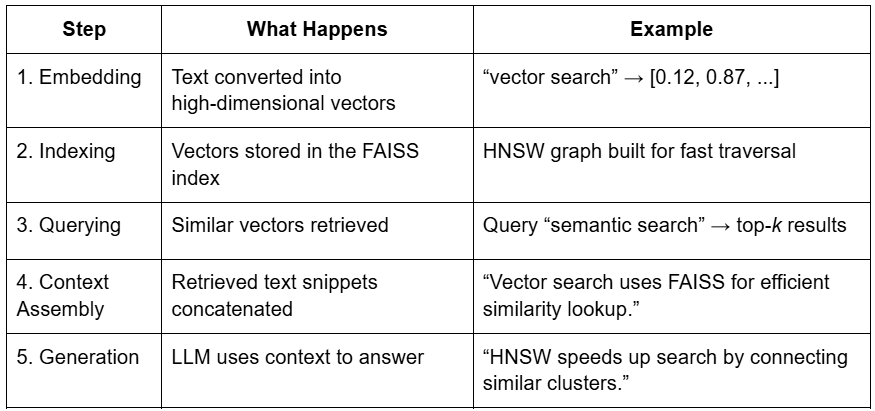
Let’s connect all the components (Table 1).
This is the essence of RAG — combining the recall strength of retrieval with the reasoning power of generation.
Putting It All Together
Imagine browsing through a giant photo album of your entire text corpus.
Vector search helps you instantly find pictures with similar colors and patterns — that’s embeddings at work.
But RAG doesn’t stop there. It shows those pictures to a storyteller (the LLM), who uses them to narrate a coherent story about what’s happening across them.
Embeddings give you semantic lookup.
RAG gives you semantic understanding (Figure 2).
If this flow made sense, you’re ready for the real action — understanding how Retrieval Augmented Generation actually works under the hood.
Next, we’ll break down the architecture, components, and the 2-stage process that powers modern RAG pipelines.
Would you like immediate access to 3,457 images curated and labeled with hand gestures to train, explore, and experiment with … for free? Head over to Roboflow and get a free account to grab these hand gesture images.
What Is Retrieval-Augmented Generation (RAG)?
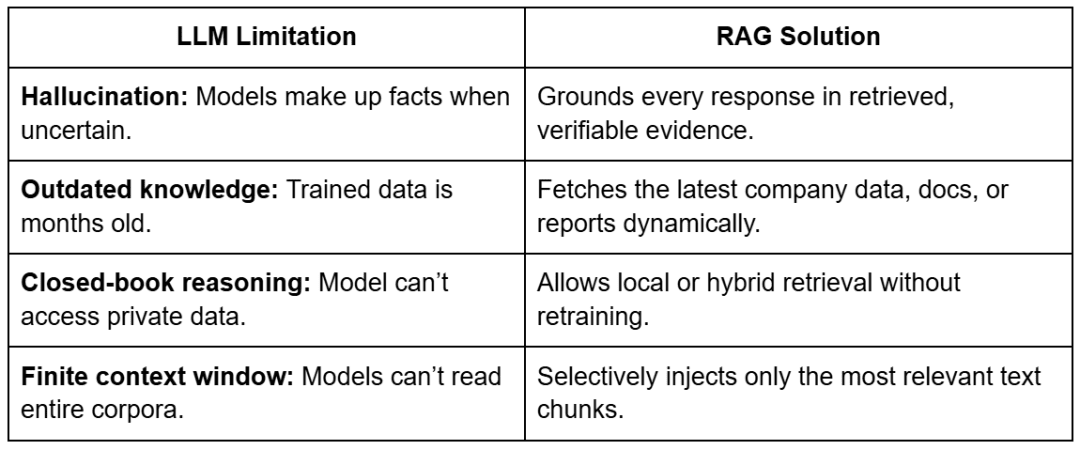
Large Language Models (LLMs) have changed how we interact with information.
But they come with two fundamental weaknesses: they can’t access external data and they forget easily.
Even the most powerful LLMs (e.g., GPT-4 or Mistral) rely entirely on patterns learned during training.
They don’t know about the latest company reports, your private PDFs, or a proprietary codebase unless explicitly retrained — which is expensive, slow, and often impossible for organizations working with sensitive data.
This is exactly where Retrieval-Augmented Generation (RAG) steps in.
RAG acts as a bridge between frozen LLM knowledge and fresh, external information.
Instead of forcing the model to memorize everything, we give it a retrieval memory system — a searchable knowledge store filled with your domain data.
Imagine giving your LLM a library card — and access to an intelligent librarian.
Whenever a question arrives, the LLM doesn’t rely on its memory alone — it sends the librarian to fetch relevant documents, reads them carefully, and then generates a grounded, evidence-based response.
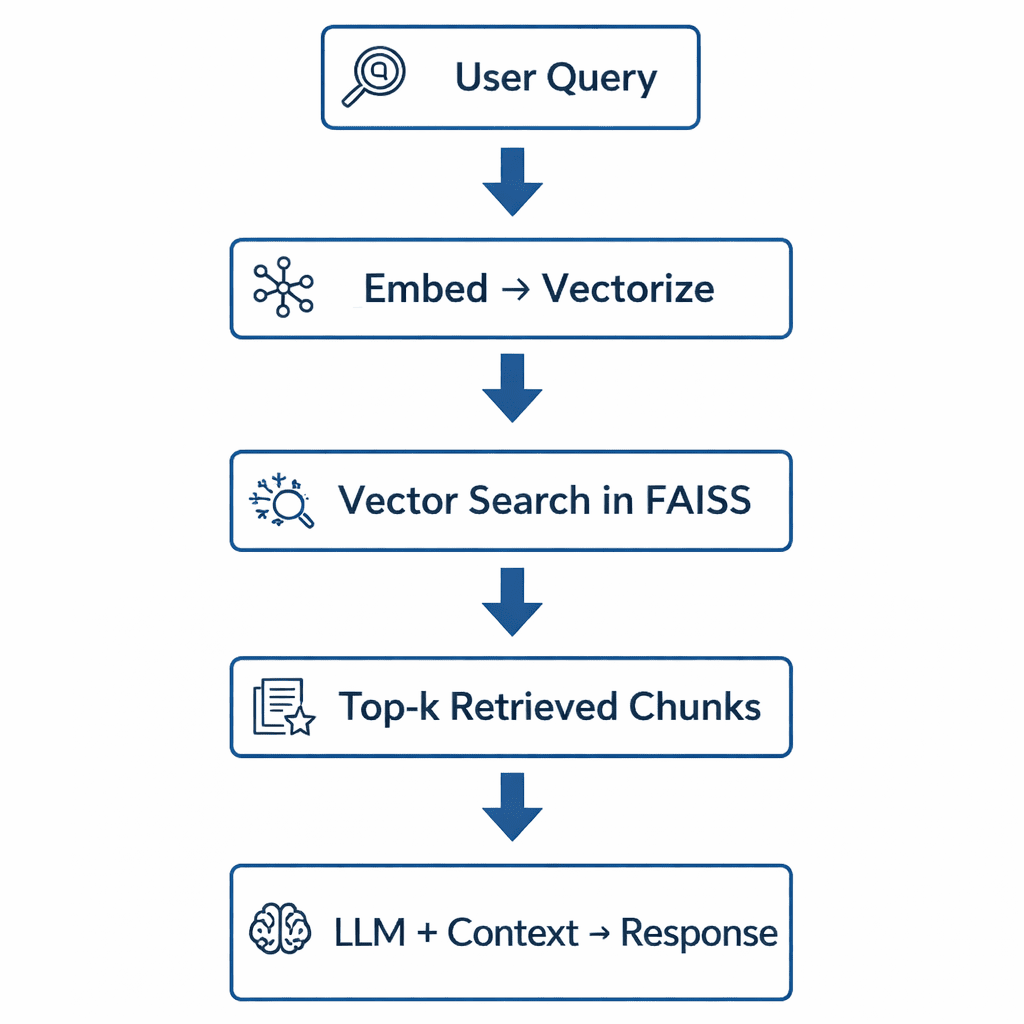
The Retrieve-Read-Generate Architecture Explained
RAG systems follow a predictable 3-step pipeline that connects information retrieval with text generation:
Retrieve
The user’s question is first converted into a numerical vector (embedding).
This vector represents the semantic meaning of the query and is matched against stored document vectors in a vector index (e.g., FAISS, Pinecone, or Milvus).
The top-k closest matches — meaning the most semantically similar chunks — are returned as potential context.
Read
These retrieved chunks are merged into a short context window — effectively a mini-knowledge pack relevant to the user’s query.
This step is vital: instead of dumping the entire corpus into the model, we pass only the most useful and concise context.
Generate
The LLM (e.g., one running locally through Ollama or remotely via an API) takes both the query and retrieved context, then composes an answer that blends natural language fluency with factual grounding.
If well-designed, the model avoids hallucinating and gracefully responds “I don’t know” when information is missing.
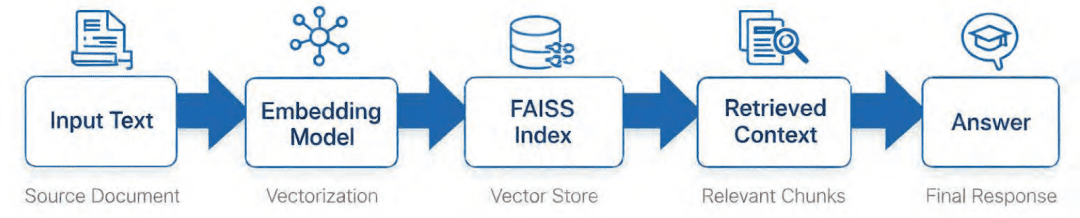
Figure 3 displays a high-level visual summary of this process.
Why Retrieval-Augmented Generation (RAG) Improves LLM Accuracy
At first glance, RAG may appear to be “just another way to query a model,” but it represents a fundamental shift in how LLMs reason.
Traditional LLMs store knowledge in their parameters — they memorize facts.
RAG decouples knowledge from parameters and instead retrieves it on demand.
This means you can keep your model small, fast, and efficient, while still answering domain-specific queries with accuracy.
Let’s unpack this with a few concrete advantages, as reported in Table 2.
The result?
A modular intelligence system — where the retriever evolves with your data, and the generator focuses purely on language reasoning.
The Broader Picture: A Hybrid of Search and Generation
You can think of RAG as the perfect fusion of information retrieval and natural language generation.
Traditional search engines stop at retrieval — they return ranked documents.
LLMs go further — they interpret and explain.
RAG combines both: find relevant context, then generate insights from it.
It’s the same principle behind how humans answer questions:
- We first recall or look up what we know.
- Then we synthesize an answer in our own words.
RAG gives LLMs the same skill — combining retrieval precision with generative fluency.
Key Takeaway
RAG doesn’t replace fine-tuning — it complements it.
It’s the fastest, cheapest, and most reliable way to make LLMs domain-aware without touching their weights.
Once you set up your retriever (built from the FAISS indexes we created in Lesson 2) and connect it to a generator (which we’ll later run via Ollama), you’ll have a self-contained intelligent assistant — one that can reason over your data and answer complex questions in natural language.
How to Build a RAG Pipeline with FAISS and Ollama (Local LLM)
Now that you understand what Retrieval Augmented Generation is and why it matters, let’s break down how to actually build one — conceptually first, before we dive into the code.
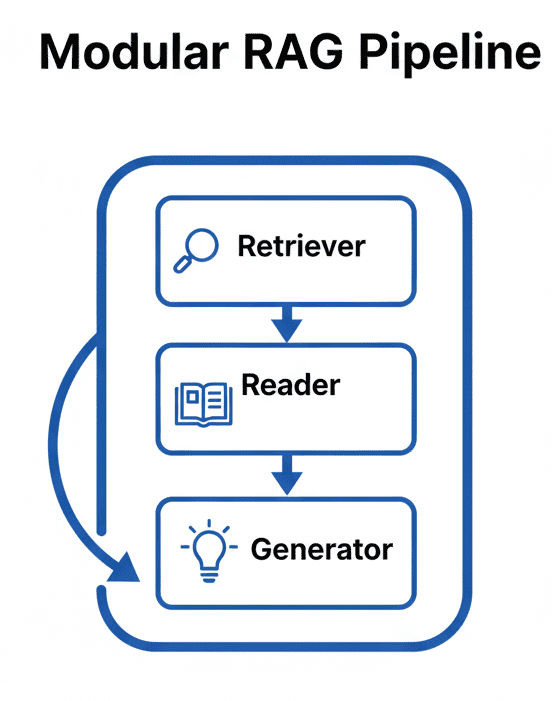
A RAG pipeline may sound complicated, but in practice it’s a clean, modular system made of 3 major parts: the retriever, the reader, and the generator.
Each part does one job well, and together they form the backbone of every production-grade RAG system — whether you’re querying a few PDFs or an entire knowledge base.
Step 1: Implementing HNSW Vector Search with FAISS for RAG
The retriever’s job is to search your document corpus and return the chunks most relevant to a user query.
It’s powered by the vector indexes you built in Lesson 2, which enable efficient approximate nearest-neighbor (ANN) search.
When a user asks a question, here’s what happens:
- The query text is embedded using the same Sentence Transformer model used during indexing.
- That query embedding is compared with your stored document embeddings via a FAISS index.
- The retriever returns the top-k results (typically 3-5 chunks) ranked by cosine similarity.
Think of it as Google Search for your private data — except instead of matching keywords, it matches meaning (Figure 4).
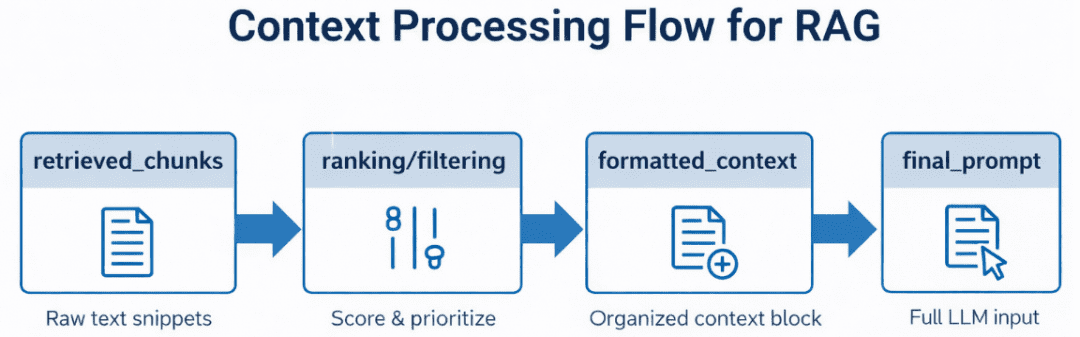
Step 2: Prompt Engineering for Retrieval-Augmented Generation (RAG)
Once the relevant chunks are retrieved, we can’t just throw them at the LLM.
They must be assembled and formatted into a coherent, bounded prompt.
This is the job of the reader — a lightweight logic layer that:
- Ranks and filters retrieved chunks by similarity score or metadata (e.g., document name or section).
- Merges them into a context block that stays within the LLM’s context-window limit (say, 4K-8K tokens).
- Wraps them inside a consistent prompt template.
In our code, this will be handled using utilities from config.py — notably build_prompt(), which combines system prompts, retrieved text, and user queries into a final message ready for the model (Figure 5).
Step 3: Generating Grounded Answers with Ollama Local LLM
Finally, the generator — your LLM — reads the composed prompt and generates a response grounded in the retrieved data.
In our implementation, this will be the stage where we integrate with Ollama, a local LLM runtime capable of running models (e.g., Llama 3, Mistral, or Gemma 2) on your machine.
But the design will stay framework-agnostic, so you can later swap Ollama for an API call to OpenAI, Claude, or an enterprise model running in-house.
What makes this step powerful is the synergy between retrieval and generation: the LLM isn’t hallucinating — it’s reasoning with evidence. If the context doesn’t contain the answer, it should politely say so, thanks to the strict vs. synthesis prompt patterns defined in config.py (Figure 6).
Adding Feedback Loops to Improve Retrieval Accuracy
In more advanced systems, RAG doesn’t end at generation. You can capture user feedback (e.g., thumbs-up/down or re-query actions) to fine-tune retrieval parameters, re-rank documents, or even re-embed sections of your corpus. This transforms a static RAG setup into a continually learning knowledge engine.
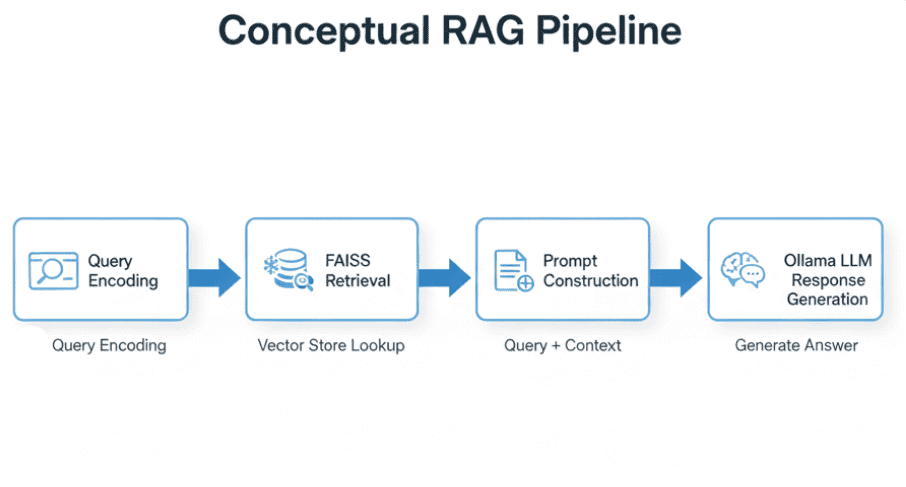
Putting It All Together
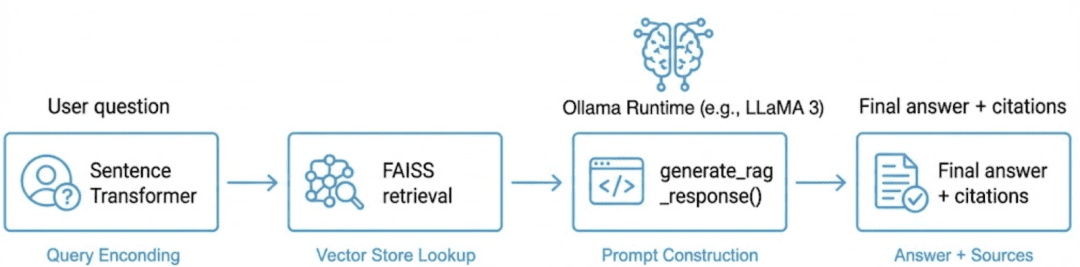
Figure 7 displays a conceptual flow that ties the 3 components together.
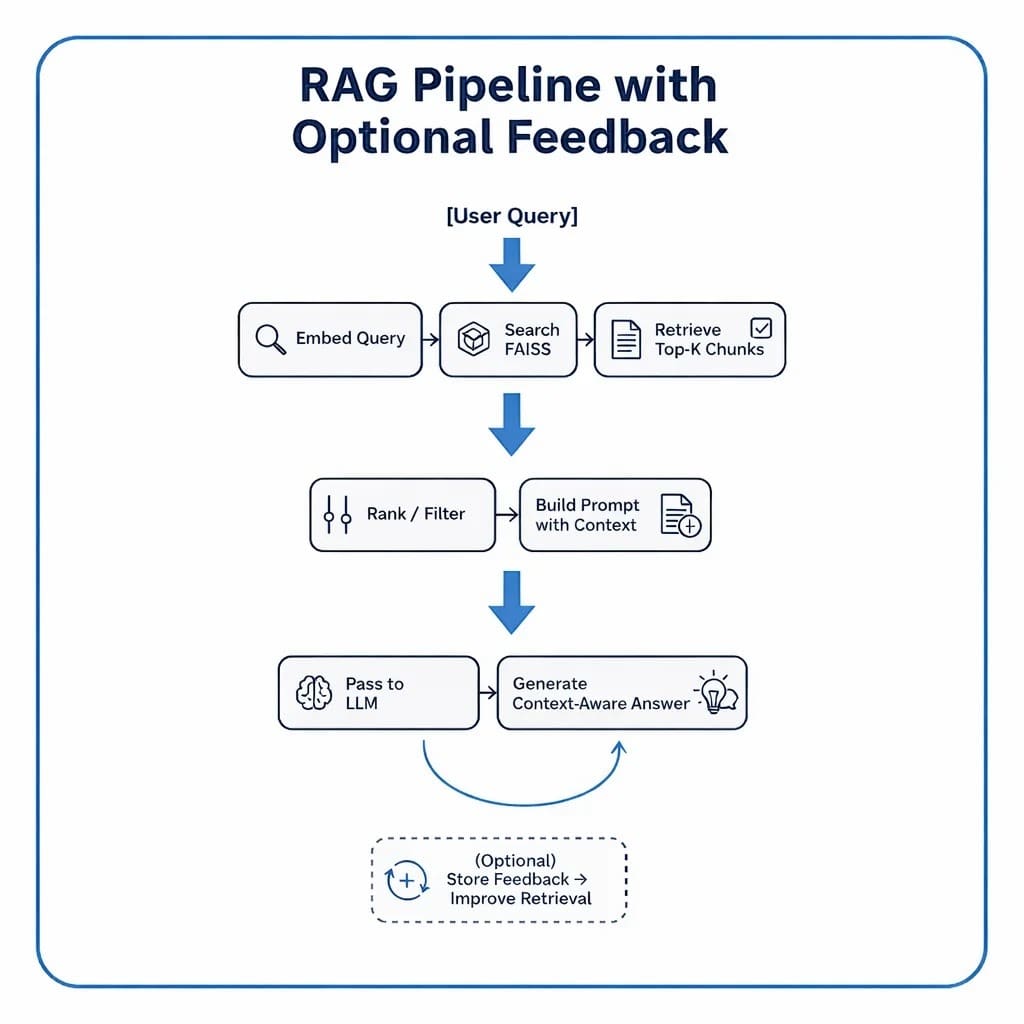
Each box in this pipeline maps directly to a section of your upcoming implementation.
In code, these steps will unfold through modular utilities and clean interfaces so you can swap retrievers, tweak prompt templates, or change models without rewriting the entire system.
Configuring Your Development Environment: Setting Up Ollama and FAISS for a Local RAG Pipeline
To follow this RAG pipeline guide, you’ll need several Python packages installed on your system. The tutorial builds upon semantic embeddings and vector search, requiring machine learning libraries, HTTP clients, and visualization tools.
$ pip install sentence-transformers==2.7.0
$ pip install faiss-cpu==1.8.0.post1
$ pip install numpy==1.26.4
$ pip install requests==2.32.3
$ pip install rich==13.8.1
Optional Dependencies
For visualization and enhanced functionality:
$ pip install scikit-learn==1.5.1
$ pip install matplotlib==3.9.2
$ pip install ollama>=0.1.0
This installs the Python client only. The Ollama runtime must be installed separately.
Local LLM Setup (Ollama)
The RAG pipeline uses Ollama for local language model inference. Install Ollama separately:
- Install Ollama: Visit ollama.ai and follow the installation instructions for your platform.
- Pull a model: Once Ollama is installed, download a model:
$ ollama pull llama3
- Verify installation:
$ ollama list
Need Help Configuring Your Development Environment?
All that said, are you:
- Short on time?
- Learning on your employer’s administratively locked system?
- Wanting to skip the hassle of fighting with the command line, package managers, and virtual environments?
- Ready to run the code immediately on your Windows, macOS, or Linux system?
Then join PyImageSearch University today!
Gain access to Jupyter Notebooks for this tutorial and other PyImageSearch guides pre-configured to run on Google Colab’s ecosystem right in your web browser! No installation required.
And best of all, these Jupyter Notebooks will run on Windows, macOS, and Linux!
Implementation Walkthrough
We’ll cover this in 3 parts:
config.py: central configuration and prompt templatesrag_utils.py: retrieval + LLM integration logic03_rag_pipeline.py: driver script that ties everything together
Configuration (config.py)
The config.py module defines paths, constants, and templates that are used throughout the RAG pipeline. Think of it as the “control room” for your entire setup.
Directory and Path Setup
BASE_DIR = Path(__file__).resolve().parent.parent
DATA_DIR = BASE_DIR / "data"
INPUT_DIR = DATA_DIR / "input"
OUTPUT_DIR = DATA_DIR / "output"
INDEX_DIR = DATA_DIR / "indexes"
FIGURES_DIR = DATA_DIR / "figures"
Here, we define a consistent directory structure so that every script can find data, indexes, and output files, regardless of where it runs from.
This ensures reproducibility — a key trait for multi-script projects like this one.
Tip: Using Path(__file__).resolve().parent.parent automatically points to your project’s root directory, keeping all paths portable.
Corpus and Embedding Artifacts
CORPUS_PATH = INPUT_DIR / "corpus.txt"
CORPUS_META_PATH = INPUT_DIR / "corpus_metadata.json"
EMBEDDINGS_PATH = OUTPUT_DIR / "embeddings.npy"
METADATA_ALIGNED_PATH = OUTPUT_DIR / "metadata_aligned.json"
DIM_REDUCED_PATH = OUTPUT_DIR / "pca_2d.npy"
These paths represent:
- Corpus files: your input text and metadata
- Embedding artifacts: precomputed vectors and PCA-reduced coordinates for visualization
We also include environment variable overrides (i.e., CORPUS_PATH, CORPUS_META_PATH) to make it easy to point to new datasets without editing code.
Index Artifacts
FLAT_INDEX_PATH = INDEX_DIR / "faiss_flat.index"
HNSW_INDEX_PATH = INDEX_DIR / "faiss_hnsw.index"
These define storage for your Flat (exact) and HNSW (approximate) FAISS indexes.
They’re generated in Lesson 2 and reused here for retrieval.
Model and General Settings
EMBED_MODEL_NAME = "sentence-transformers/all-MiniLM-L6-v2"
SEED = 42
DEFAULT_TOP_K = 5
SIM_THRESHOLD = 0.35
- Sentence Transformer model: the same compact model used for embedding queries and documents
SEED: ensures deterministic samplingDEFAULT_TOP_K: number of chunks retrieved per questionSIM_THRESHOLD: a similarity cut-off to filter weak matches
Prompt Templates for RAG
STRICT_SYSTEM_PROMPT = (
    "You are a concise assistant. Use ONLY the provided context."
    " If the answer is not contained verbatim or explicitly, say you do not know."
)
SYNTHESIZING_SYSTEM_PROMPT = (
    "You are a concise assistant. Rely ONLY on the provided context, but you MAY synthesize"
    " an answer by combining or paraphrasing the facts present. If the context truly lacks"
    " sufficient evidence, say you do not know instead of guessing."
)
The following 2 templates control LLM behavior:
- Strict mode: purely extractive, no paraphrasing
- Synthesizing mode: allows combining retrieved snippets to form explanatory answers
This distinction is critical when testing retrieval quality versus generation quality.
Intelligent Prompt Builder
def build_prompt(context_chunks, question: str, allow_synthesis: bool = False) -> str:
    system_prompt = SYNTHESIZING_SYSTEM_PROMPT if allow_synthesis else STRICT_SYSTEM_PROMPT
    context_str = "nn".join(context_chunks)
    return f"System: {system_prompt}n{CONTEXT_HEADER}n{context_str}nn" + USER_QUESTION_TEMPLATE.format(question=question)
This function assembles the final prompt fed into the LLM.
It concatenates retrieved context snippets, appends the system instructions, and ends with the user query.
Tip: The key here is flexibility — by toggling allow_synthesis, you can dynamically switch between closed-book and open-book answering styles.
Directory Bootstrap
for d in (OUTPUT_DIR, INDEX_DIR, FIGURES_DIR):
    d.mkdir(parents=True, exist_ok=True)
Ensures that all critical folders exist before any writing occurs — a small but essential safeguard for production stability (Figure 8).
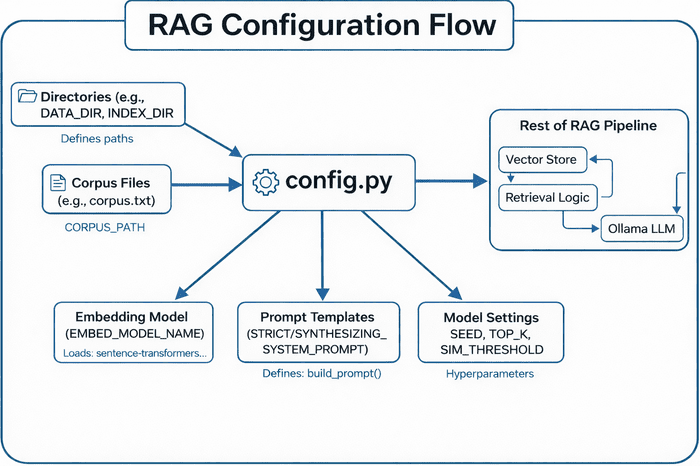
config.py centralizes paths, corpus files, embedding models, prompt templates, and model settings — feeding these configurations into the rest of the RAG pipeline (i.e., vector store, retrieval logic, and Ollama LLM) (source: image by the author).At this point, the configuration module provides the foundation for the next step: actually retrieving and generating answers.
Integrating Ollama with FAISS Vector Search for RAG
Now that our FAISS index is ready to serve embeddings, the next step is to connect it with an LLM — the final reasoning layer that generates natural-language answers based on retrieved context.
The rag_utils.py file is where retrieval meets generation.
It ties together the embedding search results, builds prompts, calls the LLM (Ollama by default), and even adds explainability through citations and per-sentence support scoring.
Overview and Setup
Let’s start by looking at the top of the file:
import os, json, re, requests
import numpy as np
from typing import List, Dict, Tuple, Any

try:
    import ollama  # type: ignore
except ImportError:
    ollama = None
At the core, this script:
- Uses Ollama for local LLM inference, but gracefully falls back to HTTP if the Python client isn’t installed.
- Imports NumPy for fast vector math, requests for API calls, and typing hints for readability.
Then, it configures Ollama’s endpoints:
OLLAMA_BASE_URL = os.getenv("OLLAMA_BASE_URL", "http://localhost:11434")
OLLAMA_API_URL = f"{OLLAMA_BASE_URL}/api/generate"
OLLAMA_TAGS_URL = f"{OLLAMA_BASE_URL}/api/tags"
Tip: You can override OLLAMA_BASE_URL with an environment variable — handy when deploying on remote servers or Docker containers (Figure 9).
Health Check and Model Discovery
Before we make any generation calls, it’s good practice to confirm that Ollama is actually reachable.
def ollama_available() -> bool:
    try:
        r = requests.get(OLLAMA_TAGS_URL, timeout=2)
        return r.status_code == 200
    except requests.RequestException:
        return False
If this returns False, your RAG pipeline will still work — it will simply skip generation or return a warning message.
Similarly, you can list all locally available models:
def list_ollama_models() -> List[str]:
    """Return a list of available local Ollama model names (empty if unreachable)."""
    resp = requests.get(OLLAMA_TAGS_URL, timeout=2)
    resp.raise_for_status()
    data = resp.json()
    models = []
    for m in data.get("models", []):
        name = m.get("name", "")
        if name.endswith(":latest"):
            name = name.rsplit(":", 1)[0]
        if name:
            models.append(name)
    return sorted(set(models))
This lets you dynamically query what’s installed (e.g., llama3, mistral, or gemma2).
If you’re running an interactive RAG app, this list can populate a dropdown for user selection.
Making the Ollama Call
Here’s the heart of your LLM connector:
def call_ollama(model: str, prompt: str, stream: bool = False) -> str:
    """Call Ollama using python client if available else raw HTTP."""
    if ollama is not None:
        try:
            if stream:
                out = []
                for chunk in ollama.generate(model=model, prompt=prompt, stream=True):
                    out.append(chunk.get("response", ""))
                return "".join(out)
            else:
                resp = ollama.generate(model=model, prompt=prompt)
                return resp.get("response", "")
        except Exception:
            pass
- If the
ollamalibrary is installed, the function uses its official Python client for better efficiency and streaming support. - If not, it falls back to a manual HTTP request:
payload = {"model": model, "prompt": prompt, "stream": stream}
resp = requests.post(OLLAMA_API_URL, json=payload, timeout=120, stream=stream)
It even supports streaming tokens one by one — useful for building chat UIs or dashboards that display the answer as it’s generated.
Why this dual approach?
Not all environments (e.g., Docker containers or lightweight cloud runners) have the ollama Python package installed, but they can still access the REST (Representational State Transfer) API.
Optional: Cloud Fallback (OpenAI)
There’s a commented-out section providing an optional fallback to OpenAI’s API.
If uncommented, you can quickly switch between local and cloud models (e.g., gpt-4o-mini).
# OPENAI_MODEL = os.getenv("OPENAI_MODEL", "gpt-4o-mini")
# openai.api_key = os.getenv("OPENAI_API_KEY")
# def call_openai(prompt: str, model: str = OPENAI_MODEL) -> str:
#     ...
This flexibility lets you deploy the same RAG logic on-premises (Ollama) or in the cloud (OpenAI).
Selecting the Top-k Relevant Chunks
Once a user asks a question, we compute its embedding and retrieve similar text chunks:
def select_top_k(question_emb, embeddings, texts, metadata, k=5, sim_threshold=0.35):
    sims = embeddings @ question_emb  # cosine if normalized
    ranked = np.argsort(-sims)
    results = []
    for idx in ranked[:k * 2]:
        score = float(sims[idx])
        if score < sim_threshold and len(results) >= k:
            break
        results.append({
            "id": metadata[idx]["id"],
            "text": texts[idx],
            "score": score,
            "topic": metadata[idx].get("topic", "unknown")
        })
        if len(results) >= k:
            break
    return results
This function:
- Computes cosine similarities between the query and all embeddings.
- Ranks them, filters by a similarity threshold, and returns the top-k chunks with metadata.
This lightweight retrieval replaces the need to re-query FAISS every time — perfect for quick experiments or small datasets.
Splitting Answers into Sentences
Once the LLM produces an answer, we may want to analyze it sentence-by-sentence.
def _sentence_split(text: str) -> List[str]:
    raw = re.split(r'(?<=[.!?])s+|n+', text.strip())
    return [s.strip() for s in raw if s and not s.isspace()]
This regex-based approach avoids heavy NLP libraries and still performs well for most English prose.
Computing Sentence Support
A unique feature of this pipeline is its ability to score each sentence in the LLM’s answer by how well it aligns with the retrieved context chunks.
This helps determine which parts of the generated answer are actually supported by the retrieved evidence — forming the basis for citations such as [1], [2].
def _compute_support(sentences, retrieved, metadata, embeddings, model):
    id_to_idx = {m["id"]: i for i, m in enumerate(metadata)}
    chunk_vecs, ranks = [], []
    for rank, r in enumerate(retrieved, start=1):
        idx = id_to_idx.get(r["id"])
        if idx is None:
            continue
        chunk_vecs.append(embeddings[idx])
        ranks.append(rank)
    if not chunk_vecs:
        return [], sentences

    chunk_matrix = np.vstack(chunk_vecs)
    sent_embs = model.encode(sentences, normalize_embeddings=True, convert_to_numpy=True)
Each sentence is embedded and compared to the embeddings of the top-k retrieved chunks.
This yields 2 useful artifacts:
support_rows: structured table of support scorescited_sentences: answer text annotated with citations such as [1], [2]
Example: Sentence-to-Context Alignment
For example, suppose the user asked:
“What is Streamlit used for?”
The retriever would return the top-k most relevant chunks for that query.
Each sentence in the model’s generated answer is then compared to the retrieved chunks to determine how well it is supported (Table 3).
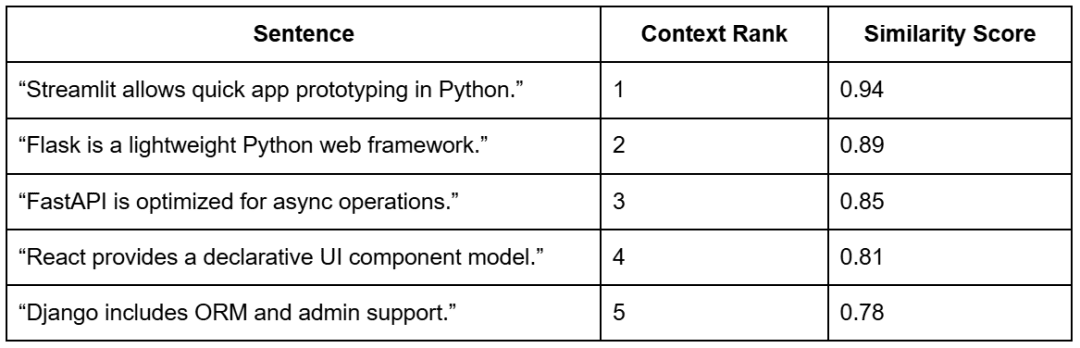
Note: The context ranks come from the retrieval step based on the query “What is Streamlit used for?”. The similarity scores show how strongly each sentence aligns with those retrieved chunks — indicating how well each part of the generated answer is supported by evidence.
Formatting and Styling
To display results nicely, the _apply_style() helper supports different output styles:
def _apply_style(answer, style, cited_sentences):
    if style == "bullets" and cited_sentences:
        return "n" + "n".join(f"- {s}" for s in cited_sentences)
    return answer
This allows both paragraph and bullet-point summaries with inline citations — perfect for user-facing dashboards.
The Core: generate_rag_response()
Finally, the star of this file — the main RAG generation function:
def generate_rag_response(question, model, embeddings, texts, metadata,
                          llm_model_name="llama3", top_k=5,
                          allow_synthesis=False, force_strict=False,
                          add_citations=False, compute_support=False,
                          style="paragraph") -> Dict:
This function orchestrates the full retrieval-generation pipeline:
Step 1: Detect intent and embeddings
It embeds the question and automatically decides whether to allow synthesis:
if any(pat in q_lower for pat in config.AUTO_SYNTHESIS_PATTERNS):
    allow_synthesis = True
    heuristic_triggered = True
So if a query contains words like “why” or “benefits”, the model automatically switches to a paraphrasing mode instead of strict extraction.
Step 2: Retrieve top-k chunks
top = select_top_k(q_emb, embeddings, texts, metadata, k=top_k)
prompt = build_prompt([r["text"] for r in top], question, allow_synthesis=allow_synthesis)
Step 3: Generate via LLM
if not ollama_available():
    answer = "[Ollama not available at base URL.]"
else:
    answer = call_ollama(llm_model_name, prompt)
Step 4: Optional post-processing
If citations or support scoring are enabled:
sentences = _sentence_split(answer)
support_rows, cited_sentences = _compute_support(sentences, top, metadata, embeddings, model)
answer = _apply_style(answer, style, cited_sentences)
Finally, it returns a structured dictionary — containing everything from the retrieved context to the generated answer and support metrics.
Summary of the Utilities
The rag_utils.py file provides a robust and extensible RAG backbone:
- Local-first design: works seamlessly with Ollama or over HTTP
- Hybrid retrieval: embedding search + FAISS indexes
- Explainable outputs: sentence-level support and citations
- Prompt control: configurable synthesis vs. strict modes
- Output flexibility: paragraph or bullet styles, JSON export
Running a Local RAG Pipeline with Ollama and FAISS
Imports and Module Wiring
"""

Steps:
1. Load embeddings & indexes (or build fallbacks)
2. Accept user question(s)
3. Retrieve top-k relevant chunks
4. Construct prompt & call Ollama (fallback to placeholder if unavailable)
5. Display answer with retrieved context & scores
"""
from __future__ import annotations

import argparse
import json
from pathlib import Path

import numpy as np
from rich import print
from rich.table import Table

from pyimagesearch import config
from pyimagesearch.embeddings_utils import load_embeddings, load_corpus, get_model, generate_embeddings
from pyimagesearch.vector_search_utils import build_flat_index, load_index, build_hnsw_index
from pyimagesearch.rag_utils import generate_rag_response, list_ollama_models, ollama_available
What this sets up:
- CLI (command line interface) flags (
argparse), pretty terminal output (rich), NumPy for arrays. - Pulls in config paths, embedding helpers, FAISS index builders and loaders, the RAG core (
generate_rag_response), and Ollama helpers.
Ensure Embeddings (load or build once)
def ensure_embeddings(corpus_path=None, meta_path=None):
    if config.EMBEDDINGS_PATH.exists():
        emb, meta = load_embeddings()
        texts, _ = load_corpus(corpus_path or config.CORPUS_PATH, meta_path or config.CORPUS_META_PATH)
        return emb, meta, texts
    texts, meta = load_corpus(corpus_path or config.CORPUS_PATH, meta_path or config.CORPUS_META_PATH)
    model = get_model()
    emb = generate_embeddings(texts, model=model)
    from pyimagesearch.embeddings_utils import save_embeddings
    save_embeddings(emb, meta)
    return emb, meta, texts
What it does (and why):
- If
data/output/embeddings.npyis present, it loads the embeddings and aligned metadata, then reads the current corpus to ensure your text list is up to date. - If not present, it embeds the corpus with SentenceTransformer and caches both artifacts to disk for speed on re-runs.
Ensure Indexes (Flat must exist; HNSW is optional)
def ensure_indexes(embeddings):
    # Try load flat
    idx = None
    if config.FLAT_INDEX_PATH.exists():
        try:
            from pyimagesearch.vector_search_utils import load_index
            idx = load_index(config.FLAT_INDEX_PATH)
        except Exception:
            idx = None
    if idx is None:
        idx = build_flat_index(embeddings)
    # Optional: attempt HNSW
    hnsw = None
    if config.HNSW_INDEX_PATH.exists():
        try:
            hnsw = load_index(config.HNSW_INDEX_PATH)
        except Exception:
            hnsw = None
    else:
        try:
            hnsw = build_hnsw_index(embeddings)
        except Exception:
            hnsw = None
    return idx, hnsw
What it does (and why):
- Flat index (exact, inner product): Attempts to load from disk; if missing, builds from the embedding matrix. This guarantees you always have a correct baseline.
- HNSW (approximate, fast): Loads if available; otherwise builds the index. If FAISS isn’t installed with HNSW support, it fails gracefully and returns
None. - Returns: A tuple (
flat,hnsw) for downstream use.
Interactive Q&A Loop — Optional Mode
def interactive_loop(model, embeddings, texts, metadata, llm_model: str, top_k: int, allow_synth: bool):
    print("[bold cyan]Enter questions (type 'exit' to quit).[/bold cyan]")
    while True:
        try:
            q = input("Question> ").strip()
        except (EOFError, KeyboardInterrupt):
            print("n[red]Exiting.[/red]")
            break
        if not q:
            continue
        if q.lower() in {"exit", "quit"}:
            break
        result = generate_rag_response(q, model, embeddings, texts, metadata, llm_model_name=llm_model, top_k=top_k, allow_synthesis=allow_synth)
        show_result(result)
What it does (and why):
- Lets you chat with your local RAG system.
- For each typed question, calls
generate_rag_response(...)— retrieves context → builds the prompt → calls Ollama → formats the answer — and prints a rich table of the results.
Pretty Printing the Answer and Context (optional prompt/support)
def show_result(result, show_prompt: bool = False, show_support: bool = False):
    print("n[bold green]Answer[/bold green]:")
    print(result["answer"].strip())
    synth_flag = "yes" if result.get("synthesis_used") else "no"
    if result.get("synthesis_used") and result.get("synthesis_heuristic"):
        print(f"[dim]Synthesis: {synth_flag} (auto-enabled by heuristic)n[/dim]")
    else:
        print(f"[dim]Synthesis: {synth_flag}n[/dim]")
    table = Table(title="Retrieved Context")
    table.add_column("Rank")
    table.add_column("ID")
    table.add_column("Score", justify="right")
    table.add_column("Snippet")
    for i, r in enumerate(result["retrieved"], start=1):
        snippet = r["text"][:80] + ("..." if len(r["text"]) > 80 else "")
        table.add_row(str(i), r["id"], f"{r['score']:.3f}", snippet)
    print(table)
    if show_prompt:
        print("[bold yellow]n--- Prompt Sent to LLM ---[/bold yellow]")
        print(result.get("prompt", "[prompt missing]"))
    if show_support and result.get("support"):
        support_table = Table(title="Sentence Support Scores")
        support_table.add_column("Sentence")
        support_table.add_column("Rank")
        support_table.add_column("Score", justify="right")
        for row in result["support"]:
            support_table.add_row(row["sentence"], str(row["citation_rank"]), f"{row['support_score']:.3f}")
        print(support_table)
What it does (and why):
- Prints the final answer and indicates whether synthesis was used (including whether it was auto-enabled by the heuristic).
- Renders a Retrieved Context table showing rank, ID, similarity score, and a clean snippet.
- If
--show-promptis used, prints the full prompt for transparency. - If
--support-scoresis enabled, shows per-sentence support strength against the retrieved chunks — useful for debugging groundedness.
CLI Entry Point (main) — flags, loading, answering
def main():
    parser = argparse.ArgumentParser(description="Minimal RAG pipeline demo")
    parser.add_argument("--llm-model", default="llama3", help="Ollama model name (must be pulled beforehand, e.g. 'ollama pull llama3')")
    parser.add_argument("--top-k", type=int, default=config.DEFAULT_TOP_K)
    parser.add_argument("--corpus-path", type=str, help="Override corpus file path")
    parser.add_argument("--corpus-meta-path", type=str, help="Override corpus metadata path")
    parser.add_argument("--question", type=str, help="Single question to answer (skip interactive mode)")
    parser.add_argument("--allow-synthesis", action="store_true", help="Permit model to synthesize answer by combining provided context facts")
    parser.add_argument("--list-models", action="store_true", help="List available local Ollama models and exit")
    parser.add_argument("--show-prompt", action="store_true", help="Display the full constructed prompt for debugging/teaching")
    parser.add_argument("--strict", action="store_true", help="Force strict extractive mode (disable synthesis even if heuristic matches)")
    parser.add_argument("--citations", action="store_true", help="Annotate sentences with citation indices")
    parser.add_argument("--style", choices=["paragraph", "bullets"], default="paragraph", help="Answer formatting style")
    parser.add_argument("--support-scores", action="store_true", help="Compute and display per-sentence support scores")
    parser.add_argument("--json", action="store_true", help="Output full result JSON to stdout (suppresses pretty tables except retrieved context)")
    args = parser.parse_args()
    if args.list_models:
        if not ollama_available():
            print("[red]Ollama not reachable at default base URL. Start Ollama to list models.[/red]")
            return
        models = list_ollama_models()
        if not models:
            print("[yellow]No models returned. Pull some with: ollama pull llama3[/yellow]")
        else:
            print("[bold cyan]Available Ollama models:[/bold cyan]")
            for m in models:
                print(f" - {m}")
        return
    print(f"[bold magenta]Using LLM model:[/bold magenta] {args.llm_model}")
    print("[bold magenta]Loading embeddings...[/bold magenta]")
    embeddings, metadata, texts = ensure_embeddings(corpus_path=args.corpus_path, meta_path=args.corpus_meta_path)
    model = get_model()
    print("[bold magenta]Preparing indexes (flat + optional hnsw)...[/bold magenta]")
    flat, hnsw = ensure_indexes(embeddings)
    # NOTE: We use embedding matrix directly for retrieval selection in rag_utils (cosine) for transparency.
    if args.question:
        result = generate_rag_response(
            args.question,
            model,
            embeddings,
            texts,
            metadata,
            llm_model_name=args.llm_model,
            top_k=args.top_k,
            allow_synthesis=args.allow_synthesis,
            force_strict=args.strict,
            add_citations=args.citations,
            compute_support=args.support_scores,
            style=args.style,
        )
        if args.json:
            import json as _json
            print(_json.dumps(result, indent=2))
        show_result(result, show_prompt=args.show_prompt, show_support=args.support_scores)
    else:
        # For interactive mode we keep previous behavior (could extend flags similarly if desired)
        interactive_loop(model, embeddings, texts, metadata, args.llm_model, args.top_k, args.allow_synthesis)

    print("[green]nFinished RAG demo.n[/green]")
What it does (and why):
- Defines a rich set of flags to control the model, retrieval depth, strictness vs. synthesis, prompt visibility, citations, style, and JSON output.
--list-modelslets you sanity-check your local Ollama setup without running the full pipeline.- Loads or creates embeddings, prepares indexes, then either:
- answers a single question (
--question ...), or - launches the interactive loop.
- answers a single question (
- Optional JSON output is useful for scripting or automated tests.
Standard Python Entrypoint
if __name__ == "__main__":
    main()
What it does:
- Runs the CLI when you execute
python 03_rag_pipeline.py.
Tiny Gotchas and Tips
- If FAISS was installed without HNSW support,
ensure_indexeswill still work — it just will not provide an HNSW index. The Flat index is always available. - Make sure the Ollama model you request (e.g.,
llama3) is pulled first:
ollama pull llama3
- You can view exactly what the model saw with:
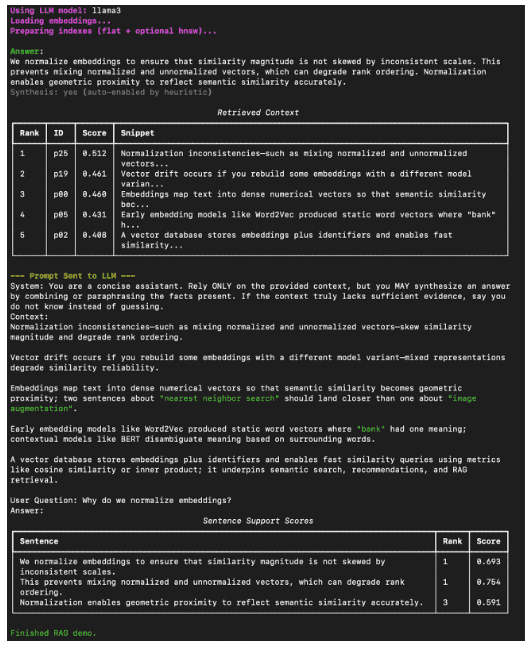
python 03_rag_pipeline.py --question "What is IVF indexing?" --show-prompt
- For teaching and debugging groundedness:
python 03_rag_pipeline.py --question "Why normalize embeddings?" --citations --support-scores
How to Run a Local RAG System with Ollama and FAISS
Now that everything’s wired up — embeddings, FAISS indexes, and the RAG utilities — it’s time to see the full pipeline in action.
You can start by verifying your local Ollama setup and ensuring the model (e.g., Llama 3) is pulled:
ollama pull llama3
Then, from your project root, launch the RAG pipeline:
python 03_rag_pipeline.py --question "What is FAISS?" --show-prompt --support-scores
If you’d rather chat interactively:
python 03_rag_pipeline.py
You’ll be greeted with a prompt like:
Question> Why do we normalize embeddings?
and can exit at any time with exit or Ctrl+C.
Example Output
Here’s what a typical run looks like inside your terminal (Figure 11).
What You Learned: Building a Production-Ready Local RAG System with Ollama and FAISS
By the end of this tutorial, you will have built and tested a complete, local Retrieval-Augmented Generation (RAG) system:
- Connected the FAISS vector store built in Lesson 2 to a local LLM served by Ollama.
- Used embeddings to retrieve semantically relevant chunks from your corpus.
- Constructed prompts dynamically and generated grounded answers, optionally including citations and synthesis.
This closes the loop of your vector → retrieval → generation workflow — forming the foundation for more advanced, production-ready RAG pipelines.
What’s next? We recommend PyImageSearch University.
86+ total classes • 115+ hours hours of on-demand code walkthrough videos • Last updated: February 2026
★★★★★ 4.84 (128 Ratings) • 16,000+ Students Enrolled
I strongly believe that if you had the right teacher you could master computer vision and deep learning.
Do you think learning computer vision and deep learning has to be time-consuming, overwhelming, and complicated? Or has to involve complex mathematics and equations? Or requires a degree in computer science?
That’s not the case.
All you need to master computer vision and deep learning is for someone to explain things to you in simple, intuitive terms. And that’s exactly what I do. My mission is to change education and how complex Artificial Intelligence topics are taught.
If you’re serious about learning computer vision, your next stop should be PyImageSearch University, the most comprehensive computer vision, deep learning, and OpenCV course online today. Here you’ll learn how to successfully and confidently apply computer vision to your work, research, and projects. Join me in computer vision mastery.
Inside PyImageSearch University you’ll find:
- ✓ 86+ courses on essential computer vision, deep learning, and OpenCV topics
- ✓ 86 Certificates of Completion
- ✓ 115+ hours hours of on-demand video
- ✓ Brand new courses released regularly, ensuring you can keep up with state-of-the-art techniques
- ✓ Pre-configured Jupyter Notebooks in Google Colab
- ✓ Run all code examples in your web browser — works on Windows, macOS, and Linux (no dev environment configuration required!)
- ✓ Access to centralized code repos for all 540+ tutorials on PyImageSearch
- ✓ Easy one-click downloads for code, datasets, pre-trained models, etc.
- ✓ Access on mobile, laptop, desktop, etc.
Summary
In this final lesson, you brought everything together (i.e., embeddings, vector search, and generation) to build a complete Retrieval-Augmented Generation (RAG) pipeline from scratch. You began by understanding how retrieval connects to language models, bridging the gap between semantic search and contextual reasoning.
Next, you explored how the system uses SentenceTransformer embeddings and FAISS indexes to fetch relevant context from a corpus before generating an answer. You then examined the RAG utilities in detail — from ollama_available() and call_ollama(), which handle model calls and fallbacks, to select_top_k(), which performs the crucial retrieval step by ranking and filtering results based on cosine similarity. You also saw how automatic synthesis heuristics determine when to allow the LLM to combine information creatively, adding flexibility to the pipeline.
Then came the driver script, where the theoretical pieces transformed into a working application. You walked through the full flow — loading embeddings, preparing indexes, retrieving the top-k most relevant chunks, and generating context-aware answers via Ollama. You also learned how to add citations, measure support scores, and switch between strict and synthesis modes for transparent reasoning.
Finally, you ran the pipeline locally, queried your own data, and observed meaningful, grounded responses generated by a local LLM. With this, you completed a true end-to-end workflow — from encoding and indexing knowledge to retrieving and generating answers — running fully offline and powered by FAISS and Ollama.
In short, you did not just learn RAG — you built it.
Citation Information
Singh, V. “Vector Search Using Ollama for Retrieval-Augmented Generation (RAG),” PyImageSearch, P. Chugh, S. Huot, A. Sharma, and P. Thakur, eds., 2026, https://pyimg.co/q68nv
@incollection{Singh_2026_vector-search-using-ollama-for-rag,
  author = {Vikram Singh},
  title = {{Vector Search Using Ollama for Retrieval-Augmented Generation (RAG)}},
  booktitle = {PyImageSearch},
  editor = {Puneet Chugh and Susan Huot and Aditya Sharma and Piyush Thakur},
  year = {2026},
  url = {https://pyimg.co/q68nv},
}
To download the source code to this post (and be notified when future tutorials are published here on PyImageSearch), simply enter your email address in the form below!

Download the Source Code and FREE 17-page Resource Guide
Enter your email address below to get a .zip of the code and a FREE 17-page Resource Guide on Computer Vision, OpenCV, and Deep Learning. Inside you’ll find my hand-picked tutorials, books, courses, and libraries to help you master CV and DL!
The post Vector Search Using Ollama for Retrieval-Augmented Generation (RAG) appeared first on PyImageSearch.