
Part2: Guide to Huggingface AutoModels** for Vision and Audio
Part2: Guide to Hugging-face AutoModels** for Vision
In the first part of this article, we explored NLP AutoModels — classification, question answering, text generation, and more.
Now let’s move beyond text.
Hugging Face Transformers also support vision, audio, and multimodal tasks using the same powerful AutoModel philosophy:
Vision models work with pixels instead of words, but the idea remains the same:
- Pretrained on large image datasets
- Fine-tuned on your specific task
- Used for inference in production systems
Before models see images, they need preprocessing.
Image Preprocessing
from transformers import AutoImageProcessor
processor = AutoImageProcessor.from_pretrained("google/vit-base-patch16-224")
This handles:
- Resizing
- Normalization
- Pixel conversion
1. AutoModelForImageClassification
Assigns one label per image.
from transformers import AutoModelForImageClassification
Example Tasks
- Cat vs Dog classification
- Medical image diagnosis
- Product categorization
- Defect detection
Fine tuning pipeline
Step1 Load Pretrained Model & Image Processor
Vision models do not use tokenizers.
They use image processors.
from transformers import AutoImageProcessor, AutoModelForImageClassification

model_name = "google/vit-base-patch16-224"

processor = AutoImageProcessor.from_pretrained(model_name)
model = AutoModelForImageClassification.from_pretrained(
    model_name,
    num_labels=2
)
Image Processor Does
- Resize images
- Normalize pixel values
- Convert images → tensors
Step2: Dataset Format
dataset/
├── cat/
│   ├── img1.jpg
│   ├── img2.jpg
├── dog/
│   ├── img3.jpg
│   ├── img4.jpg
Step3: Load Dataset
from datasets import load_dataset

dataset = load_dataset("imagefolder", data_dir="dataset/")
Hugging Face understands:
Images
Labels
Class names
Step4: Preprocess Images
Just like tokenization in NLP, images must be processed.
def transform(example):
    example["pixel_values"] = processor(
        example["image"],
        return_tensors="pt"
    )["pixel_values"][0]
    return example

dataset = dataset.with_transform(transform)
Step5: Fine tuning
from transformers import Trainer, TrainingArguments

training_args = TrainingArguments(
    output_dir="./image_classifier",
    per_device_train_batch_size=8,
    num_train_epochs=3,
    evaluation_strategy="no",
    logging_steps=10,
    remove_unused_columns=False
)
### Train the Model
trainer = Trainer(
    model=model,
    args=training_args,
    train_dataset=dataset["train"]
)

trainer.train()

### save the model
model.save_pretrained("./image_classifier")
processor.save_pretrained("./image_classifier")

### Inferencing
### Load the model
from PIL import Image
import torch

processor = AutoImageProcessor.from_pretrained("./image_classifier")
model = AutoModelForImageClassification.from_pretrained("./image_classifier")

### Predict the image
image = Image.open("test.jpg")

inputs = processor(image, return_tensors="pt")

with torch.no_grad():
    outputs = model(**inputs)

logits = outputs.logits
predicted_class = logits.argmax(-1).item()

print(model.config.id2label[predicted_class])

## Outputs Dog
2. AutoModelForObjectDetection
AutoModelForObjectDetection loads a pretrained vision model with an object detection head.
from transformers import AutoModelForObjectDetection
The model predicts:
- Object labels
- Bounding boxes (x, y, width, height or xmin, ymin, xmax, ymax)
- Confidence scores
Example of bounding boxes generated for image


Use AutoModelForObjectDetection if:
- An image contains multiple objects
- You need locations, not just labels
- Objects may appear more than once
Common Real-World Use Cases

Autonomous driving (cars, pedestrians, signs)

Retail shelf monitoring

Face detection

Traffic analysis

Security & surveillance

Sports analytics
Example
input: A Street image
Output: Labeled bounding boxes
Car       → box (x1, y1, x2, y2)
Person    → box (x1, y1, x2, y2)
Traffic light → box (x1, y1, x2, y2)
Popular Detection Models Behind the Scenes
AutoModel automatically selects the correct architecture, such as:
- DETR (Detection Transformer)
- YOLOS
- RT-DETR
- Faster R-CNN (via adapters)
Finetuning
Step1: Load Pretrained model and Image preprocessor
from transformers import AutoImageProcessor, AutoModelForObjectDetection

model_name = "facebook/detr-resnet-50"

processor = AutoImageProcessor.from_pretrained(model_name)
model = AutoModelForObjectDetection.from_pretrained(
    model_name,
    num_labels=3  # example: person, car, bicycle
)
Step2: Dataset Format
Unlike image classification, labels are not single values.
Each image needs:
- Object labels
- Bounding box coordinates
Example Annotated image (COCO style)
{
  "image": "image1.jpg",
  "objects": {
    "bbox": [[50, 60, 200, 300], [300, 100, 400, 350]],
    "category": [0, 1]
  }
}
Load Dataset
from datasets import load_dataset

dataset = load_dataset("coco", split="train")

### Preprocess
def transform(example):
    image = example["image"]
    annotations = example["objects"]

    encoding = processor(
        images=image,
        annotations=annotations,
        return_tensors="pt"
    )

    example["pixel_values"] = encoding["pixel_values"][0]
    example["labels"] = encoding["labels"][0]
    return example

dataset = dataset.with_transform(transform)

### fine tuning
from transformers import TrainingArguments, Trainer

training_args = TrainingArguments(
    output_dir="./object_detector",
    per_device_train_batch_size=4,
    num_train_epochs=5,
    logging_steps=10,
    remove_unused_columns=False
)

### Training
trainer = Trainer(
    model=model,
    args=training_args,
    train_dataset=dataset
)

trainer.train()
### Save the model
model.save_pretrained("./object_detector")
processor.save_pretrained("./object_detector")

## infernce
### Load the model
from PIL import Image
import torch

processor = AutoImageProcessor.from_pretrained("./object_detector")
model = AutoModelForObjectDetection.from_pretrained("./object_detector")

### Detection
image = Image.open("test.jpg")

inputs = processor(images=image, return_tensors="pt")

with torch.no_grad():
    outputs = model(**inputs)

### Post processing
target_sizes = torch.tensor([image.size[::-1]])

results = processor.post_process_object_detection(
    outputs,
    threshold=0.5,
    target_sizes=target_sizes
)[0]

### Example output
for score, label, box in zip(
    results["scores"],
    results["labels"],
    results["boxes"]
):
    print(
        model.config.id2label[label.item()],
        score.item(),
        box.tolist()
    )

### Output
person 0.98 [34.5, 60.1, 210.2, 380.4]
car    0.95 [260.3, 120.0, 420.8, 340.7]
How to generated Labeled images (with bounding boxes)
Tools to Label Images for Object Detection Training
Object detection models require bounding box annotations around objects. These annotations are usually stored in formats like COCO, Pascal VOC, or YOLO.
Below are the best tools used in real-world projects, from beginners to enterprise scale.
LabelImg: A simple, open-source desktop tool for drawing bounding boxes.
CVAT (Computer Vision Annotation Tool): for large datasets, teams
Label Studio: An open-source, multi-purpose data labeling platform.
Roboflow: A full dataset management platform (labeling + augmentation + hosting).
Annotation format
| Format     | Used By            |
| ---------- | ------------------ |
| COCO       | DETR, Faster R-CNN |
| YOLO       | YOLO models        |
| Pascal VOC | Legacy models      |
| JSON       | Custom pipelines   |
COCO (Common Objects in Context) format is the most widely used annotation format for object detection, segmentation, and keypoints.
High-Level Structure of a COCO Annotation File
A COCO annotation file is a single JSON file with these main sections:
{
  "images": [],
  "annotations": [],
  "categories": []
}

### Images Section
"images": [
  {
    "id": 1,
    "file_name": "street1.jpg",
    "width": 1280,
    "height": 720
  }
]

### Categories section
"categories": [
  {
    "id": 1,
    "name": "person"
  },
  {
    "id": 2,
    "name": "car"
  },
  {
    "id": 3,
    "name": "traffic light"
  }
]
### annotation section
"annotations": [
  {
    "id": 1,
    "image_id": 1,
    "category_id": 1,
    "bbox": [100, 200, 80, 250],
    "area": 20000,
    "iscrowd": 0
  }
]
3. AutoModelForSemanticSegmentation
Fine-Tuning & Inference Explained (Pixel-Level Understanding)
If object detection answers:
“What objects are in the image and where?”
Then semantic segmentation answers
“What is every pixel in this image?”
This is the most detailed form of image understanding.
AutoModelForSemanticSegmentation loads a pretrained vision backbone with a pixel-wise classification head.
When Should You Use This Model?
Use AutoModelForSemanticSegmentation if:
- You need pixel-accurate results
- Object boundaries matter
- Each pixel belongs to exactly one class
Common Real-World Use Cases
- Autonomous driving (road, car, sidewalk, sky)
- Medical imaging (organs, tumors)
- Satellite imagery (water, land, buildings)
- Background removal
- Scene understanding
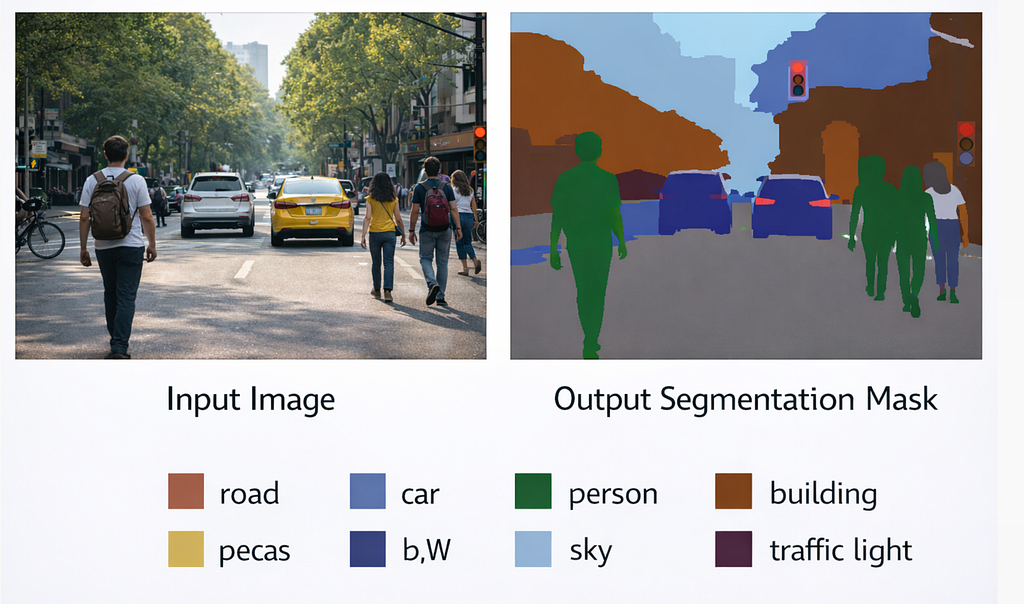
Example Problem
Input image: Street scene
output : Road → gray
Car → blue
Person → green
Sky → light blue
Building → brown
Fine tunning pipeline
from transformers import AutoImageProcessor, AutoModelForSemanticSegmentation

model_name = "nvidia/segformer-b0-finetuned-ade-512-512"

processor = AutoImageProcessor.from_pretrained(model_name)
model = AutoModelForSemanticSegmentation.from_pretrained(model_name)
Image segmentation example
Dataset Format
Unlike detection:
- You do not annotate boxes
- You annotate masks
dataset/
├── images/
│   ├── img1.jpg
│   ├── img2.jpg
├── masks/
│   ├── img1.png
│   ├── img2.png
### Load Dataset
from datasets import load_dataset

dataset = load_dataset(
    "imagefolder",
    data_dir="dataset/",
)

### Preprocess Image
def transform(example):
    image = example["image"]
    mask = example["mask"]

    inputs = processor(
        images=image,
        segmentation_maps=mask,
        return_tensors="pt"
    )

    example["pixel_values"] = inputs["pixel_values"][0]
    example["labels"] = inputs["labels"][0]
    return example

dataset = dataset.with_transform(transform)

### fine tuning
from transformers import TrainingArguments, Trainer

training_args = TrainingArguments(
    output_dir="./segmentation_model",
    per_device_train_batch_size=4,
    num_train_epochs=5,
    logging_steps=10,
    remove_unused_columns=False
)

### traning the model
trainer = Trainer(
    model=model,
    args=training_args,
    train_dataset=dataset["train"]
)

trainer.train()

### Save the model
model.save_pretrained("./segmentation_model")
processor.save_pretrained("./segmentation_model")

### inference
from PIL import Image
import torch

processor = AutoImageProcessor.from_pretrained("./segmentation_model")
model = AutoModelForSemanticSegmentation.from_pretrained("./segmentation_model")

### running inference
image = Image.open("test.jpg")

inputs = processor(images=image, return_tensors="pt")

with torch.no_grad():
    outputs = model(**inputs)

logits = outputs.logits

### Convert logits to mask
predicted_mask = logits.argmax(dim=1)[0]
### Each pixel in predicted_mask corresponds to a class ID.

### Visualization
Original Image → Segmentation Mask → Colored Overlay
AutoModelForVision2Seq
Image → Text Explained (Captioning, OCR, Visual Reasoning)
AutoModelForVision2Seq is used when your input is an image and your output is text.
If:
- Image classification → image → label
- Object detection → image → boxes
- Segmentation → image → pixels
Then Vision2Seq answers:
“Describe or reason about this image in words.”
AutoModelForVision2Seq It is a vision encoder + text decoder model.
The model:
- Encodes the image (vision transformer / CNN)
- Decodes text token by token (language model)
Use AutoModelForVision2Seq if you want:
- Image captioning
- OCR + text generation
- Visual question answering (image → text)
- Document understanding
- Multimodal assistants
Real-World Use Cases
- Accessibility tools (describe images)
- Invoice & document processing
- Screenshot understanding
- Image-based chatbots
- Visual reasoning systems
Behind AutoModelForVision2Seq, Hugging Face loads models like:
- BLIP / BLIP-2
- Donut (document understanding)
- Kosmos
- VisionEncoderDecoder models
You don’t need to manage architectures manually.
Example
Input : Image of a street with cars and people
Output: “A busy street with pedestrians crossing and cars stopped at a traffic light.”
pipeline
### Model loading
from transformers import AutoProcessor, AutoModelForVision2Seq

model_name = "Salesforce/blip-image-captioning-base"

processor = AutoProcessor.from_pretrained(model_name)
model = AutoModelForVision2Seq.from_pretrained(model_name)

###Inference (Image → Text)
from PIL import Image
import torch

image = Image.open("street.jpg").convert("RGB")
### Caption generation
inputs = processor(images=image, return_tensors="pt")

with torch.no_grad():
    output_ids = model.generate(
        **inputs,
        max_new_tokens=30
    )

caption = processor.decode(output_ids[0], skip_special_tokens=True)
print(caption)

### example output
A city street with cars and people walking across the road.
Example Training Data
Image: street.jpg
Target text: "A busy street with pedestrians and cars."

Dataset format
data = {
    "image": ["img1.jpg", "img2.jpg"],
    "text": [
        "A dog playing in the park.",
        "A person riding a bicycle."
    ]
}
Vision2Seq models are pretrained on massive data,
but fine-tuning is how you make them useful for your problem.
Minimal fine tuning Training
 ### Loading Model
from transformers import AutoProcessor, AutoModelForVision2Seq

model_name = "Salesforce/blip-image-captioning-base"

processor = AutoProcessor.from_pretrained(model_name)
model = AutoModelForVision2Seq.from_pretrained(model_name)

### Example dataset
data = [
    {
        "image": "img1.jpg",
        "text": "A yellow taxi driving down a city street."
    },
    {
        "image": "img2.jpg",
        "text": "A person crossing the road at a traffic light."
    }
]

### Preprocessing
from PIL import Image

def preprocess(example):
    image = Image.open(example["image"]).convert("RGB")

    inputs = processor(
        images=image,
        text=example["text"],
        padding="max_length",
        truncation=True,
        return_tensors="pt"
    )

    inputs["labels"] = inputs["input_ids"]
    return inputs

### training
from transformers import TrainingArguments, Trainer

training_args = TrainingArguments(
    output_dir="./vision2seq",
    per_device_train_batch_size=2,
    num_train_epochs=3,
    fp16=True,
    remove_unused_columns=False
)

trainer = Trainer(
    model=model,
    args=training_args,
    train_dataset=dataset
)

trainer.train()
Next part (Part3) I will list out Huggingface Audio Models, Thanks for your time and attention
Part2: Guide to Huggingface AutoModels** for Vision and Audio was originally published in Towards AI on Medium, where people are continuing the conversation by highlighting and responding to this story.