
Context Engineering: The Essential Skill for the AI Orchestration Era
If you’ve been building with LLMs, you’ve probably experienced this: you craft the perfect prompt, your model gives great responses in testing, but then in production it hallucinates, forgets instructions, or produces wildly inconsistent outputs. So what you usually do? You tweak the prompt. Follow those best practices like using chain-of-thought, add examples, etc. Makes that prompt becomes very verbose and complex.
“It’s should be fine right? I’ll just dump this entire excel file with 3 sheet tabs along with this 3000+ words long pdf report into the prompt and it should work. These models are getting better and longer context window, right?!” You run the application again, and… “what in the world is this response?!”
The issue isn’t your prompt. It’s your context.
The Problem Nobody Talks About
In 2026, we’re seeing a shift in how AI engineers think about LLM applications: Model quality is often limited not by the model itself, but by the context we give it.
This realization explains why:
- Prompt engineering alone isn’t enough. The best wording can’t fix bad information flow
- RAG systems fail despite “good embeddings”. Retrieving irrelevant documents pollutes context
- AI agents behave inconsistently. They’re overwhelmed by unstructured context
- Costs spiral out of control. Bloated context windows waste tokens and money
As someone coming from data background, I’ve learned that treating context like a data pipeline changes everything.
What Is Context Engineering?
I read this somewhere else, but I really like how it clearly describes it:
Context engineering is the practice of deliberately deciding what information an AI model sees, when it sees it, and in what format.
It’s not just about writing better prompts. It’s about designing the entire information flow into your model.
Context Engineering vs. Prompt Engineering
Here’s the key difference:

Seeing that comparison, I think you can kinda see the difference and know that prompt engineering is actually just a part of the context engineering. And you are correct!
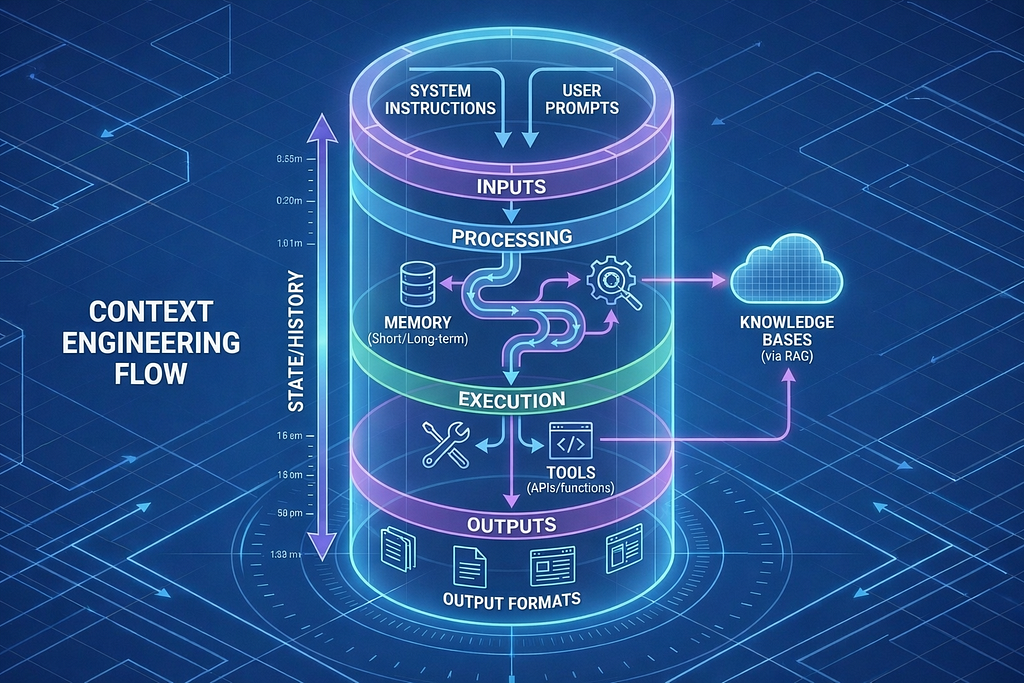
What Actually Goes Into “Context”?
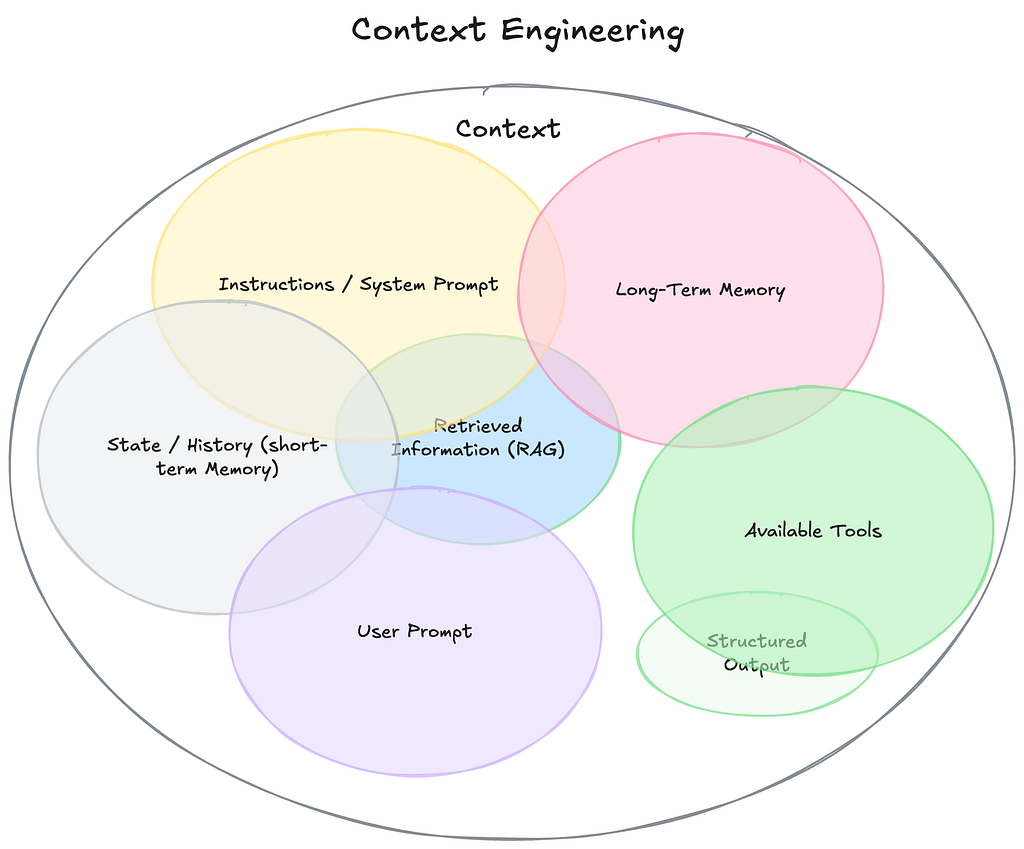
When you call an LLM, you’re not just sending a prompt. You’re sending a multi-layered context window:
1. System Instructions: LLM Behavioral guidelines
2. Conversation History: Previous interactions
3. Retrieved Knowledge: Documents from RAG
4. User Query: Current question
5. Available Tools: Functions the model can call
Most developers only optimize layer #4 (the user query). Context engineering optimizes all five layers.
A Real Example Breakdown
I think it’s better to see these concepts in action and have you try it yourself not just me yapping.
So I built a context engineering visualizer application to make this concrete. It’s an internal company knowledge assistant that demonstrates how information flows into the context window before inference.
The system uses synthetic data from a Product Strategy & Decision Handbook for AtlasPay (a payment processing company) to simulate real enterprise knowledge management scenarios. This educational approach lets you explore context engineering without proprietary data concerns.
- Try the application: [Context Engineering Visualizer on Hugging Face]
- Or run it locally: [GitHub repo]
- Here is the PDF document that the system use if you are curious about it: [Product Strategy & Decision Handbook — AtlasPay]
The tech stack:
- LangChain for agent framework and tools
- OpenAI GPT-4.1-mini as the LLM
- FAISS vector store for semantic search
- Gradio for the interactive UI
- PyPDF for document processing
Here’s what happens when you ask: ”What is STAM and why is it our North Star metric?”. Note that I used several metric that probably only exists in the context of AtlasPay. So that the RAG capability is heavily relevant to the question instead of the model internal knowledge from training data.
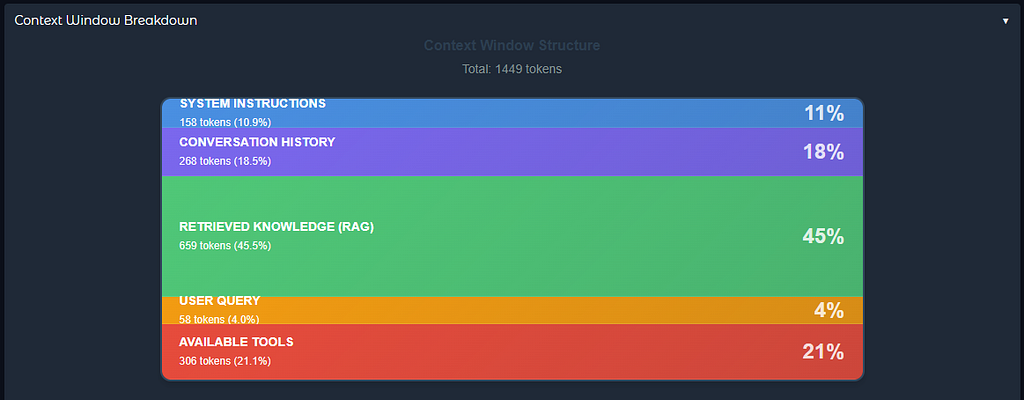
The Context Window Assembly
The visualizer shows you a beautiful stacked container breakdown (like a database cylinder) where each layer’s height is proportional to its token usage:
================================================================================
CONTEXT WINDOW VISUALIZATION
================================================================================

1. SYSTEM INSTRUCTIONS (Blue Layer - 38.2%)
   Tokens: 156
   Content:
   You are an internal company knowledge assistant for AtlasPay.

   Your role:
   - Answer questions about AtlasPay's product strategy, decisions, metrics
   - Use retrieved context from internal documentation
   - Reference specific sections when citing decisions
   - Use the calculate_metric tool for computations
   ...

2. CONVERSATION HISTORY (Purple Layer - 3.1%)
   Tokens: 13
   Content:
   No previous conversation

3. RETRIEVED KNOWLEDGE - RAG (Green Layer - 47.6%)
   Tokens: 194
   Content:
   --- Chunk 1 ---
   Metadata: page: 3, source: Product Strategy Handbook

   STAM (Successful Transactions per Active Merchant) is AtlasPay's
   North Star metric. It measures platform health by tracking how many
   successful transactions we process per active merchant...

   --- Chunk 2 ---
   ...

4. USER QUERY (Orange Layer - 6.6%)
   Tokens: 27
   Content:
   What is STAM and why is it our North Star metric?

5. AVAILABLE TOOLS (Red Layer - 4.4%)
   Tokens: 18
   Content:
   - calculate_metric: Official business metric computation
   - get_current_time: Get current date and time

================================================================================
TOTAL CONTEXT TOKENS: 408
================================================================================
Notice what’s happening here:
- 📌Only top 3 relevant chunks retrieved from a 10+ page PDF (not the entire document)
- 📌Clear separation between instructions, data, and query
- 📌Metadata tracking where each chunk shows its source page
- 📌Visual proportions where you can see RAG takes up ~48% of context
- 📌Tools available but only called when needed
The model received exactly what it needed, no more, no less.
The Visual Interface
The visualizer application provides an intuitive Gradio interface with several key features:
1. Stacked Container Visualization
Instead of just showing numbers, the UI displays a beautiful stacked container (like a database cylinder) where:
- Each layer has its own color (Blue → Purple → Green → Orange → Red)
- Layer height is proportional to token usage
- Hover over layers to see details
- Total tokens displayed at the top
2. Collapsible Sidebar
The sidebar contains:
- Settings toggle for visualization on/off
- Information about the source document (Product Strategy Handbook)
- 5 sequential example scenarios organized by use case
- Each scenario has 3 progressive questions that build on each other
3. Interactive Chat Interface
- Clean modern design with conversation history
- User messages on right, assistant on left
- Context visualization updates in real-time below the chat
- Expandable “Detailed Layer Contents” shows full text of each layer
4. Live Context Breakdown
Every query shows:
- Visual stacked representation
- Token count and percentage per layer
- Full content of each layer (expandable)
- Retrieved chunk metadata (page numbers, source)
This makes abstract concepts like context engineering visible and tangible. You can literally see how your question affects what information gets retrieved and included. Now back to the theory!
The Four Principles of Context Engineering
After building this system, I distilled context engineering into 4 core principles (I added some simplified code snippets below for clarity):
1. Relevance: Only Include What Helps
# ❌ Bad: Dump everything
docs = vectorstore.get_all_documents()  # 50+ chunks, 10k+ tokens

# ✅ Good: Retrieve top-k relevant using semantic search
docs = vectorstore.similarity_search(query, k=3)  # 3 chunks, ~600 tokens
More context ≠ better answers. Noise hurts performance and costs money. The visualizer processes a 10+ page PDF into ~50 chunks but only sends the top 3 most relevant to the model.
2. Structure: Organize Information Clearly
# ❌ Bad: Mix everything together
context = f"{system_prompt} {docs} {history} {query} {tools}"

# ✅ Good: Clear layers with labels
context = f"""Context from Knowledge Base:
{retrieved_docs}

Previous Conversation:
{history_text}

Current Question:
{user_query}"""
Models perform better when they can distinguish between different types of information. The visualizer shows this visually where each layer gets its own color and clear separation. There are several other ways to do this, I saw some people using JSON schema or even XML tags, but you get the idea.
3. Timing: Retrieve Information When Needed
# ❌ Bad: Pre-load everything
def __init__(self):
    self.all_docs = load_entire_database()  # Loaded once, used forever

# ✅ Good: Dynamic retrieval per query
def process_query(self, query: str):
    docs = self.vectorstore.similarity_search(query, k=3)  # Retrieved dynamically
Don’t front-load information. Fetch what you need, when you need it. The visualizer uses FAISS to perform semantic search per query, retrieving only relevant chunks.
4. Consistency: Use Stable Patterns
# ✅ Stable system prompt (never changes)
self.system_prompt = "You are an internal company knowledge assistant..."

# ✅ Predictable temperature (deterministic)
self.llm = ChatOpenAI(model="gpt-4.1-mini", temperature=0)

# ✅ Reusable context assembly pattern
def process_query(self, query):
    # Same structure every time
    history = self.memory.get_history_text()
    knowledge = self.knowledge_base.retrieve_relevant(query, k=3)

    return f"""Context from Knowledge Base:
{knowledge}

Previous Conversation:
{history}

Current Question:
{query}"""
Consistency reduces randomness and improves reliability. The visualizer uses the same context assembly pattern for every query.
Deep Dive Code Example: Building Context Layer by Layer
Note: You can skip this section if you want or already check the source code on the GitHub repository. I just want to show you the components from my own implementation of the visualizer application.
The Main Agent
Here’s how the visualizer assembles context (core logic):
class ContextEngineeringAgent:
    def __init__(self):
        # Core components
        self.llm = ChatOpenAI(model="gpt-4.1-mini", temperature=0)
        self.knowledge_base = KnowledgeBase(
            pdf_path="data/handbook.pdf",
            embedding_model="text-embedding-3-small",
            top_k=3
        )
        self.memory = ConversationMemory(max_messages=4)
        self.visualizer = ContextVisualizer()

        # Stable system prompt
        self.system_prompt = """You are an internal company knowledge assistant for AtlasPay.

Your role:
- Answer questions about product strategy, metrics, and decisions
- Use retrieved context from internal documentation
- Reference specific sections when citing decisions
- Use calculate_metric tool for computations"""

        # Create agent with tools
        self.agent = create_agent(
            model=self.llm,
            tools=[calculate_metric, get_current_time],
            system_prompt=self.system_prompt
        )

    def process_query(self, user_query: str):
        # Reset visualizer for new query
        self.visualizer = ContextVisualizer()

        # Layer 1: System instructions
        self.visualizer.add_layer("System Instructions", self.system_prompt)

        # Layer 2: Conversation history (recent only)
        history_text = self.memory.get_history_text()
        self.visualizer.add_layer("Conversation History", history_text)

        # Layer 3: Retrieved knowledge (top-3 relevant chunks)
        retrieved_docs = self.knowledge_base.retrieve_relevant(user_query)
        self.visualizer.add_layer("Retrieved Knowledge (RAG)", retrieved_docs)

        # Layer 4: User query
        self.visualizer.add_layer("User Query", user_query)

        # Layer 5: Available tools
        tools_text = "n".join([f"- {t.name}: {t.description}" for t in self.tools])
        self.visualizer.add_layer("Available Tools", tools_text)

        # Assemble context with clear structure
        context_message = f"""Context from Knowledge Base:
{retrieved_docs}

Previous Conversation:
{history_text}

Current Question:
{user_query}"""

        # Invoke agent
        result = self.agent.invoke({
            "messages": [{"role": "user", "content": context_message}]
        })

        response = result["messages"][-1].content

        # Update memory
        self.memory.add_user_message(user_query)
        self.memory.add_ai_message(response)

        return response, self.visualizer
The RAG Component (Relevance in Action)
class KnowledgeBase:
    def __init__(self, pdf_path: str, embedding_model: str, top_k: int = 3):
        self.pdf_path = pdf_path
        self.top_k = top_k
        self.embeddings = OpenAIEmbeddings(model=embedding_model)

        # Load PDF document
        loader = PyPDFLoader(pdf_path)
        documents = loader.load()

        # Split into optimized chunks
        text_splitter = RecursiveCharacterTextSplitter(
            chunk_size=800,           # Optimized for structured content
            chunk_overlap=150,        # Balance context and redundancy
            separators=["nn", "n", ". ", ", ", " ", ""]
        )
        chunks = text_splitter.split_documents(documents)

        # Create FAISS vector store
        self.vectorstore = FAISS.from_documents(chunks, self.embeddings)

        # Save index for fast loading later
        self.vectorstore.save_local("faiss_index_store")

    def retrieve_relevant(self, query: str) -> str:
        # Semantic search for top-k chunks
        docs = self.vectorstore.similarity_search(query, k=self.top_k)

        # Format with metadata
        ## Using the metadata along with the content is the best practice
        formatted = []
        for i, doc in enumerate(docs, 1):
            chunk = f"--- Chunk {i} ---nMetadata: {doc.metadata}nn{doc.page_content}"
            formatted.append(chunk)

        return "nn".join(formatted)
Notice: A 10+ page PDF creates ~50 chunks, but we only send the top 3 most relevant to the model. Each chunk includes metadata (page number, source) for traceability.
The Memory Component (Smart Truncation)
class ConversationMemory:
    def __init__(self, max_messages: int = 4):
        self.messages = []
        self.max_messages = max_messages

    def add_user_message(self, content: str):
        self.messages.append(HumanMessage(content=content))
        self._truncate()

    def add_ai_message(self, content: str):
        self.messages.append(AIMessage(content=content))
        self._truncate()

    def _truncate(self):
        """Keep only recent messages to avoid context bloat"""
        if len(self.messages) > self.max_messages:
            self.messages = self.messages[-self.max_messages:]

    def get_history_text(self) -> str:
        if not self.messages:
            return "No previous conversation"

        history = []
        for msg in self.messages:
            role = "User" if isinstance(msg, HumanMessage) else "Assistant"
            history.append(f"{role}: {msg.content}")
        return "n".join(history)
We limit history to 4 messages. For longer conversations, this prevents context overflow while maintaining relevant continuity.
Note: There are several approaches to handle long conversation history:
- Trimming (used here): Keep only the most recent N messages
- Summarization: Compress older messages into summaries
- Deletion: Permanently remove certain states
More info: [LangChain Memory Documentation]
Watching Context in Action
The visualizer includes 5 sequential scenarios that demonstrate real enterprise use cases. Each scenario shows how the context window adapts. For example we use the first scenario to understand the North Star Metric and then we calculate the STAM value and then we follow up with a question about the merchant engagement.
First Question: Understanding North Star Metric
“What is STAM and why is it our North Star metric?”
- ✅ Retrieved 3 relevant chunks from product handbook
- ✅ No conversation history (first query)
- ✅ Chunks include metadata (page numbers, source)
- ✅ ~400 total tokens
Second Question: STAM Value Calculation
“Calculate STAM if we have 125,000 successful transactions and 500 active merchants”
- ✅ Previous conversation added to history
- ✅ Different chunks retrieved based on new query
- ✅ Agent calls `calculate_metric` tool (computation logic lives in tool, not docs)
- ✅ ~450 total tokens
Third Question: Context-Aware Follow-up
“What does this STAM value tell us about merchant engagement?”
- ✅ History includes previous STAM calculation (250 transactions/merchant)
- ✅ Agent uses context to understand “this STAM value” refers to previous result
- ✅ Retrieves relevant chunks about STAM interpretation
- ✅ No need to repeat the calculation
- ✅ ~520 total tokens
This third question is where context engineering shines. The agent understood “this STAM value” because we engineered the context to include relevant conversation history.
Try these scenarios yourself in the [Live Demo]. It is provided in the sidebar of the application.
A Key Design Pattern: Computation Logic in Tools, Not Docs
One interesting aspect of this visualizer is how it handles metric calculations. The Product Strategy Handbook intentionally omits calculation formulas. Instead, it references the official metrics service or centralized computation system. But I think this is really specific to the context of AtlasPay and not really a general best practice, so make sure to adapt it to your own use case.
Here’s the tool implementation:
@tool
def calculate_metric(metric_name: str, values: str) -> str:
    """
    Compute an official business metric using centralized metrics logic.

    This tool represents the company's authoritative metrics service.
    Product strategy documents intentionally omit calculation formulas
    and defer all computations to this tool to ensure consistency.

    Supported metrics:
    - "stam": Successful Transactions per Active Merchant
    - "nrr": Net Revenue Retention
    - "payment_success_rate": Adjusted Payment Success Rate
    """
    nums = [float(x.strip()) for x in values.split(",")]

    if metric_name.lower() == "stam":
        result = nums[0] / nums[1]  # transactions / merchants
        return f"STAM: {result:.2f} successful transactions per merchant"

    elif metric_name.lower() == "nrr":
        result = (nums[0] / nums[1]) * 100  # retained / starting
        return f"Net Revenue Retention (NRR): {result:.2f}%"

    # ... other metrics
Pattern Explanation:
- Single source of truth: Formulas exist in one place (the tool)
- No formula drift: Documentation describes what and why, not how
- Forced tool usage: Agent cannot compute metrics from context alone
- No hallucination: Agent can’t make up formulas
- Real-world modeling: Mimics actual enterprise metric systems
This demonstrates an important principle:
Not everything should be in the context. Some information is better as tools can be called to do the computation.
Note: By the way don’t be lazy to write the docstring of these tool functions, because it’s different from writing this for human documentation, the urgency for AI are far greater since they heavily rely on these tool descriptions in order to choose what tools to use/call.
Final Thoughts
If 2025 was the year of AI Agents, 2026 is shaping up to be the year of AI Orchestration. We’re moving beyond single-agent systems to complex multi-agent workflows where LLMs orchestrate other LLMs, tools, and external systems. In this environment, context management becomes exponentially more critical.
Here are several key takeaways from this article:
- Context is multi-layered: System instructions, history, RAG, query, and tools all contribute
- Less is often more: 3 relevant chunks beat 50 irrelevant ones
- Structure matters: Clear separation helps models reason better
- Dynamic beats static: Retrieve per-query with semantic search, don’t pre-load
- Visualize to understand: You can’t optimize what you can’t see
- Tools complement context: Some info is better as tools than in context
As AI systems mature, context design is becoming the main differentiator. Larger context windows don’t mean free intelligence. Claude has around 250K tokens, Gemini has 1M+, but using them all is expensive and slow. A GPT-4 with good context engineering often beats GPT-5 with bad context.
Thank you for reading this article! I hope you found it helpful. If you have any questions or feedback, please feel free to reach out to me.
Tags: #ContextEngineering #LLM #RAG #AIAgents #PromptEngineering #LangChain #MachineLearning
Context Engineering: The Essential Skill for the AI Orchestration Era was originally published in Towards AI on Medium, where people are continuing the conversation by highlighting and responding to this story.