
Claude Code Section 3: Extending Claude’s Reach — 7 Concepts That Connect Claude to Your Entire…
Claude Code Section 3: Extending Claude’s Reach — 7 Concepts That Connect Claude to Your Entire Stack
This is Section 3 of a 4-part series on mastering Claude Code. If you haven’t read Section 1 — The Foundations — and Section 2 — Making Claude Personal — start there first. This section builds directly on both.
Here’s where most developers plateau.
They’ve done the basics. Claude Code is installed. They’ve got a CLAUDE.md, a few permission rules, maybe a /compact habit. Claude knows their stack. It’s useful — genuinely useful — and they’re getting things done faster than before.
But they’re still doing one thing at a time. They’re still manually triggering every action. Claude is working for them, but it isn’t yet working around them — running in the background, integrating with their tools, coordinating across tasks in parallel.
That’s the ceiling Section 2 hits. And it’s what Section 3 breaks through.
The 7 concepts here are about reach. Hooks let Claude react automatically to events. MCP Servers connect Claude to your databases, APIs, and SaaS tools. Slash Commands package repeatable workflows into a single keystroke. Subagents let Claude spin up parallel workers that each handle a piece of a complex task simultaneously. Headless mode turns Claude into an automation engine that runs in CI/CD without you in the room.
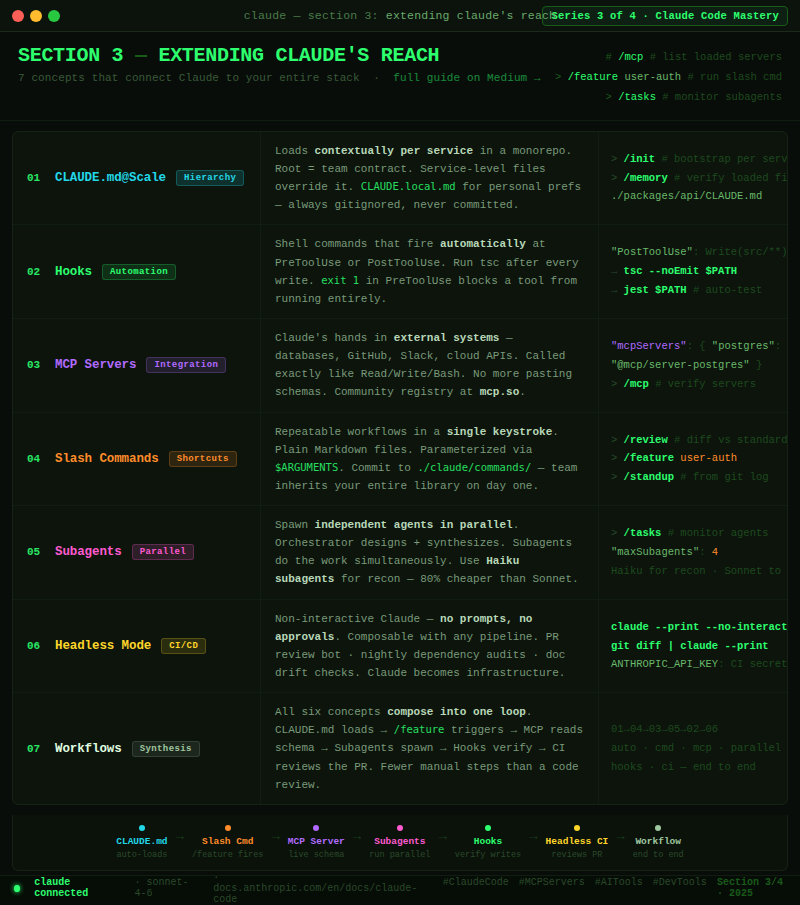
Individually, each of these is a significant upgrade. Together, they transform Claude Code from a smart terminal tool into an orchestration layer across your entire development stack.
Let’s build that reach.
Concept 1: CLAUDE.md at Scale — Monorepos, Teams, and the Hierarchy in Practice
In Section 2, you learned what CLAUDE.md is and how to write one. At a single-repo, solo-developer scale, a single root CLAUDE.md is enough. But when you’re working across a monorepo with multiple services, a team with different conventions per package, or a large codebase where context should change based on where you’re working — that’s where the full hierarchy becomes essential.
The complete CLAUDE.md hierarchy:
~/.claude/CLAUDE.md              # Global — loads for every project you open
./CLAUDE.md                      # Project root — your team's shared constitution
./CLAUDE.local.md                # Personal project-level — gitignored
./packages/api/CLAUDE.md         # Service-level — only loads when working in /packages/api
./packages/api/src/CLAUDE.md     # Subdirectory-level — loads for that subtree only
Claude loads all applicable files and merges them. More specific files override broader ones on conflicts. This means you can share team conventions at the root while giving each service its own personality.
A monorepo setup that works:
# Root CLAUDE.md — commits with the repo
## Monorepo: payments-platform
- pnpm workspaces — always use pnpm, never npm or yarn
- Shared types in /packages/shared/src/types
- All services expose health check at GET /health
- Git commits: conventional commits format — feat:, fix:, chore:, etc.
- Never modify root package.json without flagging it
---
# packages/api/CLAUDE.md - API service specific
## API Service Rules
- Node 20, Fastify 4, TypeScript strict mode
- Routes in /routes, handlers in /handlers, services in /services
- Auth via middleware in /middleware/auth.ts - never inline auth checks
- PostgreSQL via Prisma - no raw SQL except in /repositories
- Run `pnpm test:api` - requires running DB on localhost:5432
---
# packages/worker/CLAUDE.md - Background worker service
## Worker Service Rules
- BullMQ for job queue - jobs defined in /jobs directory
- Each job must implement the BaseJob interface from shared
- Always handle job failure with exponential backoff
- Never call external APIs directly - go through /services/http.ts
The team convention pattern:
The root CLAUDE.md is a contract. Check it into source control and treat changes to it like changes to a critical config file — PR required, review needed. Your personal CLAUDE.local.md is where your individual preferences go (your editor commands, your local port overrides, your personal shortcuts). It never gets committed.
# Bootstrap CLAUDE.md for each package automatically
> /init

# Claude will analyze the service and write a draft CLAUDE.md for it
# Edit it, refine it, commit it

# Verify what CLAUDE.md files are loaded in your current session:
> /memory
The insight: A well-structured CLAUDE.md hierarchy means Claude behaves differently — appropriately differently — based on where it’s working. It doesn’t need to be told it’s in the API service vs. the worker service. It already knows. The rules load automatically because the files are there.
Concept 2: Hooks — Automating What Happens Before and After Claude Acts
Hooks are one of the most underused features in Claude Code — and one of the highest-leverage once you understand them.
A Hook is a shell command that Claude Code runs automatically at defined moments in the agent loop. Before Claude uses a tool. After Claude uses a tool. At the start of a session. When Claude finishes a task. You define the triggers and the commands. Claude runs them without you having to ask.
The four Hook events:

Event When it fires PreToolUse Before Claude runs any tool (Read, Write, Bash, MCP) PostToolUse After a tool completes successfully Notification When Claude wants to notify you (task done, needs input) Stop When Claude finishes a response or task
Configuring Hooks in settings.json:
{
  "hooks": {
    "PostToolUse": [
      {
        "matcher": "Write",
        "hooks": [
          {
            "type": "command",
            "command": "npm run lint --fix -- $CLAUDE_TOOL_INPUT_PATH"
          }
        ]
      }
    ],
    "PreToolUse": [
      {
        "matcher": "Bash",
        "hooks": [
          {
            "type": "command",
            "command": "echo '[Hook] Claude running bash: $CLAUDE_TOOL_INPUT_COMMAND'"
          }
        ]
      }
    ],
    "Stop": [
      {
        "matcher": ".*",
        "hooks": [
          {
            "type": "command",
            "command": "osascript -e 'display notification "Claude finished" with title "Claude Code"'"
          }
        ]
      }
    ]
  }
}
The environment variables available in Hooks:
$CLAUDE_TOOL_NAME           # Which tool fired (Read, Write, Bash, etc.)
$CLAUDE_TOOL_INPUT_PATH     # File path if the tool touched a file
$CLAUDE_TOOL_INPUT_COMMAND  # Bash command if tool is Bash
$CLAUDE_TOOL_RESULT         # Output from the tool (PostToolUse only)
$CLAUDE_SESSION_ID          # Current session ID
Hook patterns that unlock real automation:
{
  "hooks": {
    "PostToolUse": [
      {
        "matcher": "Write(src/**/*.ts)",
        "hooks": [
          {
            "type": "command",
            "command": "npx tsc --noEmit $CLAUDE_TOOL_INPUT_PATH 2>&1 | head -20"
          }
        ]
      },
      {
        "matcher": "Write(src/**/*.test.ts)",
        "hooks": [
          {
            "type": "command",
            "command": "npx jest $CLAUDE_TOOL_INPUT_PATH --passWithNoTests 2>&1 | tail -5"
          }
        ]
      }
    ],
    "PreToolUse": [
      {
        "matcher": "Write(migrations/**)",
        "hooks": [
          {
            "type": "command",
            "command": "echo 'ERROR: Writing to migrations/ is blocked' && exit 1"
          }
        ]
      }
    ]
  }
}
What this means in practice:
Every time Claude writes a TypeScript file, the hook runs tsc on it automatically and pipes the result back — Claude sees the type errors and can fix them without you asking. Every time Claude writes a test file, the hook runs that test immediately. Every time Claude tries to write to /migrations, the hook exits with an error, blocking the write entirely before it happens.
Hooks are the difference between Claude that acts and Claude that acts and verifies. You’re building a feedback loop directly into the agent’s action cycle.
One important note: Hook commands run with your user permissions and can execute anything. Only put trusted commands in your hooks. Validate $CLAUDE_TOOL_INPUT_PATH before using it in destructive operations.
Concept 3: MCP Servers — Giving Claude Eyes and Hands Across Your Stack
The tools in Section 1 — Read, Write, Bash, WebFetch — work on your local filesystem and terminal. MCP Servers extend Claude beyond that. They’re the bridge between Claude Code and your external world: your databases, your APIs, your SaaS tools, your internal services.
MCP stands for Model Context Protocol — an open standard that lets Claude call tools defined by external servers. You configure which servers Claude connects to, and Claude can then use their tools exactly like it uses its built-in tools. From Claude’s perspective, there’s no difference between running Bash and calling a Postgres query tool or a GitHub API tool.
Configuring MCP Servers in settings.json:
{
  "mcpServers": {
    "postgres": {
      "command": "npx",
      "args": ["-y", "@modelcontextprotocol/server-postgres"],
      "env": {
        "POSTGRES_CONNECTION_STRING": "postgresql://localhost/myapp_dev"
      }
    },
    "github": {
      "command": "npx",
      "args": ["-y", "@modelcontextprotocol/server-github"],
      "env": {
        "GITHUB_TOKEN": "${GITHUB_TOKEN}"
      }
    },
    "filesystem": {
      "command": "npx",
      "args": ["-y", "@modelcontextprotocol/server-filesystem", "/home/user/projects"]
    }
  }
}
What MCP unlocks, concretely:
# Without MCP — you paste schema, Claude guesses
> Add a column called "last_login" to the users table

# With Postgres MCP - Claude reads the live schema first
> Check the current schema of the users table and add a
  last_login column with the appropriate type and index

# Without GitHub MCP - Claude can't see your PRs, issues, or CI status
> Review the open PRs on this repo

# With GitHub MCP - Claude pulls them directly
> List the open PRs, find any that touch auth/, and flag
  which ones are failing CI

# Without Slack MCP - Claude has no visibility into team comms
> Summarize the #backend-alerts channel from the last 24 hours

# With Slack MCP - Claude reads it directly
> Check #backend-alerts for any errors in the last 2 hours
  and create a GitHub issue for anything critical
The MCP server ecosystem:
The community has built servers for almost every tool you use. A non-exhaustive list:
- Databases: PostgreSQL, MySQL, SQLite, MongoDB, Redis
- Version control: GitHub, GitLab, Bitbucket
- Project management: Jira, Linear, Asana, Notion
- Cloud: AWS, Google Cloud, Vercel, Supabase
- Communication: Slack, Discord
- Search: Brave Search, Exa
- Browser: Puppeteer, Playwright (for web automation)
# Find available servers:
# → https://github.com/modelcontextprotocol/servers
# → https://mcp.so (community registry)

# Verify which MCP servers are loaded in your session:
> /mcp

# Test that a server is working:
> List the tools available from the postgres MCP server
Building your own MCP Server:
MCP is an open protocol. If you have an internal API, a custom data source, or any tool Claude should be able to call, you can wrap it in an MCP server in under an hour. The spec is at modelcontextprotocol.io and SDKs exist for TypeScript, Python, and Go.
// A minimal custom MCP server in TypeScript
import { Server } from "@modelcontextprotocol/sdk/server/index.js";
import { StdioServerTransport } from "@modelcontextprotocol/sdk/server/stdio.js";

const server = new Server({ name: "my-internal-api", version: "1.0.0" });

server.setRequestHandler("tools/call", async (req) => {
  if (req.params.name === "get_feature_flags") {
    const flags = await fetchFeatureFlags(); // your internal API call
    return { content: [{ type: "text", text: JSON.stringify(flags) }] };
  }
});

const transport = new StdioServerTransport();
await server.connect(transport);
The mental model: MCP Servers are Claude’s senses and hands in external systems. Without them, Claude is working blind — reading your local files, guessing at what’s in your database, unable to interact with your tools. With them, Claude operates with full situational awareness across your stack.
Concept 4: Slash Commands — Your Personal Claude CLI
Slash commands are custom commands you define that Claude executes when you type a /shortcut in any session. They’re reusable, parameterized, and stored as simple Markdown files. Any workflow you repeat — code review, dependency audit, security scan, documentation generation — becomes a single keystroke.
Where slash commands live:
~/.claude/commands/             # Global — available in all projects
./claude/commands/              # Project-level — shared with your team
./claude/commands/personal/     # Personal project-level — gitignored
Creating your first slash command:
A slash command is just a Markdown file. The filename becomes the command name.
# Create: ~/.claude/commands/review.md
# Usage: > /review

# Or with a project namespace
# Create: ./claude/commands/deploy-check.md
# Usage: > /project:deploy-check
Example: a /review command that enforces your standards:
<!-- ~/.claude/commands/review.md -->
Review the changes in `git diff HEAD` against our standards:

1. **Security**: Check for exposed secrets, unvalidated inputs, SQL injection risks
2. **Error handling**: Verify every async operation has proper error handling
3. **Test coverage**: Flag any new logic without corresponding tests
4. **Our conventions**: Check for console.log (use our logger), raw Promises (use async/await), hardcoded values (use constants)
5. **Performance**: Flag N+1 queries, missing indexes, large payload responses

Output: a numbered list of issues found, grouped by severity (Critical / Warning / Suggestion).
If nothing critical: say so clearly and give an overall verdict.
Example: a parameterized /feature command:
<!-- ./claude/commands/feature.md -->
We're building a new feature: $ARGUMENTS

Steps:
1. Read @./docs/architecture.md to understand the system context
2. Identify every file that needs to change
3. Write a feature doc at ./docs/features/$ARGUMENTS.md - include the data model, API contract, and key decisions
4. Implement the feature following our patterns from CLAUDE.md
5. Write tests for every new code path
6. Update @./docs/architecture.md if the system design changed

Start by reading the architecture doc and telling me which files you'll touch.
# Use it:
> /feature user-invitations
# Claude reads architecture.md, plans the feature, creates the doc, implements it
Example: a /standup command that summarizes your day:
<!-- ~/.claude/commands/standup.md -->
Look at `git log --since="yesterday" --author="$(git config user.email)" --oneline`
and `git diff main --stat`.

Write a standup summary in this format:
**Yesterday:** [bullet list of what was completed based on commits]
**Today:** [ask me what I'm working on next - leave a blank]
**Blockers:** [any TODOs or unfinished work visible in the diff]

Keep it under 10 lines. Write it like a human, not a robot.
Your command library builds over time:
# Common commands worth creating early:
/review        — git diff review against your standards
/feature       — structured feature implementation workflow
/debug         — systematic debugging routine with logging output
/audit         — dependency and security audit
/standup       — generate yesterday''s standup from git history
/docs          — update all docs to reflect current codebase state
/pr            — generate a PR description from the diff
/refactor      — guided refactor with tests-first approach
The compounding principle: Every command you create is a workflow that previously required a paragraph of prompting — now it’s a word. Your team can share the project-level commands directory. New developers inherit your entire workflow library on day one.
Concept 5: Subagents — Parallel Work at Scale
Everything so far runs in a single agent loop — one task, one thread, one context window. Subagents break that constraint. They let Claude spin up multiple independent agents that work simultaneously, each handling a different piece of a complex task, all coordinating through the orchestrating session.
This is the feature that handles tasks too large for a single context window, too parallelizable to do sequentially, or too complex to coordinate manually.
How subagents work:
The primary Claude session (the orchestrator) uses the Task tool to spawn subagents. Each subagent gets its own context, its own tools, and its own instructions. They run in parallel and report back. The orchestrator collects results and synthesizes.
# Trigger parallel work explicitly:
> Audit this codebase for security issues.
  Spawn separate agents to check each of these areas in parallel:
  - API routes for input validation issues
  - Authentication and session handling
  - Database queries for injection risks
  - Dependencies for known CVEs
  Then combine their findings into a single prioritized report.

# Claude spins up 4 agents simultaneously, each focusing on one area,
# then synthesizes their reports into one output - in roughly
# the time it would take to do one.
The pattern for large migrations:
# Migrate a codebase from CommonJS to ESM:
> This migration affects 47 files.
  Group them into batches that don't depend on each other.
  Spawn one subagent per batch to convert them in parallel.
  Each agent should:
  1. Convert require() to import/export syntax
  2. Add .js extensions to relative imports
  3. Run the relevant tests after converting
  Report any failures back to me before continuing.
Subagents are also how you use Haiku cheaply at scale:
# Run expensive reconnaissance on Haiku, implement on Sonnet
> Spawn a Haiku subagent to:
  - List all files that import from /src/legacy/
  - For each file, identify which legacy functions it uses
  - Return a dependency map as JSON

  Then use that map to plan the migration.

# This analysis might touch 80 files - on Haiku it costs ~$0.10
# vs ~$0.50 on Sonnet. The orchestrator (Sonnet) handles only synthesis.
Controlling subagent behavior:
# Limit what subagents can do (they inherit the parent's permission profile
# but you can narrow it further):
> Spawn a read-only subagent to analyze the database schema
  (read access only — no writes, no bash commands)

# Set concurrency limits in settings.json:
# { "maxSubagents": 4 }
# Monitor what subagents are doing:

> /tasks
# → Shows active subagent tasks, their status, and token usage
When to reach for subagents:
Use them when a task has clearly separable parts that don’t need to coordinate while running — parallel test runs, multi-service analysis, batched file operations, simultaneous documentation generation. Don’t use them for tasks that are inherently sequential or where early steps inform later ones.
The mental model: The orchestrator is the senior engineer who breaks down the task and reviews the work. Subagents are the junior engineers who each go implement their piece. The orchestrator doesn’t do grunt work — it designs, coordinates, and synthesizes.
Concept 6: Headless Mode & CI/CD — Claude as an Automation Engine
Everything in the series so far assumes you’re at the terminal, in an interactive session. Headless mode removes that assumption. Claude Code can run entirely non-interactively — no prompts, no approval requests, no human in the loop — which makes it composable with any automation system.
This is how Claude becomes part of your CI/CD pipeline, your nightly jobs, your automated review workflows.
The flags that enable headless operation:
# Non-interactive, no approval prompts, output to stdout
$ claude --print --no-interactive "run all tests and summarize failures"

# Same thing, output as structured JSON
$ claude --print --output-format json "list all TODO comments in src/ with file and line number"

# Pipe stdin, pipe stdout - composable with everything
$ git diff origin/main | claude --print --no-interactive "review this diff for breaking changes"

# Quiet mode - no status messages, just the output
$ claude --print --quiet "check if the API contract in docs/api.md matches the actual routes"
GitHub Actions integration:
# .github/workflows/claude-review.yml
name: Claude Code Review

on:
  pull_request:
    types: [opened, synchronize]

jobs:
  claude-review:
    runs-on: ubuntu-latest
    steps:
      - uses: actions/checkout@v4
        with:
          fetch-depth: 0

      - name: Install Claude Code
        run: npm install -g @anthropic-ai/claude-code

      - name: Run Claude Review
        env:
          ANTHROPIC_API_KEY: ${{ secrets.ANTHROPIC_API_KEY }}
        run: |
          REVIEW=$(git diff origin/main | claude --print --no-interactive
            "Review this PR diff. Flag: security issues, missing error handling,
             broken API contracts, missing tests for new logic.
             Output as markdown. Be concise.")
          echo "$REVIEW" >> $GITHUB_STEP_SUMMARY

      - name: Post Review as Comment
        uses: actions/github-script@v7
        with:
          script: |
            const review = process.env.CLAUDE_REVIEW;
            github.rest.issues.createComment({
              issue_number: context.issue.number,
              owner: context.repo.owner,
              repo: context.repo.repo,
              body: review
            });
        env:
          CLAUDE_REVIEW: ${{ steps.claude-review.outputs.review }}
Nightly automation patterns:
#!/bin/bash
# nightly-audit.sh — runs as a cron job

# Dependency audit
claude --print --no-interactive
  "Check package.json and package-lock.json for dependencies with known CVEs.
   Output: a JSON array of {package, version, severity, cve}"
  > ./reports/dependency-audit-$(date +%Y%m%d).json

# Documentation drift check
claude --print --no-interactive
  "Compare @./docs/api.md against the actual routes in @./src/routes/.
   List any endpoints in the routes that aren't documented,
   and any documented endpoints that no longer exist."
  > ./reports/doc-drift-$(date +%Y%m%d).txt

# Dead code scan
claude --print --no-interactive
  "Find exported functions in src/ that are never imported anywhere.
   Output: file path, function name, line number. JSON format."
  > ./reports/dead-code-$(date +%Y%m%d).json

# Send the reports
python scripts/send-reports.py
Environment variables for CI configuration:
# In CI environments, set these instead of settings.json:
ANTHROPIC_API_KEY=sk-ant-...        # Required
CLAUDE_MODEL=claude-sonnet-4-6      # Override default model
CLAUDE_MAX_TOKENS=8192              # Cap output size
CLAUDE_NO_INTERACTIVE=1             # Force non-interactive mode
The principle: Headless mode means Claude is not just a tool you use — it’s infrastructure you deploy. Every workflow that currently lives in your head (“I always check for X before merging”) can become a step in a pipeline that runs automatically, every time, without you having to remember to do it.
Concept 7: Composing Workflows — Putting the Full System Together
The previous six concepts are powerful individually. What makes Section 3 click is understanding how they compose into something genuinely greater than the sum of its parts.
Here’s a complete, real-world workflow that combines all six:
Scenario: You’re building a new payment webhook handler. You want Claude to implement it end-to-end, safely, with full context, and update all the relevant docs as it goes.
Step 1: The right CLAUDE.md hierarchy is already loaded
$ cd packages/payments-service
$ claude

# Claude automatically loads:
# - ~/.claude/CLAUDE.md (global rules)
# - ./CLAUDE.md (monorepo root: pnpm, conventional commits)
# - ./packages/payments-service/CLAUDE.md (Fastify, Stripe patterns, test requirements)
# Already knows the stack. No re-explaining.
Step 2: Use the /feature slash command with a living doc
> /feature stripe-webhook-handler
# Claude reads @./docs/architecture.md, plans the feature,
# creates @./docs/features/stripe-webhook-handler.md
Step 3: Hooks run automatically as Claude writes
Claude writes: src/handlers/webhookHandler.ts
→ PostToolUse hook fires: tsc --noEmit on the file → type errors caught immediately

Claude writes: src/handlers/webhookHandler.test.ts
→ PostToolUse hook fires: jest runs the new tests → failures reported back

Claude tries to write: .env (to add STRIPE_SECRET_KEY example)
→ PreToolUse hook fires: exit 1 → write blocked, Claude notes it in the doc instead
Step 4: Claude calls the Postgres MCP server to verify schema
# Claude doesn't guess at the schema — it checks live
> Before writing the handler, check the current schema of
  the webhook_events table in the database

# MCP server call → returns live schema → Claude builds to it exactly
Step 5: Claude spawns subagents for parallel work
# While the main handler is being written, Claude spawns:
# Subagent A: generates the Stripe event type definitions
# Subagent B: finds all existing webhook tests to match the pattern
# Subagent C: checks the docs for the retry logic spec
# → All three complete simultaneously, orchestrator synthesizes
Step 6: End-of-session doc update via /docs slash command
> /docs
# Claude updates @./docs/features/stripe-webhook-handler.md,
# @./docs/architecture.md (event-driven section),
# and @./docs/api-contracts.md (new endpoint spec)
Step 7: CI picks it up when you push
# GitHub Actions runs the claude-review workflow automatically
# Claude reviews the diff, posts a comment on the PR,
# flags anything that doesn't match the architecture docs
The whole workflow — from kickoff to PR review — ran with fewer manual steps than a typical code review cycle. And it’s repeatable. Every feature from here forward follows the same path.
The full composability diagram:
CLAUDE.md Hierarchy    →  Right context loads automatically for the service
Slash Commands         →  /feature triggers the structured workflow
Hooks                  →  Type check + test run after every write
MCP Servers            →  Live schema, real GitHub data, actual Slack messages
Subagents              →  Parallel workers for research + generation
Headless / CI          →  Claude reviews the PR you just pushed
This is what “extending Claude’s reach” actually means. Not Claude doing more things — Claude woven into the fabric of how your team already works.
How These 7 Concepts Connect
Here’s the updated wiring diagram — Sections 1 and 2 as the foundation, Section 3 as the extension layer:
Foundation (Section 1)        Personalization (Section 2)     Reach (Section 3)
─────────────────────         ──────────────────────────────  ──────────────────────────────
Terminal                  →   Flags                       →   Headless / CI/CD
Prompts                   →   CLAUDE.md                   →   CLAUDE.md at Scale + Slash Commands
Permissions               →   File Access Control         →   Hooks (pre/post action control)
Tools (Read/Write/Bash)   →   Model Selection             →   MCP Servers + Subagents
Context Window            →   Compact Context             →   Subagents (distribute the load)
History & Resume          →   Memory (auto + manual)      →   Composing Workflows end-to-end
Token Cost                →   Living Docs                 →   Parallel Haiku subagents for cheapness
Each layer makes the previous one more powerful. Section 1 gives you the agent. Section 2 makes it personal. Section 3 gives it reach — and turns a personal tool into a team capability.
Your Action Plan
- Set up your CLAUDE.md hierarchy — If you work in a monorepo or multi-service repo, create a CLAUDE.md at the root and at least one service-level file. Run /init in each service directory to bootstrap a draft.
- Add one Hook — Start simple: a PostToolUse hook that runs your linter every time Claude writes a file. Add it to settings.json and watch it fire on your next session.
- Connect one MCP Server — Pick the most painful context gap you have (usually: your database schema). Add the appropriate MCP server, spend 10 minutes configuring it, and never paste a schema into a prompt again.
- Create three slash commands — At minimum: /review (git diff review), /docs (doc update), and one that wraps your most repeated workflow. Start with the templates from Concept 4.
- Run one parallel task — Give Claude a task that has clearly separable parts and explicitly ask it to use subagents. Watch what happens to the time-to-complete.
- Add Claude to one CI step — Even just a claude –print diff review on PRs. The GitHub Actions template in Concept 6 is a copy-paste starting point.
- Build a complete end-to-end workflow — Pick your next feature. Use the composability diagram from Concept 7 as a checklist and run through the whole stack.
What’s Next
Section 4: Mastering the Edge Cases covers debugging Claude when it goes wrong, prompt injection defense, working with massive codebases that exceed any context window, cost optimization at scale, multi-model strategies, and the patterns that separate developers who use Claude Code from developers who truly rely on it.
Which of these 7 concepts are you most excited to try? Drop a comment below — the most-requested one gets a dedicated deep-dive post.
Follow me on LinkedIn for the Section 3 cheat sheet and the rest of the series.
Resources:
- Hooks docs: docs.anthropic.com/en/docs/claude-code/hooks
- MCP Servers: modelcontextprotocol.io and github.com/modelcontextprotocol/servers
- MCP community registry: mcp.so
- Settings reference: docs.anthropic.com/en/docs/claude-code/settings
- Previous: Section 2 — Making Claude Personal
- Next: Section 4 — Mastering the Edge Cases
Claude Code Section 3: Extending Claude’s Reach — 7 Concepts That Connect Claude to Your Entire… was originally published in Towards AI on Medium, where people are continuing the conversation by highlighting and responding to this story.