
Automate Your ML Workflow with GitHub Actions
Introduction
CI/CD refers to the process in which your development team involves frequent code changes pushed in the main branch while ensuring that it does not impact any changes made by developers working parallelly. It provides smooth and convenient management.
We will be doing CI/CD with the help of GitHub actions. GitHub Actions make it easy to automate all your software workflows now with the help of CI/CD. Build, test, and deploy your code right from GitHub. It uses YAML syntax to define the events, jobs, and steps. These files are stored in GitHub workflows, and a series of commands are automatically triggered whenever a code is pushed.
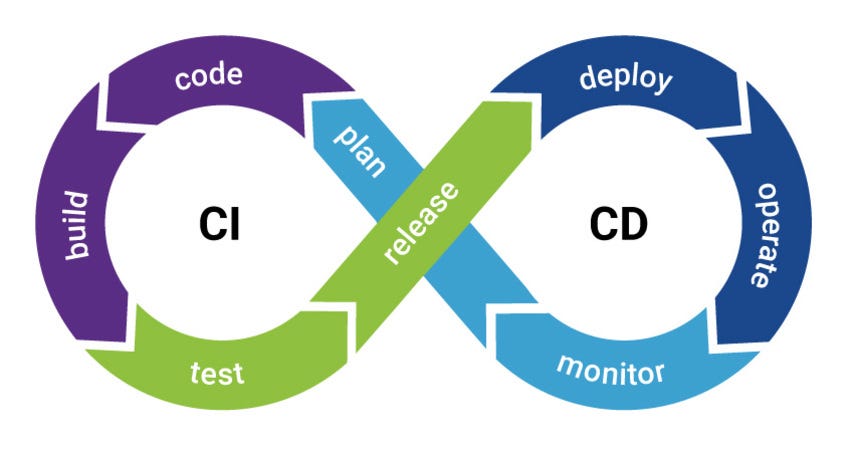
Various Stages of the CI/CD pipeline:
Build — We will compile the code in this stage.
Test — We will test the code in this stage. We can save both efforts as well as time can be saved by performing the techniques of automation.
Release — In this stage, we will release the application in our GitHub repository.
Deployment — We will deploy the application to the production environment.
Validation and compliance — Your organization’s needs determine the steps to validate a build.
What are GitHub Actions?
1. GitHub Actions help to automate tasks within the software development life cycle.
2. GitHub Actions are event-driven, i.e., we can run a series of commands after a specified event has occurred.
3. We can use GitHub Actions to automatically run your software testing scripts. An event automatically triggers the workflow, which contains a job. The job then uses steps to control the order in which actions are run. The workflow is an automated procedure that you add to your repository. Workflows are one or more jobs that can be scheduled or triggered by an event. We can use the workflow to build, test, package, release, or deploy a project on GitHub. A job is a set of steps that execute on the same runner. By default, a workflow with multiple jobs will run those jobs in parallel.

Prerequisites or Requirements
1. A machine with 256 MB of RAM, although more than 2 GB is recommended
2. GitHub account and the project repository added to GitHub, which you want to keep track of.
3. Complete information about the frameworks used in the project(along with their versions).
CI/CD using GitHub Actions for model deployment
Like I said earlier, In a previous article, we built a spam classification model and deployed it on AWS ECS. We will now automate the deployment process using GitHub actions.
First, go to your repository and create a folder path .github/workflows/name-of-your-workflow.yml. This is the YAML file that the GitHub action will use to trigger workflows. Make sure you get the name of the folders right.
The next step is to create an IAM role and an ECS task definition for our project.
Configure AWS
An IAM (Identity and Access Management) is created to delegate permissions to a user. The root user can manage the permissions level granted to a user.
Follow their official documentation and create an IAM role with full access. Save the credential somewhere safe. Now login with the IAM user and head over to ECS.
Click on the task definition you just created, go to the JSON tab, and copy the JSON file. Or run the following command in the AWS CLI.
aws ecs describe-task-definition --task-definition task-definition-name > filename.json
Now, create a .aws/task-definition.json file path in your repository.
Specify Event
The On parameter will specify the trigger event. And branch parameter defines the commitment to which branch will trigger the workflow.
name: Deploy to Amazon ECS
on:
  push:
    branches: [ "main" ]
Now we will define the environment variables.
env:
  AWS_REGION: ap-south-1                  # set this to your preferred AWS region, e.g. us-west-1
  ECS_SERVICE: custom-service                 # set this to your Amazon ECS service name
  ECS_CLUSTER: default                       # set this to your Amazon ECS cluster name
  ECS_TASK_DEFINITION: .aws/task-definition.json # set this to the path to your Amazon ECS task definition
                                               # file, e.g. .aws/task-definition.json
  CONTAINER_NAME: custom                    # set this to the name of the container in the
                                               # containerDefinitions section of your task definition
Specify Steps
Next, create a job called deploy , which consists of several steps executed in order. The first few steps will set up the environment before running the code.
jobs:
deploy:
name: Deploy
runs-on: ubuntu-latest
environment: production
steps:
- name: Checkout
uses: actions/checkout@v3
Next, configure AWS and Docker Hub credentials.
- name: Configure AWS credentials
uses: aws-actions/configure-aws-credentials@v1
with:
aws-access-key-id: ${{ secrets.AWS_ACCESS_KEY_ID }}
aws-secret-access-key: ${{ secrets.AWS_SECRET_ACCESS_KEY }}
aws-region: ${{ env.AWS_REGION }}
- name: Log in to Docker Hub
uses: docker/login-action@f054a8b539a109f9f41c372932f1ae047eff08c9
with:
username: ${{ secrets.DOCKER_USERNAME }}
password: ${{ secrets.DOCKER_PASSWORD }}
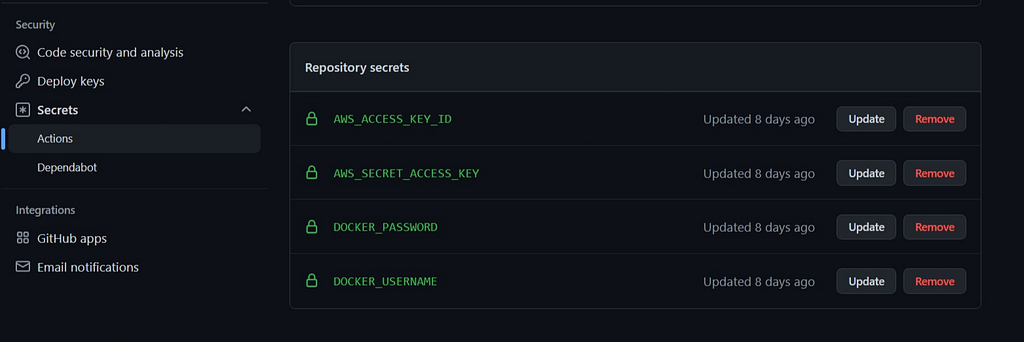
Instead of directly providing passwords, we will use GitHub secrets to encrypt our data.
Secrets are encrypted environment variables that you create in a repository. To create a secret, go to your repository and click Settings → Secrets → Actions → New repository secret.
Next, extract metadata for docker and then build and push images to docker hub.
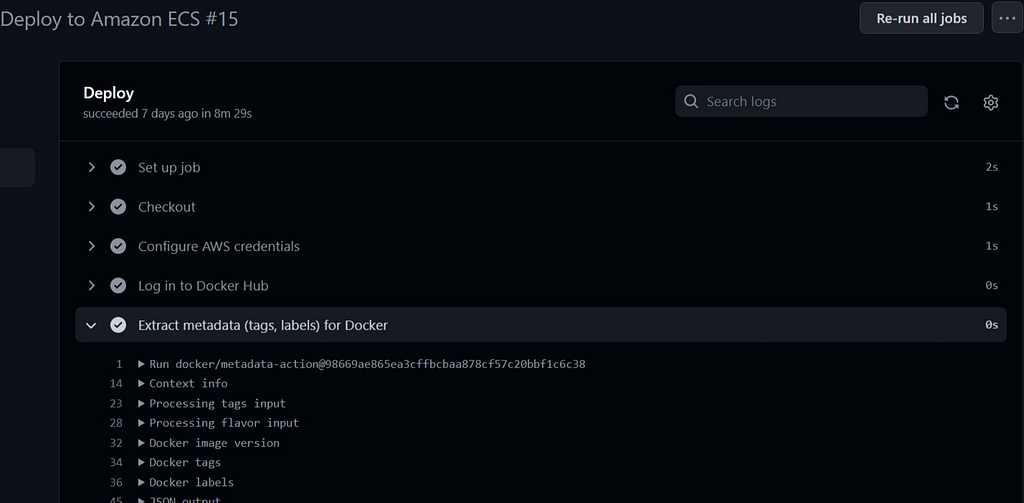
- name: Extract metadata (tags, labels) for Docker
  id: meta
  uses: docker/metadata-action@98669ae865ea3cffbcbaa878cf57c20bbf1c6c38
  with:
      images: sunilkumardash9/spam_classify #docker hub repository name
- name: Build and push Docker image
  uses: docker/build-push-action@ad44023a93711e3deb337508980b4b5e9bcdc5dc
  with:
    context: .
    push: true
    tags: ${{ steps.meta.outputs.tags }}
    labels: ${{ steps.meta.outputs.labels }}
If you are wondering,
- uses: selects an action for performing a complex task. GitHub marketplace has thousands of actions that make it easier to work with GitHub Actions.
- With: defines input parameters required by action
Next, fill in the new image id in the ECS task definition.
- name: Fill in the new image ID in the Amazon ECS task definition
  id: task-def
  uses: aws-actions/amazon-ecs-render-task-definition@v1
  with:
    task-definition: ${{ env.ECS_TASK_DEFINITION }}
    container-name: ${{ env.CONTAINER_NAME }}
    image: ${{ steps.meta.outputs.tags }}
Now, the final step is to deploy the AWS ECS task definition.
- name: Deploy Amazon ECS task definition
  uses: aws-actions/amazon-ecs-deploy-task-definition@v1
  with:
    task-definition: ${{ steps.task-def.outputs.task-definition }}
    service: ${{ env.ECS_SERVICE }}
    cluster: ${{ env.ECS_CLUSTER }}
    wait-for-service-stability: true
Review full YAML code
name: Deploy to Amazon ECS
on:
push:
branches: [ "main" ]
env:
AWS_REGION: ap-south-1 # set this to your preferred AWS region, e.g. us-west-1
# ECR_REPOSITORY: MY_ECR_REPOSITORY # set this to your Amazon ECR repository name
ECS_SERVICE: custom-service # set this to your Amazon ECS service name
ECS_CLUSTER: default # set this to your Amazon ECS cluster name
ECS_TASK_DEFINITION: .aws/task-definition.json # set this to the path to your Amazon ECS task definition
# file, e.g. .aws/task-definition.json
CONTAINER_NAME: custom # set this to the name of the container in the
# containerDefinitions section of your task definition
permissions:
contents: read
jobs:
deploy:
name: Deploy
runs-on: ubuntu-latest
environment: production
steps:
- name: Checkout
uses: actions/checkout@v3
- name: Configure AWS credentials
uses: aws-actions/configure-aws-credentials@v1
with:
aws-access-key-id: ${{ secrets.AWS_ACCESS_KEY_ID }}
aws-secret-access-key: ${{ secrets.AWS_SECRET_ACCESS_KEY }}
aws-region: ${{ env.AWS_REGION }}
- name: Log in to Docker Hub
uses: docker/login-action@f054a8b539a109f9f41c372932f1ae047eff08c9
with:
username: ${{ secrets.DOCKER_USERNAME }}
password: ${{ secrets.DOCKER_PASSWORD }}
- name: Extract metadata (tags, labels) for Docker
id: meta
uses: docker/metadata-action@98669ae865ea3cffbcbaa878cf57c20bbf1c6c38
with:
images: sunilkumardash9/spam_classify
- name: Build and push Docker image
uses: docker/build-push-action@ad44023a93711e3deb337508980b4b5e9bcdc5dc
with:
context: .
push: true
tags: ${{ steps.meta.outputs.tags }}
labels: ${{ steps.meta.outputs.labels }}
- name: Fill in the new image ID in the Amazon ECS task definition
id: task-def
uses: aws-actions/amazon-ecs-render-task-definition@v1
with:
task-definition: ${{ env.ECS_TASK_DEFINITION }}
container-name: ${{ env.CONTAINER_NAME }}
image: ${{ steps.meta.outputs.tags }}
- name: Deploy Amazon ECS task definition
uses: aws-actions/amazon-ecs-deploy-task-definition@v1
with:
task-definition: ${{ steps.task-def.outputs.task-definition }}
service: ${{ env.ECS_SERVICE }}
cluster: ${{ env.ECS_CLUSTER }}
wait-for-service-stability: true
Now, commit this to the main branch to trigger the workflow. Head over to the Actions tab on your GitHub repository. You can see all the steps getting executed in real-time.
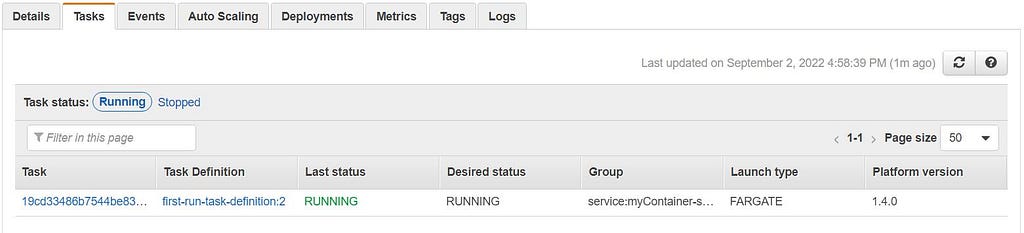
Wait until every step is completed. Now, head over to the cluster you created. Click on the tasks, and wait for a moment if it is in pending status. When it changes to running, you know your app is up and running on the server.
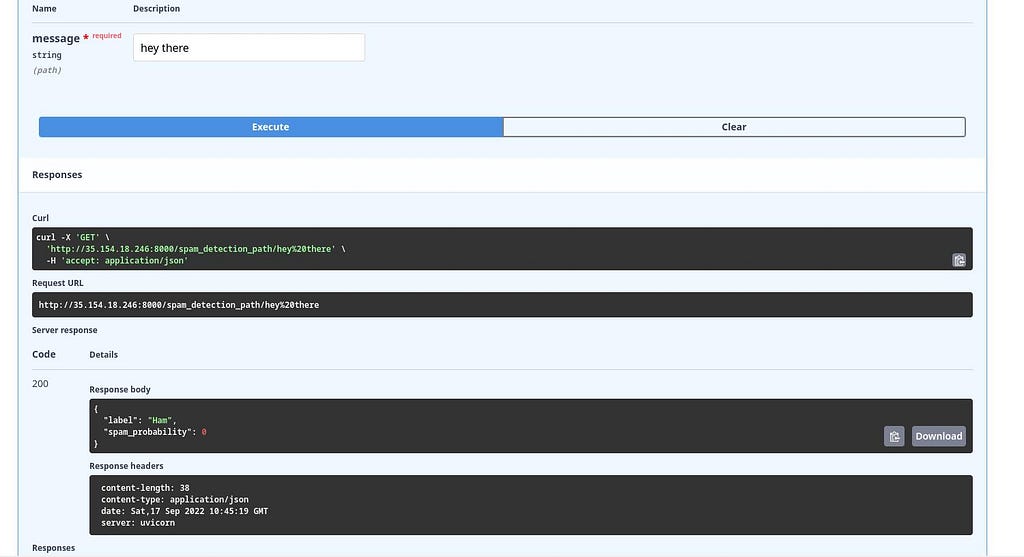
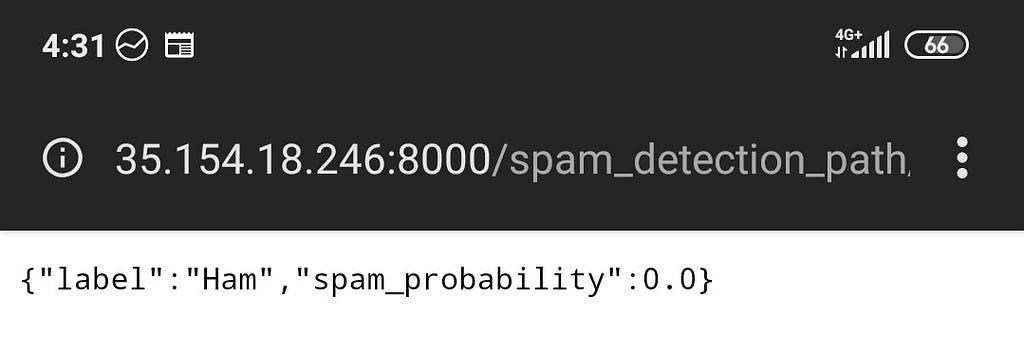
To get the IP address of your app, click on the task link, and you will see the public IP under the network section. Copy and paste it into the browser and plug your port at the end. For example http://35.154.18.246:8000/

It should show our API message.

Plug /docs at the end of the link to go to Swagger Ui and see if our app is running.
You can also access your API endpoints from a mobile browser as well.
In case you encounter any issues, you can check out the logs section ECS.

The deployment process will happen automatically when you make changes to your code.
Conclusion
Throughout the article, we discussed MlOps, CI/CD, and GitHub actions in brief and finally created a continuous model deployment pipeline. So, here are some of the key takeaways from the article.
- MlOps practices reduce friction between different data teams and streamline model deployment, building, and monitoring processes.
- CI/CD/CT are methods of automating various processes of model building, deploying, and re-training.
- GitHub Actions is a CI/CD tool that uses YAML to define workflows.
- A workflow has various jobs, and each has different steps that execute specific actions.
So, this was all about continuous deployments with GitHub actions.