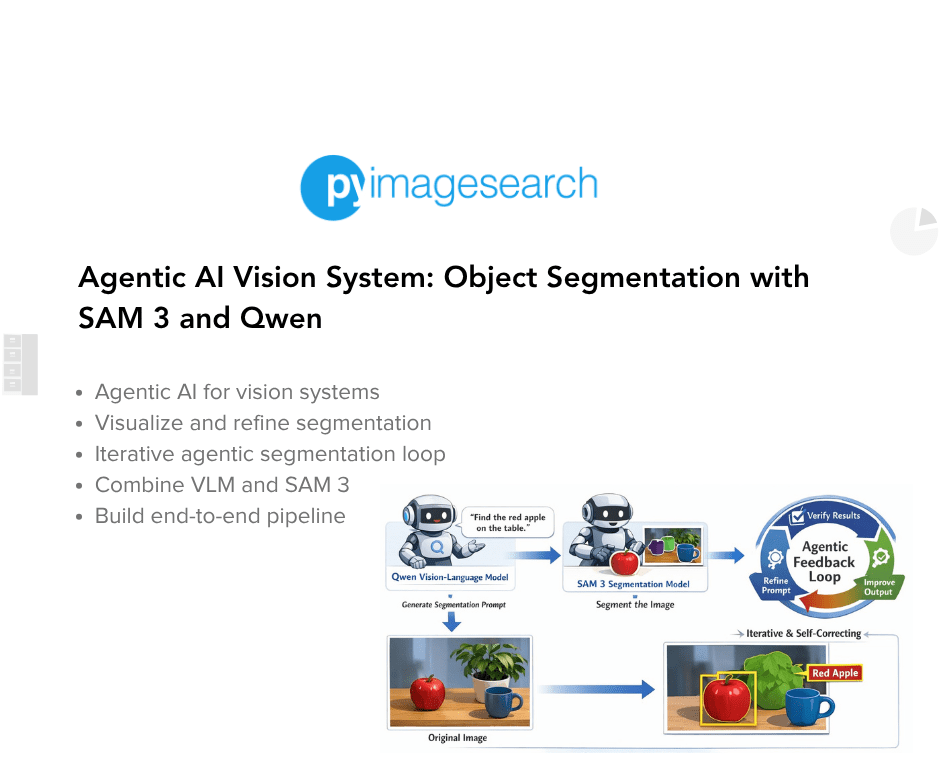
Agentic AI Vision System: Object Segmentation with SAM 3 and Qwen
Table of Contents
- Agentic AI Vision System: Object Segmentation with SAM 3 and Qwen
- Why Agentic AI Outperforms Traditional Vision Pipelines
- Why Agentic AI Improves Computer Vision and Segmentation Tasks
- What We Will Build: An Agentic AI Vision and Segmentation System
- Agentic AI Workflow: Vision-Language Reasoning and Segmentation Loop
- Agentic AI Architecture: Combining VLMs and SAM 3 for Vision
- Vision-Language Model (VLM): The Reasoning Component
- SAM 3: Open-Vocabulary Object Segmentation
- The Agentic Feedback Loop: Reasoning, Verification, and Refinement
- Why Agentic Segmentation Outperforms One-Shot Models
Agentic AI Vision System: Object Segmentation with SAM 3 and Qwen
This lesson is the 4th and final part of our series on SAM 3. In the previous parts, we built a strong foundation for concept-aware segmentation.
In Part 1, we introduced the fundamentals of SAM 3 and explored how it enables concept-based visual understanding and segmentation. We moved beyond fixed labels and used natural language to describe objects.
In Part 2, we extended this idea by introducing multi-modal prompting and interactive segmentation. We combined text, points, and bounding boxes to gain more precise control over segmentation.
In Part 3, we extended this into the temporal domain. We applied SAM 3 to videos and built systems for concept-aware segmentation and object tracking across frames.
In this final part, we take a major step forward. Instead of treating segmentation as a single-step prediction, we introduce an agentic AI system that can reason, verify, and iteratively refine its outputs.
This lesson is the last of a 4-part series on SAM 3:
- SAM 3: Concept-Based Visual Understanding and Segmentation
- Advanced SAM 3: Multi-Modal Prompting and Interactive Segmentation
- SAM 3 for Video: Concept-Aware Segmentation and Object Tracking
- Agentic AI Vision System: Object Segmentation with SAM 3 and Qwen (this tutorial)
To learn how to build an Agentic AI Vision System with SAM 3 and Qwen, just keep reading.
Why Agentic AI Outperforms Traditional Vision Pipelines
Modern computer vision systems are evolving beyond traditional pipelines.
We designed systems where:
- an image is passed to a vision model
- the model produces a prediction
- the pipeline ends there
This approach works well for clearly defined tasks. However, it struggles when tasks require understanding intent, handling ambiguity, or refining outputs.
To address this, we now transition toward agentic AI systems.
Agentic systems are not limited to a single prediction. Instead, they behave more like an iterative reasoning loop.
They can:
- interpret a user request
- select the appropriate models or tools
- evaluate intermediate outputs
- refine their decisions over multiple steps
This shift allows us to build systems that are adaptive, iterative, and self-correcting.
Why Agentic AI Improves Computer Vision and Segmentation Tasks
Vision tasks are often ambiguous.
For example, consider the instruction:
- “the bag on the leftmost side”
A traditional segmentation model cannot directly handle this:
- it expects fixed labels like “bag”
- it does not understand spatial reasoning like “leftmost”
This is where agentic design becomes powerful.
We introduce a Vision-Language Model (VLM) to:
- understand the instruction
- extract the correct intent
- translate it into a form usable by a segmentation model
Then, instead of trusting the output blindly, we:
- verify the result
- refine the input if needed
- retry the process
This creates a loop where the system continuously improves.
What We Will Build: An Agentic AI Vision and Segmentation System
In this lesson, we build an agentic segmentation system that combines reasoning with perception.
The system takes:
- an image
- a natural language instruction
and produces:
- segmentation masks
- bounding boxes
- confidence scores
- a final overlay visualization
Agentic AI Workflow: Vision-Language Reasoning and Segmentation Loop
The pipeline follows these steps:
- User Input: First, we provide an image along with a natural language instruction.
- Instruction Understanding (VLM): Next, the VLM processes both the image and the text. It extracts the core intent and converts it into a short concept.
- Concept Simplification: The system converts complex instructions into concise phrases. For example:
- “the bag on the leftmost side” → “leftmost bag”
- Segmentation (SAM3): Then, SAM3 uses this concept to generate:
- segmentation masks
- bounding boxes
- confidence scores
- Verification (VLM): After segmentation, the VLM evaluates whether the output matches the instruction.
- Refinement Loop: If the result is incorrect:
- the VLM refines the concept
- SAM3 runs again
- the process repeats
- This loop continues until the result aligns with the user’s intent.
Agentic AI Architecture: Combining VLMs and SAM 3 for Vision
Before implementing the code, we break down the system into its core components.
Vision-Language Model (VLM): The Reasoning Component
The VLM is the reasoning component of our system. It performs 3 key roles:
Instruction Understanding. It interprets the natural language input in the context of the image.
Concept Generation. It converts long instructions into short, structured phrases. For example:
- “the person wearing a red shirt” → “person red shirt”
- “the car in the background” → “background car”
This step is critical because segmentation models perform better with:
- short
- object-centric
- unambiguous phrases
Result Verification. After segmentation, the VLM checks:
- whether the correct object was segmented
- whether spatial or contextual constraints are satisfied
SAM 3: Open-Vocabulary Object Segmentation
SAM3 acts as the perception component.
Unlike traditional segmentation models, SAM3 supports:
- flexible prompts
- open-vocabulary segmentation
This means we are not restricted to predefined classes.
Given a concept phrase, SAM3 produces:
- pixel-level segmentation masks
- bounding boxes
- confidence scores
This makes SAM3 ideal for integration with a language-based reasoning system.
The Agentic Feedback Loop: Reasoning, Verification, and Refinement
The most important part of this system is the agentic loop.
Instead of a linear pipeline, we build a feedback-driven process.
Step-by-step:
- Generate a segmentation concept
- Run segmentation using SAM3
- Evaluate the output using the VLM
If the output is incorrect:
- identify what went wrong
- refine the concept
- retry segmentation
Why Agentic Segmentation Outperforms One-Shot Models
This loop introduces several important capabilities:
- Self-correction: The system can recover from incorrect predictions
- Robustness: It handles ambiguous or complex instructions better
- Generalization: It works with open-ended language instead of fixed labels
- Improved alignment: Outputs better match user intent over iterations
Final Output: Agentic Vision System with Segmentation and Reasoning
By the end of this tutorial, we build a system that:
- understands natural language instructions
- converts them into structured segmentation concepts
- performs open-vocabulary segmentation
- verifies its own outputs
- improves results through iterative refinement
This represents a shift
from:
- static, one-shot predictions
to:
- dynamic, reasoning-driven vision systems
Key Takeaway: VLM + SAM 3 = Intelligent Vision Agent
The real power of this system is not just segmentation.
It is the collaboration between models:
- the VLM provides reasoning
- SAM3 provides perception
- the loop provides intelligence
Together, they form an agentic vision system that can think, act, and improve.
Would you like immediate access to 3,457 images curated and labeled with hand gestures to train, explore, and experiment with … for free? Head over to Roboflow and get a free account to grab these hand gesture images.
Configuring Your Development Environment
To follow this guide, you need to have the following libraries installed on your system.
!pip install -q transformers accelerate pillow torch torchvision bitsandbytes
First, we install the transformers library. This library provides access to a wide range of pretrained models, including the Vision-Language Model we will use in this project.
Next, we install accelerate, which helps efficiently run large models across GPUs and manage device placement automatically.
After that, we install pillow, a lightweight Python library used for image loading and processing. We will use this library to read images and prepare them for model inference.
We also install torch, which serves as the core deep learning framework for this project. Both the Vision-Language Model and the segmentation model rely on torch for tensor computations and GPU acceleration.
Along with torch, we install torchvision, which provides datasets, transforms, and model utilities for computer vision tasks.
Finally, we install bitsandbytes. This library enables efficient memory usage when working with large models by supporting quantization and optimized GPU kernels.
The -q flag runs the installation in quiet mode, reducing unnecessary output in the notebook.
Need Help Configuring Your Development Environment?
All that said, are you:
- Short on time?
- Learning on your employer’s administratively locked system?
- Wanting to skip the hassle of fighting with the command line, package managers, and virtual environments?
- Ready to run the code immediately on your Windows, macOS, or Linux system?
Then join PyImageSearch University today!
Gain access to Jupyter Notebooks for this tutorial and other PyImageSearch guides pre-configured to run on Google Colab’s ecosystem right in your web browser! No installation required.
And best of all, these Jupyter Notebooks will run on Windows, macOS, and Linux!
Python Setup and Imports for Agentic AI Vision System
Now that our environment is ready, we import the libraries required to build our agentic vision system. These libraries will help us perform deep learning inference, process images, visualize segmentation outputs, and load the models.
import torch
import numpy as np
import os
import json
from PIL import Image, ImageDraw
import matplotlib
import matplotlib.pyplot as plt
from transformers import (
      AutoProcessor,
   Qwen2_5_VLForConditionalGeneration,
   Sam3Model,
   Sam3Processor,
)
First, we import torch. This is the primary deep learning framework used to run both the Vision-Language Model and the segmentation model. PyTorch handles tensor computations and GPU acceleration during inference.
Next, we import numpy, a popular library for numerical computing in Python. We will use NumPy when working with arrays such as segmentation masks and bounding boxes returned by the segmentation model.
After that, we import the os and json libraries. The os module helps us manage file paths and directories, while the json module allows us to parse structured responses generated by the Vision-Language Model.
Next, we import Image and ImageDraw from the Pillow library. Pillow is a lightweight image processing library that allows us to load, manipulate, and display images. In this project, we will use it to read input images and create segmentation overlays.
Then, we import matplotlib, which we will use to visualize the results. Specifically, we use matplotlib.pyplot to create figures that display the original image, bounding boxes, and segmentation masks.
Finally, we import several classes from the transformers library. These classes allow us to load and run the models used in our system.
- The
AutoProcessorclass automatically prepares inputs for multimodal models by handling both text and image preprocessing. - The
Qwen2_5_VLForConditionalGenerationclass loads the Qwen2.5-VL Vision-Language Model, which will interpret user instructions and generate segmentation prompts. - The
Sam3ModelandSam3Processorclasses load the SAM3 segmentation model and prepare its inputs.
Before loading the models, we configure PyTorch to use optimized GPU settings. These settings help improve inference performance, especially when running large multimodal models.
torch.backends.cuda.matmul.allow_tf32 = True
torch.backends.cudnn.allow_tf32 = True
device = "cuda" if torch.cuda.is_available() else "cpu"
dtype  = torch.bfloat16 if device == "cuda" else torch.float32
print(f"Using device: {device}, dtype: {dtype}")
First, we enable TensorFloat-32 (TF32) support in PyTorch. TF32 is a numerical format supported by modern NVIDIA GPUs. It allows faster matrix multiplications during deep learning inference while maintaining good numerical stability. Since large models perform many matrix operations, enabling TF32 can significantly improve performance.
Next, we determine which device will be used for inference. Here, we check whether a CUDA-enabled GPU is available. If a GPU is detected, the system runs on "cuda". Otherwise, it falls back to the CPU.
After that, we configure the tensor precision. When running on a GPU, we use bfloat16 precision. This reduces memory usage and speeds up computation while preserving enough numerical accuracy for inference tasks.
If the system runs on a CPU, we instead use the standard float32 precision, which ensures compatibility with CPU computations.
Finally, we print the device configuration. This helps confirm whether the system is using the GPU and which precision mode is active. This information is useful when debugging performance or memory issues during model inference.
Loading SAM 3 and Qwen Vision-Language Models in Transformers
Now that the environment is configured, we load the two core models used in our agentic vision system: a Vision-Language Model (VLM) and a segmentation model.
The VLM will interpret the user’s instruction and generate a clean segmentation concept. The segmentation model will then use that concept to detect and segment objects in the image.
VLM_MODEL_ID = "Qwen/Qwen2.5-VL-7B-Instruct"  # swap for Qwen/Qwen3-VL-8B once released in transformers
SAM_MODEL_ID = "facebook/sam3"

print("Loading VLM...")
vlm_processor = AutoProcessor.from_pretrained(VLM_MODEL_ID, trust_remote_code=True)
vlm_model = Qwen2_5_VLForConditionalGeneration.from_pretrained(
   VLM_MODEL_ID,
   device_map="auto",
   torch_dtype=dtype,
   trust_remote_code=True,
)
vlm_model.eval()
print("VLM loaded.")

print("Loading SAM3...")
sam_processor = Sam3Processor.from_pretrained(SAM_MODEL_ID)
sam_model = Sam3Model.from_pretrained(SAM_MODEL_ID, torch_dtype=dtype).to(device)
sam_model.eval()
print("SAM3 loaded.")
First, we define the model identifiers. These identifiers correspond to the pretrained models hosted on the Hugging Face model hub.
The Qwen2.5-VL-7B-Instruct model is a Vision-Language Model capable of understanding both images and text instructions. We will use this model to interpret the user’s request and generate segmentation prompts.
The second model, SAM3, is an open-vocabulary segmentation model that can segment objects based on text prompts.
Next, we load the Vision-Language Model. We first load the processor associated with the model. The processor prepares the inputs required by the VLM, including tokenizing text prompts and preprocessing images.
The trust_remote_code=True argument allows the Transformers library to load custom processing code provided by the model repository.
Next, we load the model itself. The from_pretrained() method downloads the pretrained model weights and initializes the model architecture.
The device_map="auto" argument automatically distributes the model across available devices, which is useful when working with large models that require GPU memory.
We also specify torch_dtype=dtype, which ensures the model runs using the precision we configured earlier: bfloat16 on GPU or float32 on CPU.
After loading the model, we switch it to evaluation mode. Evaluation mode disables training-specific behaviors such as dropout, ensuring consistent inference results.
Next, we load the segmentation model. Similar to the VLM, we first load the Sam3Processor. This processor handles preprocessing tasks such as preparing the input image and formatting segmentation prompts.
Next, we load the SAM3 model. The from_pretrained() function loads the segmentation model weights, and we move the model to the appropriate device using .to(device).
Finally, we set the model to evaluation mode. At this point, both models are fully initialized. The Vision-Language Model will interpret user instructions, while SAM3 will perform open-vocabulary segmentation based on those instructions.
Implementing VLM Inference for Agentic Vision Reasoning with Qwen2.5-VL
Now that our models are loaded, we implement a helper function that allows us to run inference using the Vision-Language Model. This function will take an image and a list of chat messages as input and return the model’s response.
In our agentic pipeline, this function plays a very important role. We will use it to:
- extract a clean segmentation prompt from the user instruction
- refine prompts if segmentation fails
- verify whether the segmentation results match the user intent
def vlm_generate(image: Image.Image, messages: list, max_new_tokens: int = 512) -> str:
   """
   Mirrors: send_generate_request()
   Runs VLM inference given a list of chat messages and returns the reply string.
   """
   text_input = vlm_processor.apply_chat_template(
       messages, tokenize=False, add_generation_prompt=True
   )
   inputs = vlm_processor(
       text=[text_input],
       images=[image],
       return_tensors="pt",
   )
   inputs = {k: v.to(vlm_model.device) for k, v in inputs.items()}
   input_len = inputs["input_ids"].shape[1]

   with torch.no_grad():
       generated_ids = vlm_model.generate(
           **inputs,
           max_new_tokens=max_new_tokens,
           do_sample=False,
       )

   new_tokens = generated_ids[0][input_len:]
   return vlm_processor.tokenizer.decode(new_tokens, skip_special_tokens=True).strip()
First, we define the function vlm_generate. This function takes three inputs:
image: the input image that the model will analyzemessages: a list of chat-style prompts used to guide the modelmax_new_tokens: the maximum number of tokens the model can generate
The function returns a string response produced by the Vision-Language Model.
Next, we convert the chat messages into the format expected by the model. Many modern Vision-Language Models use a chat-style interface similar to conversational AI systems. The apply_chat_template() method converts the list of messages into a properly formatted text prompt that the model understands.
The argument add_generation_prompt=True tells the processor that the model should generate a response after the provided messages.
Next, we prepare the inputs for the model. Here, we pass both the text prompt and the image to the processor. The processor converts these inputs into tensors that can be processed by the model. The argument return_tensors="pt" ensures the outputs are returned as PyTorch tensors.
Next, we move the tensors to the same device as the model. This step ensures that both the model and the input tensors reside on the same device, either the GPU or CPU.
After that, we store the length of the input tokens. This value helps us determine which tokens belong to the model’s generated response, rather than the original prompt.
Next, we perform inference using the model. We use torch.no_grad() to disable gradient computations. Since we are only performing inference, this reduces memory usage and improves performance.
Inside this block, we generate the model’s output. The generate() function performs autoregressive text generation. The parameter max_new_tokens limits the length of the generated response. We also set do_sample=False, which ensures deterministic outputs instead of random sampling.
Next, we extract only the tokens generated by the model. This removes the original prompt tokens, leaving only the newly generated tokens.
Finally, we convert the generated tokens into readable text. The decode() method converts token IDs back into text. We also remove special tokens and strip unnecessary whitespace.
At this point, the function returns the final response generated by the Vision-Language Model.
This function will serve as the core interface between our agentic system and the Vision-Language Model. In the next sections, we will use it to extract segmentation prompts and evaluate the outputs produced by the segmentation model.
Implementing the SAM 3 Text-Prompted Segmentation Function
Now, we implement a helper function that runs segmentation using the SAM3 model. This function will take an input image and optional prompts, run the SAM3 model, and return the segmentation results.
In our agentic pipeline, this function serves as the tool used by the agent to perform segmentation.
Specifically, it returns three important outputs:
- segmentation masks
- bounding boxes
- confidence scores
def call_sam(
   image: Image.Image,
   text_prompt: str   = None,
   input_boxes        = None,   # list of [x1,y1,x2,y2]
   input_boxes_labels = None,   # list of 0/1 labels per box
   threshold: float   = 0.5,
) -> dict:
   """
   Mirrors: call_sam_service()
   Returns dict with keys: masks, boxes, scores (all as numpy arrays).
   """
   kwargs = dict(images=image, return_tensors="pt")
   if text_prompt:
       kwargs["text"] = text_prompt
   if input_boxes is not None:
       kwargs["input_boxes"] = [input_boxes]
       kwargs["input_boxes_labels"] = [input_boxes_labels or [1] * len(input_boxes)]

   inputs = sam_processor(**kwargs).to(device)

   with torch.no_grad():
       outputs = sam_model(**inputs)

   results = sam_processor.post_process_instance_segmentation(
       outputs,
       threshold=threshold,
       mask_threshold=0.5,
       target_sizes=inputs.get("original_sizes").tolist(),
   )[0]

   return {
       "masks":  results["masks"].cpu().numpy(),                          # [N, H, W] bool
       "boxes":  results["boxes"].cpu().to(torch.float32).numpy(),        # [N, 4]    xyxy
       "scores": results["scores"].cpu().to(torch.float32).numpy(),       # [N]
   }
First, we define the function call_sam. This function accepts several inputs:
- The
imageparameter is the input image that we want to segment. - The
text_promptparameter allows us to perform concept-based segmentation. SAM3 can segment objects using natural language prompts such as"bag"or"leftmost bag". - The
input_boxesparameter allows us to guide the segmentation model using bounding boxes. Each box is defined by four coordinates: [x1, y1, x2, y2] - Similarly,
input_boxes_labelsspecifies whether each box corresponds to a positive or negative prompt. - Finally, the
thresholdparameter determines the confidence threshold used when filtering segmentation results.
Next, we prepare the inputs required by the SAM3 processor.
Here, we create a dictionary containing the image input. The return_tensors="pt" argument ensures that the processed outputs are returned as PyTorch tensors.
If a text prompt is provided, we include it in the input dictionary. This allows SAM3 to perform text-guided segmentation.
Next, we check whether bounding boxes are provided. If bounding boxes exist, we pass them to the processor along with their labels. If no labels are specified, we automatically assign positive labels (1) to all boxes.
Next, we preprocess the inputs using the SAM3 processor. The processor converts the image, prompts, and bounding boxes into tensors that the model can understand. We also move these tensors to the selected device (GPU or CPU).
Now we perform inference using SAM3. We wrap the inference step inside torch.no_grad() to disable gradient calculations. Since we are performing inference only, this improves performance and reduces memory usage. The model returns raw segmentation outputs.
Next, we convert the raw model outputs into usable segmentation results. The post_process_instance_segmentation() function performs several important tasks:
- filters predictions using the confidence threshold
- converts predicted masks to the correct image resolution
- extracts bounding boxes and scores
The [0] index retrieves the results corresponding to the input image.
Finally, we return the segmentation results. The function returns a dictionary containing three elements.
- The
masksarray contains the segmentation masks with shape: [N, H, W] where N represents the number of detected objects. - The
boxesarray contains the bounding box coordinates in the format: [x1, y1, x2, y2] - Finally, the
scoresarray contains the confidence score for each detected object.
We also move the tensors to the CPU and convert them into NumPy arrays. This makes them easier to process and visualize in later steps.
At this point, the call_sam() function provides a simple interface for running SAM3 segmentation within our agentic vision pipeline.
Implementing the Agentic AI Segmentation Pipeline with Iterative Refinement
Now we implement the core function of our system. This function orchestrates the entire agentic workflow by combining the Vision-Language Model and the segmentation model.
Instead of running segmentation only once, the system follows an agentic loop where the Vision-Language Model interprets the user request, runs segmentation, verifies the result, and refines the prompt if needed.
def run_single_image_inference(
   image_path: str,
   user_prompt: str,
   max_agent_rounds: int = 3,
   seg_threshold: float  = 0.5,
   output_dir: str       = "agent_output",
   debug: bool           = True,
) -> str | None:
   """
   Mirrors: run_single_image_inference() from sam3.agent.inference

   Agentic loop:
     Round 1 — VLM reads image + user prompt → produces a concise SAM3 concept phrase
     Round 2 — SAM3 segments with that phrase → VLM verifies / refines if needed
     Round N — repeat until VLM is satisfied or max_agent_rounds reached
   Returns path to the saved output image (or None on failure).
   """
   os.makedirs(output_dir, exist_ok=True)
   image = Image.open(image_path).convert("RGB")

   # ── Round 1: VLM extracts a clean SAM3 text prompt ──────────────────────
   extraction_messages = [
       {
           "role": "system",
           "content": (
               "You are a precise vision assistant. "
               "Your job is to convert a user's free-form description into a SHORT, "
               "clean object concept phrase suitable for an open-vocabulary segmentation model. "
               "Reply with ONLY a JSON object: {"sam_prompt": "<phrase>"}. "
               "No explanation, no markdown, just the JSON."
           ),
       },
       {
           "role": "user",
           "content": [
               {"type": "image", "image": image},
               {"type": "text",  "text": f"User description: "{user_prompt}""},
           ],
       },
   ]
The run_single_image_inference function serves as the main entry point of our agentic vision system. It accepts several inputs:
image_path: the path to the image we want to analyzeuser_prompt: the natural language description of the object to segmentmax_agent_rounds: the maximum number of refinement iterationsseg_threshold: the confidence threshold for segmentationoutput_dir: the directory where the output image will be saveddebug: a flag that enables detailed logging
The function returns the path of the saved output image or None if segmentation fails.
First, we create the output directory and load the image. The os.makedirs() function ensures that the output directory exists. If the directory already exists, the exist_ok=True argument prevents an error. Next, we open the input image using Pillow and convert it to RGB format.
Here, we define a system message that instructs the Vision-Language Model to convert the user description into a short concept phrase. The SAM3 model performs better with short noun-style prompts such as:
- leftmost bag
- red apple
- wooden chair
rather than long sentences.
We also include the user input. This message contains both the image and the user instruction.
if debug:
       print(f"n[Agent] Round 1 — extracting SAM3 prompt from: '{user_prompt}'")

   vlm_reply = vlm_generate(image, extraction_messages)
   if debug:
       print(f"[Agent] VLM raw reply: {vlm_reply}")

   # Parse the JSON; fall back to raw reply if needed
   try:
       clean = vlm_reply.strip().lstrip("```json").rstrip("```").strip()
       sam_prompt = json.loads(clean)["sam_prompt"]
   except Exception:
       sam_prompt = user_prompt  # graceful fallback
   if debug:
       print(f"[Agent] SAM3 prompt → '{sam_prompt}'")
Next, we call the VLM inference function. The Vision-Language Model analyzes the image and generates a clean segmentation prompt.
For example:
User prompt: "the bag on the leftmost side"
Model output: {"sam_prompt": "leftmost bag"}
Next, we extract the segmentation prompt from the JSON response. This step removes formatting artifacts and converts the JSON string into a Python dictionary.
If the response cannot be parsed, we fall back to the original user prompt.
# ── Agentic segmentation loop ────────────────────────────────────────────
   sam_result = None
   final_prompt = sam_prompt

   for round_idx in range(max_agent_rounds):
       if debug:
           print(f"n[Agent] Round {round_idx + 2} — calling SAM3 with '{final_prompt}'")

       sam_result = call_sam(image, text_prompt=final_prompt, threshold=seg_threshold)
       n_masks = len(sam_result["masks"])
       if debug:
           print(f"[Agent] SAM3 found {n_masks} instance(s)")
Now we begin the agentic segmentation loop. Here, we initialize two variables:
sam_result: stores the segmentation outputfinal_prompt: stores the prompt used for segmentation
Next, we enter the iterative loop. This loop allows the system to refine segmentation prompts up to a maximum number of rounds.
Inside the loop, we call the SAM3 segmentation function. This function returns segmentation results including masks, bounding boxes, and confidence scores.
Next, we count the number of detected objects. This value helps determine whether the segmentation succeeded.
       # ── Verification: ask VLM if the result looks right ─────────────────
       if n_masks == 0:
           # No masks found — ask VLM to rephrase
           refine_messages = [
               {
                   "role": "system",
                   "content": (
                       "You are a vision assistant helping refine segmentation prompts. "
                       "The segmentation model found NO objects. "
                       "Suggest a simpler or broader alternative concept phrase. "
                       "Reply ONLY with JSON: {"sam_prompt": "<phrase>"}."
                   ),
               },
               {
                   "role": "user",
                   "content": [
                       {"type": "image", "image": image},
                       {"type": "text",  "text": (
                           f"Original user intent: "{user_prompt}". "
                           f"Failed prompt: "{final_prompt}". "
                           "Suggest a better phrase."
                       )},
                   ],
               },
           ]
           vlm_reply = vlm_generate(image, refine_messages)
           if debug:
               print(f"[Agent] VLM refine reply: {vlm_reply}")
           try:
               clean = vlm_reply.strip().lstrip("```json").rstrip("```").strip()
               final_prompt = json.loads(clean)["sam_prompt"]
           except Exception:
               break  # give up if we can't parse
If SAM3 fails to detect any objects, we ask the Vision-Language Model to refine the segmentation prompt. We construct a new prompt asking the model to generate a simpler or broader concept phrase.
For example:
Original prompt: "leftmost brown grocery bag"
Suggested prompt: "bag"
The VLM then generates a new segmentation prompt, and the loop repeats.
else:
           # We have masks — ask VLM to verify they match the user intent
           verify_messages = [
               {
                   "role": "system",
                   "content": (
                       "You are a vision QA assistant. "
                       "Given the original user intent and the segmentation result metadata, "
                       "decide if the segmentation is correct. "
                       "Reply ONLY with JSON: {"ok": true/false, "reason": "...", "sam_prompt": "<refined phrase if not ok>"}."
                   ),
               },
               {
                   "role": "user",
                   "content": [
                       {"type": "image", "image": image},
                       {"type": "text",  "text": (
                           f"User intent: "{user_prompt}".n"
                           f"SAM3 was given prompt: "{final_prompt}".n"
                           f"Result: {n_masks} mask(s) found, "
                           f"scores: {sam_result['scores'].tolist()}, "
                           f"boxes: {sam_result['boxes'].tolist()}.n"
                           "Is this correct? If yes, ok=true. If not, provide a better sam_prompt."
                       )},
                   ],
               },
           ]
           vlm_reply = vlm_generate(image, verify_messages, max_new_tokens=256)
           if debug:
               print(f"[Agent] VLM verify reply: {vlm_reply}")
           try:
               clean = vlm_reply.strip().lstrip("```json").rstrip("```").strip()
               verdict = json.loads(clean)
               if verdict.get("ok", True):
                   if debug:
                       print("[Agent] VLM verified result ✓ — stopping.")
                   break
               else:
                   final_prompt = verdict.get("sam_prompt", final_prompt)
                   if debug:
                       print(f"[Agent] VLM says not ok → retrying with '{final_prompt}'")
           except Exception:
               break  # can't parse verdict, accept current result
If SAM3 successfully detects objects, we verify whether the result matches the user intent.
In this step, we ask the Vision-Language Model to evaluate the segmentation results.
The model receives:
- the original user instruction
- the segmentation prompt used
- the number of detected masks
- the confidence scores
- the bounding boxes
Based on this information, the model decides whether the segmentation result is correct.
The model returns a JSON response such as:
{
"ok": true,
"reason": "correct object detected"
}
or
{
"ok": false,
"sam_prompt": "bag"
}
If the segmentation is incorrect, the system updates the segmentation prompt. The loop then repeats using the new prompt. If the segmentation result is correct, the loop stops. This verification step allows the system to self-correct its segmentation decisions.
   # ── Render and save output ───────────────────────────────────────────────
   if sam_result is None or len(sam_result["masks"]) == 0:
       print("[Agent] No masks produced — check your prompt or image.")
       return None

   output_path = os.path.join(
       output_dir,
       os.path.splitext(os.path.basename(image_path))[0] + "_segmented.png"
   )
   _save_overlay(image, sam_result, output_path, title=f'"{user_prompt}"')
   print(f"n[Agent] Output saved → {output_path}")
   return output_path
After the agentic loop finishes, we check whether segmentation succeeded. If no objects were detected, the function returns None. Otherwise, we generate the output image path.
Finally, we visualize the segmentation results. This function creates an image containing the segmentation masks and bounding boxes. The result is saved to disk.
This function implements the agentic reasoning loop that makes our system powerful.
Instead of relying on a single segmentation attempt, the system:
- interprets the user request
- generates a segmentation prompt
- runs segmentation
- evaluates the results
- refines the prompt if necessary
This iterative process allows the system to produce more accurate results and demonstrates how multiple AI models can collaborate within an agentic vision pipeline.
Visualizing and Saving the Segmentation Results
After running the agentic segmentation pipeline, we want to visualize the results in a clear and interpretable way. For this purpose, we implement a helper function that overlays the segmentation masks and bounding boxes on top of the original image.
This function generates a side-by-side visualization showing both the detected bounding boxes and the segmentation masks.
def _save_overlay(image: Image.Image, sam_result: dict, output_path: str, title: str = ""):
   masks  = sam_result["masks"]
   boxes  = sam_result["boxes"]
   scores = sam_result["scores"]

   fig, axes = plt.subplots(1, 2, figsize=(16, 8))

   # Left: original + boxes
   axes[0].imshow(image)
   axes[0].set_title(f"Detected boxes  |  {title}", fontsize=11)
   axes[0].axis("off")
   cmap = matplotlib.colormaps.get_cmap("rainbow").resampled(max(len(masks), 1))
   for i, (box, score) in enumerate(zip(boxes, scores)):
       x1, y1, x2, y2 = box
       color = cmap(i)[:3]
       rect = plt.Rectangle(
           (x1, y1), x2 - x1, y2 - y1,
           linewidth=2, edgecolor=color, facecolor="none"
       )
       axes[0].add_patch(rect)
       axes[0].text(x1, y1 - 4, f"{score:.2f}", color=color, fontsize=9, fontweight="bold")

   # Right: mask overlay
   composite = image.convert("RGBA")
   for i, mask in enumerate(masks):
       color = tuple(int(c * 255) for c in cmap(i)[:3])
       mask_img = Image.fromarray((mask * 255).astype(np.uint8))
       overlay  = Image.new("RGBA", composite.size, color + (0,))
       overlay.putalpha(mask_img.point(lambda v: int(v * 0.5)))
       composite = Image.alpha_composite(composite, overlay)

   axes[1].imshow(composite)
   axes[1].set_title(f"SAM3 masks  ({len(masks)} instance(s))", fontsize=11)
   axes[1].axis("off")

   plt.tight_layout()
   plt.savefig(output_path, dpi=150, bbox_inches="tight")
   plt.close()
We begin by defining the _save_overlay function, which takes the original image, the segmentation output from SAM3, the output path, and an optional title. From the segmentation results, we extract the masks, bounding boxes, and confidence scores. The masks represent pixel-level regions for each detected object, the boxes define object boundaries, and the scores indicate how confident the model is for each detection.
To visualize these results, we create a figure with two side-by-side panels. The left panel displays the original image along with bounding boxes, while the right panel shows the segmentation masks overlaid on the image.
The process starts by rendering the original image and assigning a distinct color to each detected object using a colormap. For every detection, we draw a rectangle corresponding to its bounding box and place the confidence score near it. This provides a quick overview of what the model has detected and how reliable those detections are.
For the mask visualization, the image is first converted to RGBA format so that transparent overlays can be applied. Each segmentation mask is then assigned a color, converted into an image, and used to create a semi-transparent overlay. These overlays are composited onto the original image, allowing the segmented regions to stand out while still preserving the underlying content.
The final composite is displayed in the second panel, along with the number of detected instances. The visualization is then saved to disk using a resolution of 150 DPI for clarity, with tight_layout() ensuring proper spacing and bbox_inches="tight" removing unnecessary margins. The figure is closed afterward to free up memory.
This results in a clean and intuitive visualization that combines bounding boxes, confidence scores, and segmentation masks, making it easy to verify the model’s predictions.
Running the Agentic AI Vision System on Real Images
Now that we have implemented all the components of our pipeline, we can run the complete agentic vision system on an example image.
In this step, we provide an image along with a natural language instruction and let the system handle the rest.
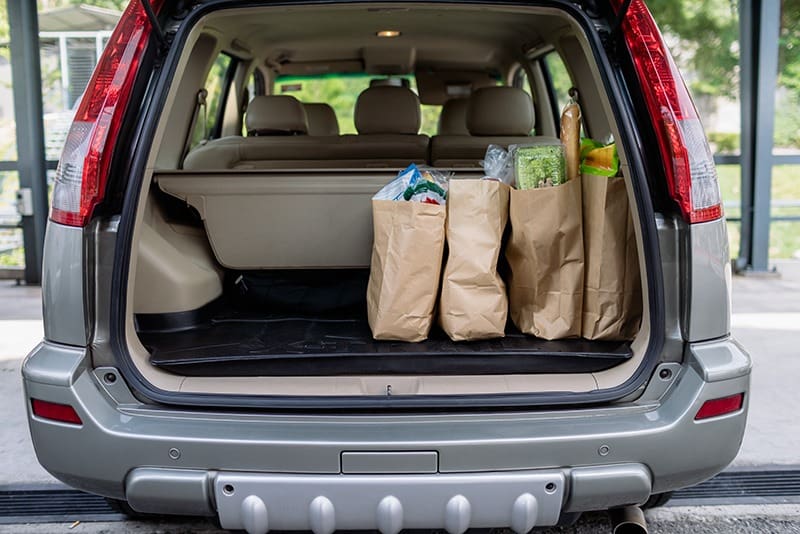
output_image_path = run_single_image_inference(
   image_path  = "/content/groceries.jpg",
   user_prompt = "the bag on the leftmost side",
   max_agent_rounds = 3,
   seg_threshold    = 0.5,
   output_dir       = "agent_output",
   debug            = True,
)

if output_image_path:
   img = Image.open(output_image_path)
   img.show()
We begin by calling the run_single_image_inference() function, which executes the complete agentic pipeline. The input image is provided through the image_path parameter, and in this example, we use groceries.jpg. Along with the image, we pass a natural language instruction — “the bag on the leftmost side”. This instruction is intentionally written in free-form language to demonstrate how the system can interpret human-like queries.
The pipeline is configured to allow up to three refinement iterations using max_agent_rounds=3. A confidence threshold of 0.5 is used to filter segmentation results, and the final output is saved to the agent_output directory. Debugging is enabled to log intermediate steps such as prompt generation, segmentation outputs, and verification decisions.
Once the pipeline runs, it returns the path to the output image if segmentation is successful. We then load this image using Pillow and display it. The final visualization includes bounding boxes around detected objects, segmentation masks overlaid on the image, and confidence scores for each detection.
Under the hood, the system follows an iterative process. The Vision-Language Model first analyzes the image and converts the user’s instruction into a concise segmentation prompt. This prompt is passed to SAM3, which generates segmentation masks. The result is then evaluated by the Vision-Language Model to determine whether it matches the user’s intent. If the output is not satisfactory, the prompt is refined and the process repeats. Once the result is verified, the system produces the final visualization and saves it to disk.
Agentic Segmentation Output: Iterative Prompt Refinement in Action
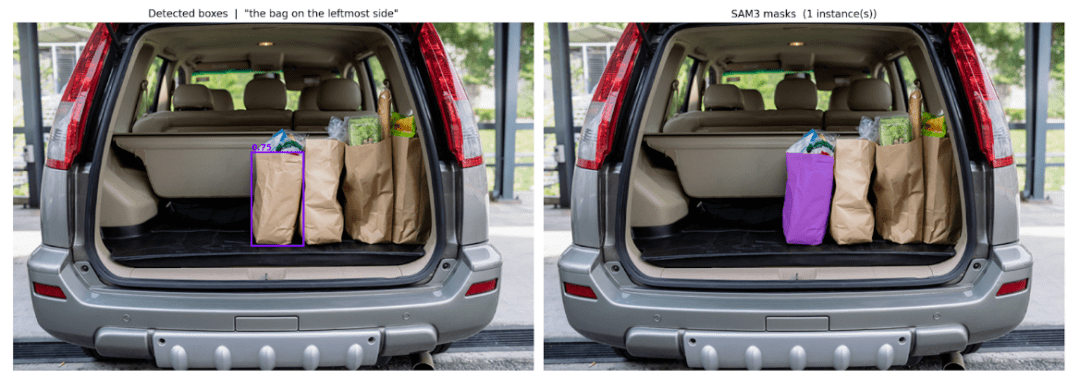
The input image (Figure 1) shows multiple grocery bags placed inside the trunk of a car.
We provide the following natural language instruction:
"the bag on the leftmost side"
This instruction is not a fixed label. Instead, it includes spatial reasoning, which makes the task more challenging for standard segmentation models.
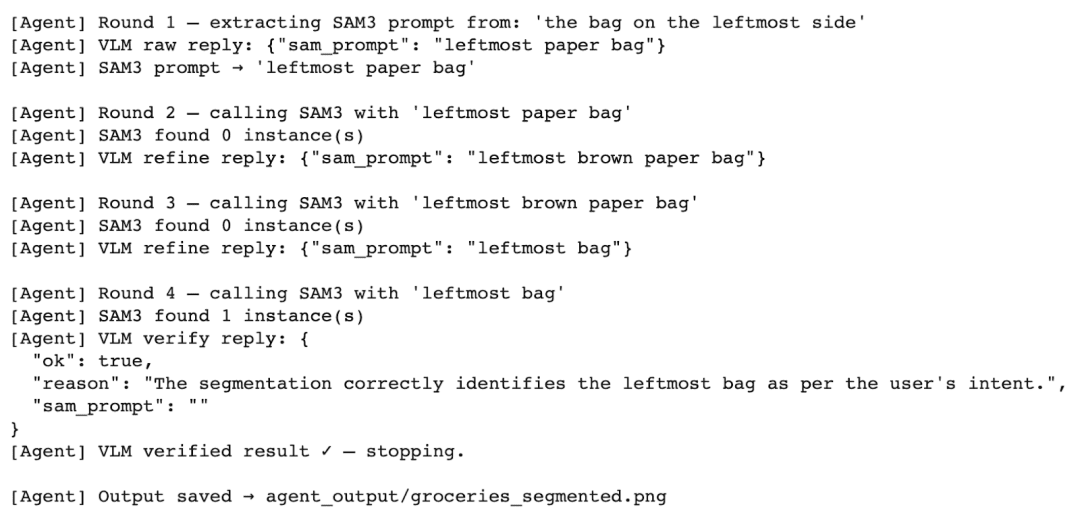
Now let’s examine how the system processes this instruction.
[Agent] Round 1 — extracting SAM3 prompt from: 'the bag on the leftmost side'
[Agent] VLM raw reply: {"sam_prompt": "leftmost paper bag"}
First, the Vision-Language Model interprets the instruction and generates an initial segmentation prompt:
[Agent] SAM3 prompt -> 'leftmost paper bag'

[Agent] Round 2 — calling SAM3 with 'leftmost paper bag'
[Agent] SAM3 found 0 instance(s)
Next, SAM3 attempts segmentation using this prompt.
However, no objects are detected.
This shows an important limitation: SAM3 is sensitive to how the prompt is phrased.
[Agent] VLM refine reply: {"sam_prompt": "leftmost brown paper bag"}
The system does not stop here.
Instead, the Vision-Language Model refines the prompt by adding more descriptive information.
[Agent] Round 3 — calling SAM3 with 'leftmost brown paper bag'
[Agent] SAM3 found 0 instance(s)
Again, SAM3 fails to detect any objects.
At this point, we observe something important: More detailed prompts do not always improve segmentation.
[Agent] VLM refine reply: {"sam_prompt": "leftmost bag"}
Now, the model simplifies the prompt.
This step is critical. Instead of making the prompt more complex, the system makes it more general.
[Agent] Round 4 — calling SAM3 with 'leftmost bag'
[Agent] SAM3 found 1 instance(s)
This time, SAM3 successfully detects the object.
[Agent] VLM verify reply: {
 "ok": true,
 "reason": "The segmentation correctly identifies the leftmost bag as per the user's intent."
 "sam_prompt": ""
}
Finally, the Vision-Language Model verifies the result and confirms that the segmentation is correct.
The agentic loop stops here, and the system saves the final output image with a bounding box and segmentation mask overlaid on the input image.
The output image (Figure 3) shows:
- the detected bounding box around the leftmost bag
- the segmentation mask highlighted in color
- the correct object selected based on the user’s instruction
What’s next? We recommend PyImageSearch University.
86+ total classes • 115+ hours hours of on-demand code walkthrough videos • Last updated: April 2026
★★★★★ 4.84 (128 Ratings) • 16,000+ Students Enrolled
I strongly believe that if you had the right teacher you could master computer vision and deep learning.
Do you think learning computer vision and deep learning has to be time-consuming, overwhelming, and complicated? Or has to involve complex mathematics and equations? Or requires a degree in computer science?
That’s not the case.
All you need to master computer vision and deep learning is for someone to explain things to you in simple, intuitive terms. And that’s exactly what I do. My mission is to change education and how complex Artificial Intelligence topics are taught.
If you’re serious about learning computer vision, your next stop should be PyImageSearch University, the most comprehensive computer vision, deep learning, and OpenCV course online today. Here you’ll learn how to successfully and confidently apply computer vision to your work, research, and projects. Join me in computer vision mastery.
Inside PyImageSearch University you’ll find:
- ✓ 86+ courses on essential computer vision, deep learning, and OpenCV topics
- ✓ 86 Certificates of Completion
- ✓ 115+ hours hours of on-demand video
- ✓ Brand new courses released regularly, ensuring you can keep up with state-of-the-art techniques
- ✓ Pre-configured Jupyter Notebooks in Google Colab
- ✓ Run all code examples in your web browser — works on Windows, macOS, and Linux (no dev environment configuration required!)
- ✓ Access to centralized code repos for all 540+ tutorials on PyImageSearch
- ✓ Easy one-click downloads for code, datasets, pre-trained models, etc.
- ✓ Access on mobile, laptop, desktop, etc.
Summary
In this lesson, we built an agentic AI vision system that combines a Vision-Language Model with a segmentation model to solve a real-world problem.
Instead of relying on a single model, we designed a pipeline where multiple components work together in a loop. This allows the system to not only perform segmentation, but also understand instructions, evaluate results, and improve itself automatically.
First, we used a Vision-Language Model to interpret the user’s natural language query and convert it into a clean segmentation prompt.
Next, we used SAM3 to perform open-vocabulary segmentation using that prompt.
Then, we introduced an agentic loop where the Vision-Language Model verifies the segmentation output and refines the prompt if necessary.
Finally, we visualized the results by overlaying bounding boxes and segmentation masks on the original image.
This approach highlights an important shift in computer vision. Instead of building static pipelines, we are now moving toward interactive and self-correcting systems that can adapt to user intent.
Such systems can be extended to a wide range of applications, including:
- interactive image editing
- robotics and autonomous perception
- visual assistants
- multimodal search systems
In the future, we can further improve this system by:
- adding support for multiple images or video inputs
- integrating more tools into the agent loop
- introducing memory for long-term reasoning
- optimizing inference for real-time applications
By combining Vision-Language Models with powerful segmentation models, we take a step closer to building intelligent visual systems that can understand and act on human instructions.
This represents the foundation of next-generation AI systems.
Citation Information
Thakur, P. “Agentic AI Vision System: Object Segmentation with SAM 3 and Qwen,” PyImageSearch, S. Huot, G. Kudriavtsev, and A. Sharma, eds., 2026, https://pyimg.co/ohlwd
@incollection{Thakur_2026_building-an-agentic-ai-vision-system-with-sam-3-and-qwen,
  author = {Piyush Thakur},
  title = {{Agentic AI Vision System: Object Segmentation with SAM 3 and Qwen}},
  booktitle = {PyImageSearch},
  editor = {Susan Huot and Georgii Kudriavtsev and Aditya Sharma},
  year = {2026},
  url = {https://pyimg.co/ohlwd},
}
To download the source code to this post (and be notified when future tutorials are published here on PyImageSearch), simply enter your email address in the form below!

Download the Source Code and FREE 17-page Resource Guide
Enter your email address below to get a .zip of the code and a FREE 17-page Resource Guide on Computer Vision, OpenCV, and Deep Learning. Inside you’ll find my hand-picked tutorials, books, courses, and libraries to help you master CV and DL!
The post Agentic AI Vision System: Object Segmentation with SAM 3 and Qwen appeared first on PyImageSearch.