
Fine-tune LLM with Databricks Unity Catalog and Amazon SageMaker AI
When you fine-tune large language models (LLMs) with Amazon SageMaker AI while using Databricks Unity Catalog, you might face unique challenges like how to maintain strict data governance while using best-in-class machine learning (ML) services.
Unity Catalog governs metadata and permissions, while the underlying data resides in Amazon Simple Storage Service (Amazon S3) when you choose AWS as the cloud environment for their Databricks Workspace. When SageMaker AI Training job accesses that data, you must preserve and not bypass the Unity Catalog’s fine-grained authorization model. Without a structured integration pattern, you risk inconsistent policy enforcement, audit gaps, and compliance exposure. For example, if SageMaker AI Training jobs bypass Unity Catalog’s authorization model when reading S3 objects, you lose visibility into which data trained which models. This creates critical compliance risks particularly in regulated industries and production workloads.
In this post, we demonstrate how to build a secure, complete LLM fine-tuning workflow that integrates Unity Catalog with Amazon SageMaker AI using Amazon EMR Serverless for preprocessing. The solution shows how to securely access governed data, maintain lineage across services, fine-tune the Ministral-3-3B-Instruct model, and register trained artifacts back into Unity Catalog. With this approach, you can continue using your existing services while preserving central governance, tracking data lineage without compromising security or compliance requirements.
Solution overview
The workflow described in this post accomplishes the following:
- Reads training data from a Unity Catalog managed table with proper governance controls
- Preprocesses the data using EMR Serverless with Apache Spark
- Fine-tunes a Ministral-3-3B-Instruct model using SageMaker AI Training jobs
- Tracks data lineage in Unity Catalog from source data through to the trained model
The following diagram illustrates the architecture:
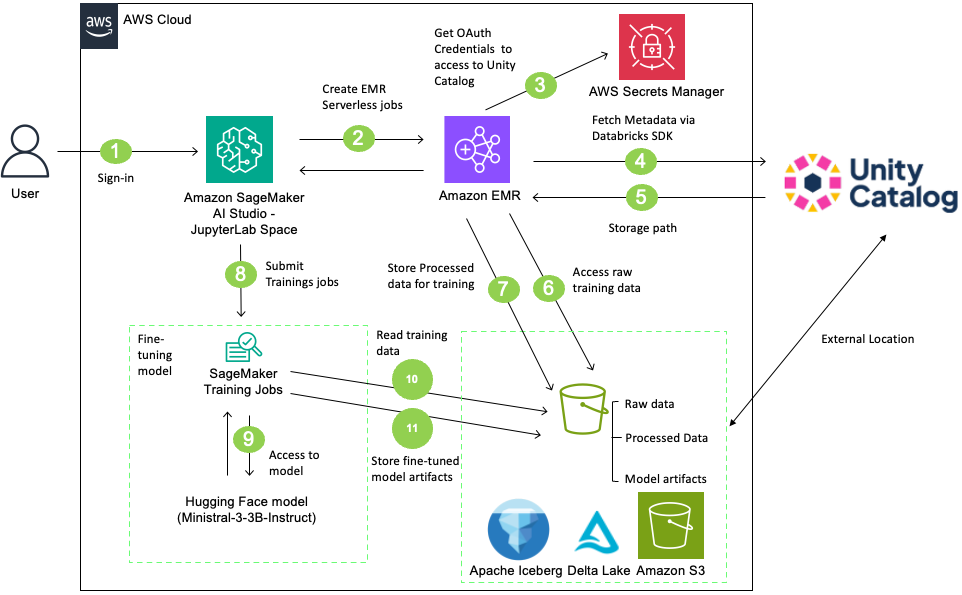
Figure 1: Solution architecture showing data flow between SageMaker AI Studio, EMR Serverless, and Databricks Unity Catalog
| Component | Purpose |
| Amazon SageMaker AI Studio – JupyterLab Space | Workflow orchestration and model training |
| Amazon EMR Serverless | Spark-based data preprocessing without cluster management |
| Databricks Unity Catalog | Metadata catalog, governance, and lineage tracking |
| Hugging Face | Access to pre-trained models |
| Amazon S3 | Storage for data and model artifacts |
| AWS Secrets Manager | Credential management |
In this solution, users sign in to SageMaker AI Studio and initiate data preprocessing using an EMR Serverless job. The EMR Serverless job accesses and processes data from a Unity Catalog-managed S3 bucket using Unity Catalog’s Open REST APIs with OAuth credentials stored in AWS Secrets Manager. After processing the data, create a table in the Unity Catalog with the processed data. Then, SageMaker AI training job retrieves the Ministral-3-3B-Instruct model from Hugging Face, fine-tunes it on the processed table, and stores the resulting model artifacts back to the Unity Catalog-managed S3 bucket. Finally, register the model in Unity Catalog and create external data lineage. This complete workflow integrates SageMaker AI, EMR Serverless, and Databricks Unity Catalog for governed, scalable LLM fine-tuning.
Prerequisites
Before you begin, verify that you have the following:
| Service | Requirement | Details |
| AWS | AWS Account | Permissions for following AWS Services
|
| Amazon VPC | VPC and security groups configured with internet access | |
| Databricks | Set up Unity Catalog for Workspace | Set up Unity Catalog for your Workspace. |
| Set up External Access | Set up external data access on your Metastore. This option is turned off by default. | |
| Generate OAuth Credentials | Create OAuth credentials (Client ID and secret) for programmatic access to Databricks. |
Walkthrough
This section walks through the complete process for fine-tuning LLM using data that Unity Catalog governs. Download the complete notebook LLM_Finetunig_SageMaker_AI_Unity_Catalog.ipynb and run it in SageMaker AI Studio using the following steps:
- Navigate to the Amazon SageMaker AI Console.
- Create a SageMaker Studio Domain using Quick Setup (if you don’t have existing domain).
- Log in to SageMaker AI Studio.
- Create a JupyterLab Space with the following configuration
- Instance Type: ml.m5.2xlarge
- Image: Sagemaker Distribution 3.8.0
- Storage: 5 GB
- Upload the downloaded Jupyter notebook.
- Open the notebook (select Python3 (ipykernel) as the kernel).
The following sections outline the key steps at a high level. Refer to the notebook for the full code implementation.
Step 1: AWS setup
By the end of this step, you complete following setups.
| Requirement | Details |
| Amazon S3 Buckets | Create an S3 Bucket that will be managed by Unity Catalog and Upload data |
| AWS Secrets Manager | Create a Secret to store Databricks OAuth credentials |
| AWS IAM Roles | Create a SageMaker AI Execution Role and EMR Serverless job runtime Role |
S3 bucket setup / Upload dataset
The notebook uses SEC EDGAR (U.S. Securities and Exchange Commission Electronic Data Gathering, Analysis, and Retrieval) filings data for LLM fine-tuning. SEC EDGAR is the SEC’s public database of corporate filings. The solution fetches 10-K and 10-Q forms for S&P 500 companies from 2023–2024 through SEC’s public APIs, downloads filing documents, extracts the Risk Factors section, and uploads the data to an Amazon S3 bucket. Files are stored in JSON format, with each record containing the company identifier (CIK), ticker symbol, entity name, filing type, fiscal period, and the full text of risk factor disclosures where companies describe potential business, financial, regulatory, and operational risks. After uploading the data, you see the following structure within your S3 bucket:
| s3://aws-blog-smai-uc-bucket-ACCOUNTID/ ├── raw/ │ └── risk_factors/ │ ├── form_type=10-K/ │ │ └── fiscal_year=2024/ │ │ └── cik=0000320193/ │ │ └── risk_factors.json │ └── form_type=10-Q/ │ └── fiscal_year=2024/ │ └── quarter=1/ │ └── cik=0000320193/ │ └── risk_factors.json ├── curated/ │ └── ml/ |
Store Databricks credentials
Databricks supports multiple authentication and authorization methods to control access to your resources. This solution uses OAuth for service principals (OAuth M2M), which provides short-lived OAuth tokens for service principals. Using OAuth 2.0 is the preferred auth protocol for accessing Databricks outside the console. The OAuth authorization requires client id and client secret. When a service principal authenticates and is granted consent, OAuth issues an access token for the SDK or other tool to use. First, create a Service Principal and generate a OAuth Secret by following the Databricks documentation. Then, store the client id and secret in AWS Secrets Manager to securely manage and retrieve the credentials.
Create IAM roles
In the later steps, you use EMR Serverless Job and SageMaker AI Training jobs. Both require IAM role to access other AWS services and execute the jobs. Review Job runtime roles for Amazon EMR Serverless and How to use SageMaker AI execution roles to learn more about how EMR Serverless jobs and SageMaker AI work with IAM. The following are sample IAM policies for each IAM role. Refer the the section 1-4 Create IAM Roles of the notebook for the full implementation guidance.
EMR Serverless Runtime Role
SageMaker AI Execution Role policy
Step 2: Databricks Unity Catalog setup
Next, complete the following setup steps on the Databricks Unity Catalog side and confirm access to the Unity Catalog table through the Databricks SDK.
| Requirement | Details |
| Configure External Location | Register your S3 bucket as an External Location in Unity Catalog to setup access to the data in S3. |
| Create Unity Catalog database objects | Set up the following database objects in your Unity Catalog environment:
|
| Grant Permissions |
Grant necessary privileges to your Service Principal. Required Permissions:
|
Upon completion, you have the following Unity Catalog structure with the appropriate permissions configured for your service principal:
| UNITY_CATALOG_NAME ├── UNITY_SCHEMA_DATA (raw) │ └── UNITY_TABLE_NAME (external table pointing to UC_MANAGED_BUCKET/raw/) ├── UNITY_SCHEMA_TRAINING (curated) │ └── (processed training data) └── UNITY_SCHEMA_MODEL (ml) └── (model artifacts and versions) |
After the Unity Catalog setup, initialize your Databricks client and test the connection to Unity Catalog before proceeding to the next steps. The notebook uses AWS Secrets Manager to retrieve the client ID and secret. After successful authentication, you can retrieve Unity Catalog table details, such as the storage location and table format.
# Initialize Databricks client
from databricks.sdk import WorkspaceClient

w = WorkspaceClient(
    host=UNITY_WORKSPACE_URL,
    client_id=DATABRICKS_CLIENT_ID,
    client_secret=DATABRICKS_CLIENT_SECRET
)

table_info = w.tables.get(f"{UNITY_CATALOG_NAME}.{UNITY_SCHEMA_DATA}.{UNITY_TABLE_NAME}")
print(f"Table: {table_info.name}")
print(f"Storage Location: {table_info.storage_location}")
print(f"Table Format: {table_info.data_source_format}")

Output:
Table: risk_factors
Storage Location: s3:// aws-blog-smai-uc-bucket-ACCOUNTID/raw/risk_factors
Table Format: DataSourceFormat.DELTA
Step 3: EMR Serverless application setup
In this step, you create an EMR Serverless application using a VPC with internet access. The solution first identifies the S3 bucket location from Unity Catalog, then the EMR Serverless job reads from and writes to the Delta table in that S3 bucket. Because EMR Serverless doesn’t include Delta Lake support by default as of February 2026, the Spark application must download Delta Lake JAR files from the Maven Central repository over to the internet during the initialization phase. Without the internet access, this download will fail and the Spark application can’t resolve the Delta table format, causing the job to fail at startup. Configure your EMR Serverless application to use existing subnets with internet access or refer to section 1.4 Setup VPC and Internet Access of the notebook to set this up.
Step 4: Data pre-processing with EMR Serverless job
Next, create a preprocessing script and submit an EMR Serverless job. The preprocessing script reads SEC EDGAR risk factors from a Delta table, filters and cleans the text data, formats it into an instruction-style prompt for fine-tuning, and writes the processed results as a Delta table to S3.
Configure sparkSubmitParameters in your EMR Serverless job Spark configurations to download the Delta Lake library from Maven Central repository and set up the Delta-specific SQL extensions and catalog configurations as below. These parameters allow the EMR Serverless Spark application to read and write Delta tables in S3 for data preprocessing. Refer the section 4-3 Submit EMR jobs of the notebook for the full code implementation.
After the EMR Serverless job completes, register the preprocessed training data as a Delta table in Unity Catalog’s curated schema, pointing to the processed data in S3. Execute SQL statements through a Databricks Serverless SQL warehouse using the Databricks SDK, creating a table in the curated schema within Unity Catalog.
Step 5: Fine-tuning with SageMaker AI Training job
After preparing the dataset for training, use a SageMaker AI training job to fine-tune an LLM. This solution uses the pre-trained Ministral-3-3B-Instruct-2512 model hosted on Hugging Face. It’s a compact 3-billion-parameter instruction-following model from Mistral AI, designed for efficient deployment while maintaining strong performance on reasoning tasks.
To set up the SageMaker AI training job, first create a training script and upload it to S3 bucket. The training script on the notebook fine-tunes the Ministral-3B-Instruct model using memory-efficient techniques. It loads the model in 8-bit floating point (FP8) quantization to reduce memory usage, then applies Low-Rank Adaptation (LoRA) to train only 1–2% of the parameters instead of the full 3 billion. The script reads the preprocessed data from the previous steps and tokenizes it with a 1,024-token context window. Refer the section 5.1 Create Training Script of the notebook for the sample implementation.
Next, configure and submit a training job. This solution uses one ml.g5.16xlarge instance for model training, passing the S3 location of the processed data from the previous steps as the training input. The SageMaker AI training job uploads the fine-tuned model artifacts to the S3 bucket after the job completes.
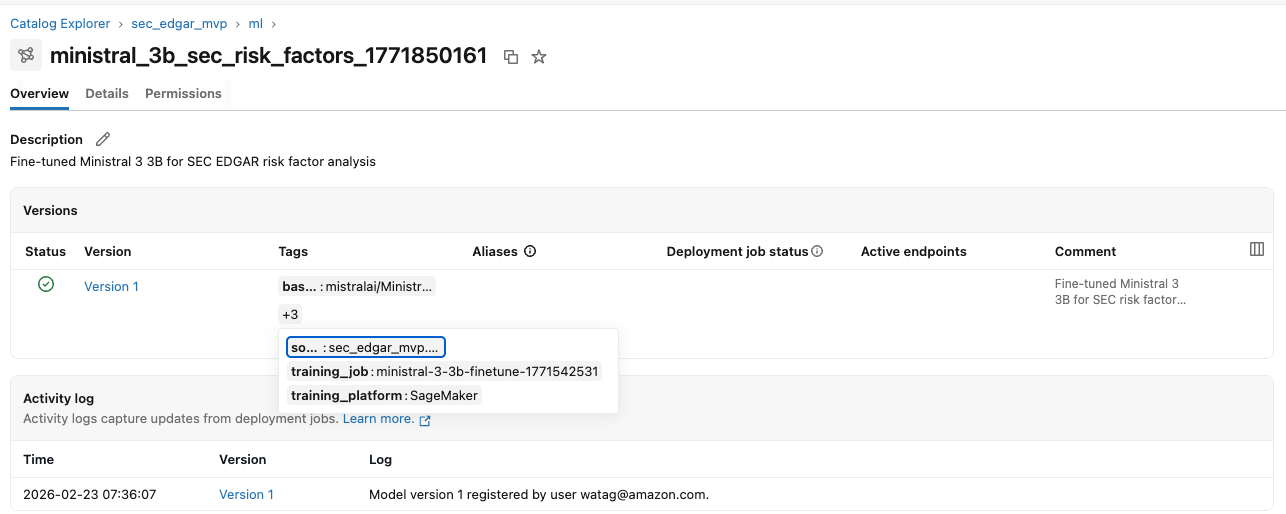
Step 6: Registering model artifacts in Unity Catalog
After uploading the model artifacts to S3, register the fine-tuned model in Unity Catalog’s ML schema using Managed MLflow on Databricks via the SDK. With Unity Catalog, you can create a Model object for access control, lifecycle management, and discovery of ML models. Databricks provides an MLflow Model Registry capability in Unity Catalog. You create an MLflow experiment to log training metadata (hyperparameters, source table, training job details) and register the model with versioning and documentation, including the source data lineage, training service, and model specifications.After the model is registered, you can view it in the Unity Catalog console.
Step 7: Creating data lineage in Unity Catalog
Lastly, create data lineage in Unity Catalog. Tracking data lineage provides visibility into which data trained each model, creating an audit trail for compliance and governance. It also streamlines debugging by tracing issues back to their source. This is particularly important for regulated industries and production ML environments where data quality and model reliability are critical.
Databricks Unity Catalog automatically captures runtime data lineage across queries run on Databricks. For workloads that run outside of Databricks (for example, EMR Serverless jobs, SageMaker AI training jobs), you can add external metadata and lineage through the External Metadata API and External Lineage API. This “bring your own data lineage” capability (currently in public preview as of April 2026) gives you a complete lineage view in Unity Catalog.
Create external metadata for the preprocessing job with EMR Serverless job and the fine-tuning job with SageMaker AI Training job. Then, create both upstream and downstream lineages using the external lineage. You need following:
- EMR Serverless job external metadata object
- Upstream lineage (raw table → EMR Serverless job)
- Downstream lineage (EMR Serverless job → pre-processed table)
- SageMaker AI Training job external metadata object
- Upstream lineage (pre-processed table → SageMaker AI Training job)
- Downstream lineage (SageMaker AI Training job → Model Version)
After creating the external data lineage with the above steps, you can view the data lineage graph from source data to the fine-tuned model in the Unity Catalog console.

Cleanup
After you test the solution, delete the following resources to avoid ongoing charges:
- EMR Serverless Application
- S3 Buckets and Objects
- IAM Roles and Policies
- AWS Secrets Manager Secrets
- VPC Resources
- Unity Catalog Resources (Catalog, Schema, Table, and Service Principal)
Refer to the section Step 8: Cleanup Resources of the notebook for step-by-step guidance.
Conclusion
In this post, we showed you how to integrate Databricks Unity Catalog with Amazon SageMaker AI to achieve governed LLM fine-tuning across services. By combining Unity Catalog for centralized metadata, access control, and lineage with Amazon EMR Serverless for preprocessing and SageMaker AI Training for scalable model development, you can maintain governance continuity while using AWS ML capabilities.We demonstrated how to securely access Unity Catalog–managed data, preprocess it using Spark, fine-tune the Ministral-3-3B-Instruct model, register the model back into Unity Catalog, and capture lineage across systems. With this approach, you can adopt a specialized architecture while supporting your security and compliance requirements.
To get started, download the notebook, deploy the reference architecture in your AWS account, and test the workflow with a Unity Catalog–managed dataset. Use this pattern as a foundation for building governed, production-ready ML and generative AI workloads across your multi-service environment. Then, try this pattern for other LLMs and larger datasets.Have you got any questions? Share your questions and feedback in the comments.