
Mission Control: An Orchestration Dashboard for OpenClaw

Part7 of the OpenClaw Series — Self-hosted AI Stack
Introduction
So far in this series, we’ve built a fully functional local AI agent: OpenClaw with Qwen3, SearXNG for web search, and Telegram as the interface. The agent runs, responds, and acts.
But something is missing: visibility. How do you know what the agent is actually doing? How do you dispatch tasks in a structured way? How do you track progress in real time?
That’s exactly what Mission Control (now rebranded as Autensa) provides — an open-source orchestration dashboard that connects to the OpenClaw Gateway and offers a Kanban board, a real-time Live Feed, and a specialized agent system.
In this article, I document the complete deployment of an isolated POC on my local setup, including every obstacle encountered along the way.
POC Architecture
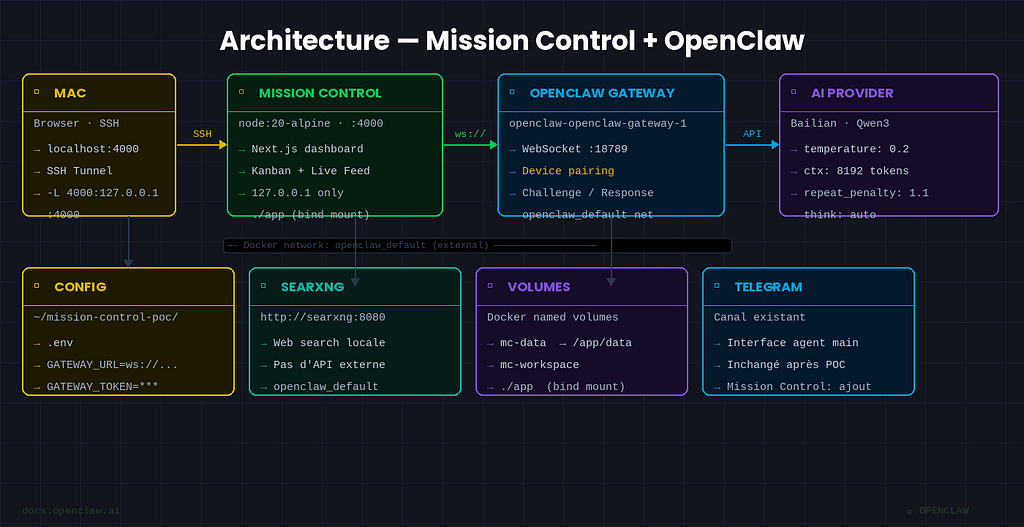
[Mac Browser]
      |
   SSH Tunnel
      |
      v
localhost:4000  ──►  mission-control (isolated Docker container)
                              |
                    ws://openclaw-openclaw-gateway-1:18789
                              |
                              v
                    openclaw (existing gateway)
                    network: openclaw_default
Key principle: Mission Control joins the existing Docker network (openclaw_default) as an external network. No new network created, no changes to the existing OpenClaw setup.
What is Mission Control?
Mission Control is a self-hosted Next.js application that provides:
- A Kanban board with 7 columns (Planning → Inbox → Assigned → In Progress → Testing → Review → Done)
- A real-time Live Feed of agent events
- An AI planning system that asks clarifying questions before dispatching
- One-click agent import from the OpenClaw Gateway
- Docker-ready deployment
GitHub: crshdn/mission-control — 1.4k stars, version v1.5.0
Prerequisites
- OpenClaw Gateway running (network: openclaw_default)
- Docker + Docker Compose on the host VM
- Your Gateway token (OPENCLAW_GATEWAY_TOKEN from your config)
Step-by-Step Deployment
Step 1 — Create the POC folder
bash
mkdir ~/mission-control-poc
cd ~/mission-control-poc
Step 2 — Get the exact OpenClaw container name
Critical point: Mission Control connects using the Docker DNS name of the container. The real name may differ from what you’d expect.
docker network inspect openclaw_default --format '{{range .Containers}}{{.Name}} {{end}}'
In my case: openclaw-openclaw-gateway-1
Also verify the port:
bash
docker ps --format "table {{.Names}}t{{.Ports}}" | grep -i claw
Step 3 — Clone Mission Control on the host
Lesson learned: don’t use a Docker volume for source code. Clone directly on the host and mount as a bind mount.
git clone https://github.com/crshdn/mission-control.git ~/mission-control-poc/app
Step 4 — Create the .env file
nano ~/mission-control-poc/.env
OPENCLAW_GATEWAY_URL=ws://openclaw-openclaw-gateway-1:18789
OPENCLAW_GATEWAY_TOKEN=YOUR_TOKEN_HERE
MC_API_TOKEN=
WEBHOOK_SECRET=
DATABASE_PATH=/app/data/mission-control.db
WORKSPACE_BASE_PATH=/app/workspace
PROJECTS_PATH=/app/workspace/projects
PORT=4000
Replace openclaw-openclaw-gateway-1 with the name found in step 2.
Step 5 — Create docker-compose.yml
nano ~/mission-control-poc/docker-compose.yml
services:
  mission-control:
    image: node:20-alpine
    working_dir: /app
    entrypoint: >
      sh -c "
        npm install &&
        npm run build &&
        npx next start -p 4000
      "
    ports:
      - "127.0.0.1:4000:4000"
    env_file:
      - .env
    volumes:
      - ./app:/app
      - mc-data:/app/data
      - mc-workspace:/app/workspace
    restart: unless-stopped
    networks:
      - openclaw_default
volumes:
  mc-data:
  mc-workspace:
networks:
  openclaw_default:
    external: true
Port is bound to 127.0.0.1 only — not accessible from outside the VM.
Step 6 — Start the container
cd ~/mission-control-poc
docker compose up -d
docker compose logs -f mission-control
The first startup takes 2–3 minutes (Next.js build). Wait for:
✓ Ready in 577ms
Obstacle #1: The Container Name
After the first startup, Mission Control showed OFFLINE. The logs showed:
[OpenClaw] Connecting to: ws://openclaw:18789
[OpenClaw] WebSocket error
[OpenClaw] Disconnected (code: 1006)
The problem: I had used openclaw as the hostname, but the actual Docker DNS name is openclaw-openclaw-gateway-1.
Fix:
# Correct in .env
OPENCLAW_GATEWAY_URL=ws://openclaw-openclaw-gateway-1:18789
# Clean restart
docker compose down && docker compose up -d
Obstacle #2: Device Pairing
After fixing the URL, the logs showed:
[OpenClaw] WebSocket opened, waiting for challenge...
[OpenClaw] Disconnected (code: 1008, reason: "pairing required")
OpenClaw implements a device pairing system: any new device connecting to the Gateway must be explicitly approved. This is an intentional and well-designed security measure.
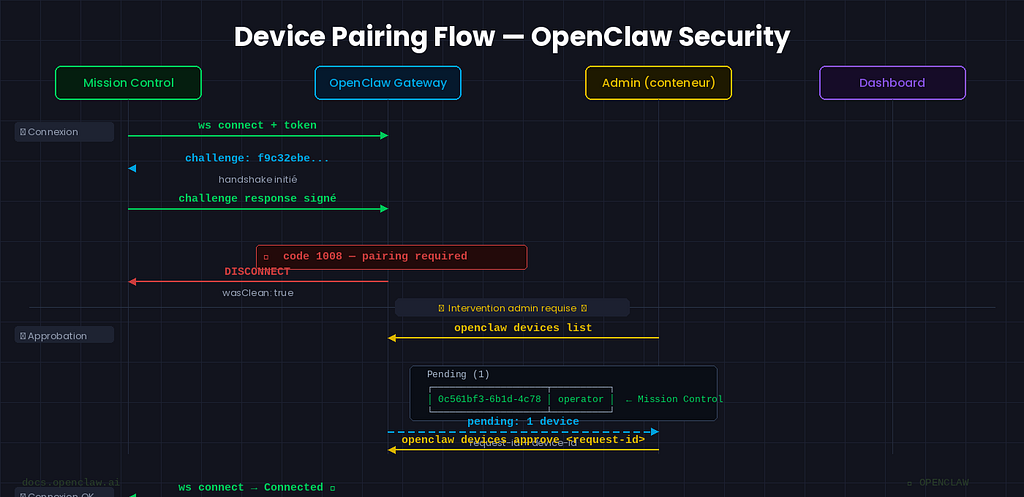
Solution — from inside the OpenClaw container:
docker exec -it openclaw-openclaw-gateway-1 sh
openclaw devices list
Pending (2)
┌──────────────────────────────────────┬────────────────┬──────────┐
│ Request                              │ Device         │ Role     │
├──────────────────────────────────────┼────────────────┼──────────┤
│ 0c561bf3-6b1d-4c78-ab23-a144a712cfbc │ cae3ff2e0e1eb… │ operator │
│ 1f19b14f-07da-473e-84f7-65febbcfaf0b │ 021ba52412086… │ operator │
└──────────────────────────────────────┴────────────────┴──────────┘
The first device (172.18.0.4) is Mission Control. The second (172.18.0.1) is my browser, which had tried to access the OpenClaw dashboard.
openclaw devices approve 0c561bf3-6b1d-4c78-ab23-a144a712cfbc
# Approved cae3ff2e0e1ebe02a1f4ccb4d26db22ca8792893269b5e988db9261c7b19472d
Accessing from Mac via SSH Tunnel
Since the port is bound to 127.0.0.1, it’s not directly accessible from the Mac. An SSH tunnel is all you need:
# New terminal on Mac
ssh -L 4000:127.0.0.1:4000 user@ai-server -N -f
Then open http://localhost:4000 on the Mac. Secure, nothing exposed on the local network.
Result
After device approval, Mission Control switches to ONLINE.
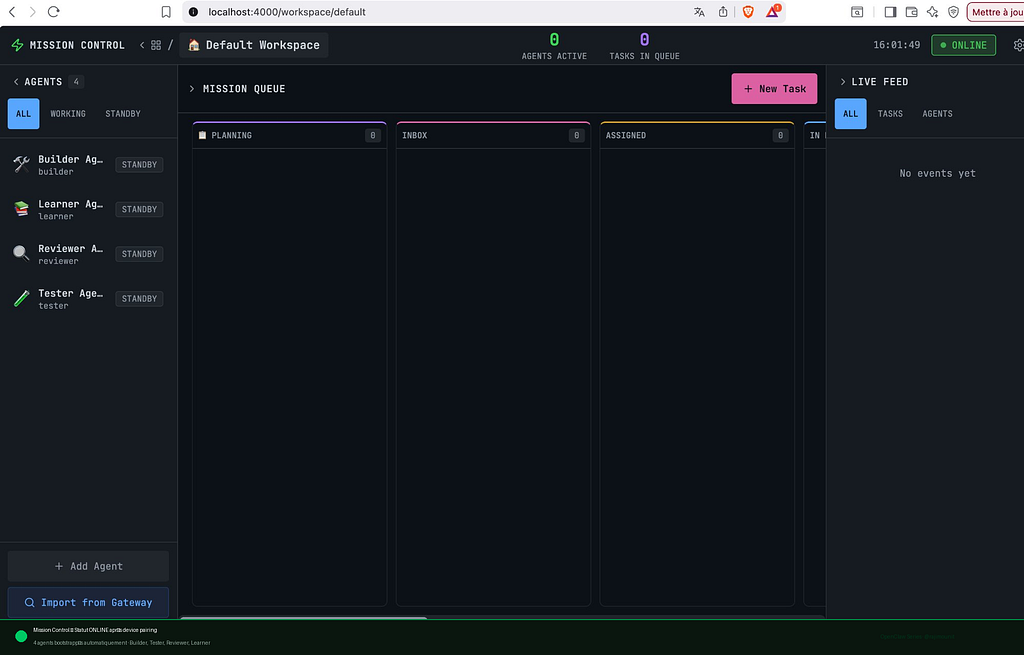
The dashboard is fully operational with 4 agents bootstrapped automatically: Builder, Tester, Reviewer, Learner — all on STANDBY, ready to receive tasks.
First Test — End-to-End Loop
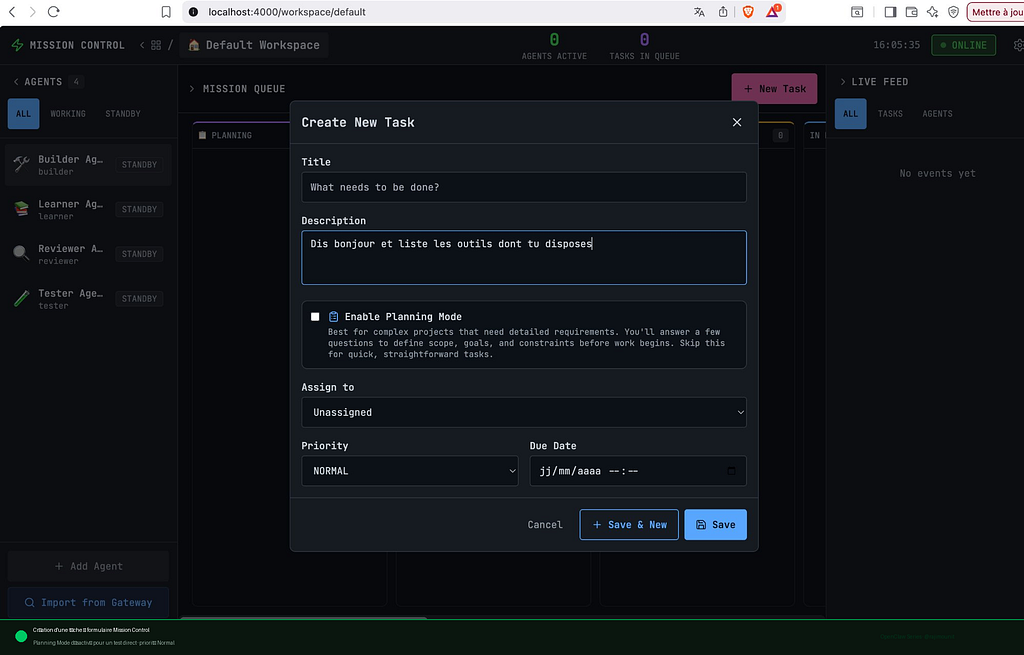
I created a simple task: “Say hello and list the tools you have available”, assigned to the Builder Agent.
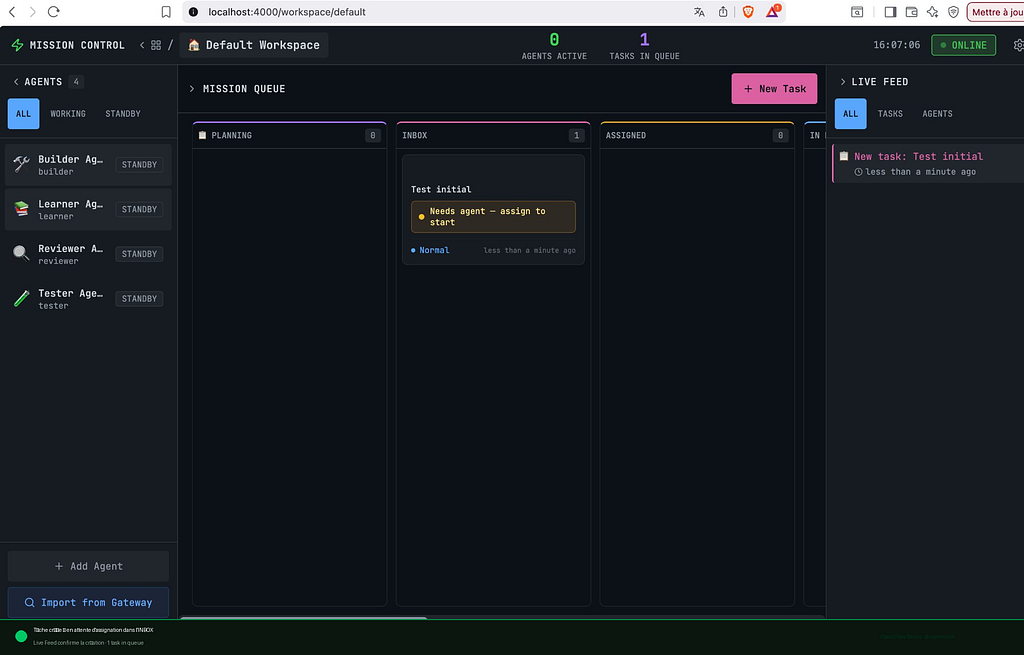
After assigning to the Builder Agent, the Live Feed traced every step in real time:

✓ New task: Test initial
✓ "Test initial" assigned to Builder Agent
✓ Task moved to assigned
✓ Task dispatched to Builder Agent
✓ Builder Agent session created
The full loop works end to end.
What This Adds in Practice
Compared to the Telegram interface alone:
- Visibility: see exactly what agents are doing in real time
- Structure: tasks follow a defined workflow (Kanban)
- Traceability: full history of events, assignments, and transitions
- Multi-agent: specialized agents per task type
Maintenance Commands
bash
# Stop
cd ~/mission-control-poc && docker compose down
# Logs
docker compose logs -f mission-control
# Update Mission Control
docker compose down
cd app && git pull && cd ..
docker compose up -d
Conclusion
Mission Control is a lightweight visibility and orchestration layer, easy to deploy as an isolated container on an existing OpenClaw setup. The two main obstacles — Docker container DNS naming and device pairing — are documented here so you don’t have to figure them out yourself.
The next article in the series will explore Paperclip, a more advanced orchestration layer with org charts, budgets, and multi-agent governance.
Stack: Ubuntu VM · Docker Compose · OpenClaw 2026.3.X · Mission Control v1.5.0
Follow the full series on Medium: @rajimounit
Mission Control: An Orchestration Dashboard for OpenClaw was originally published in Towards AI on Medium, where people are continuing the conversation by highlighting and responding to this story.